You signed in with another tab or window. Reload to refresh your session.You signed out in another tab or window. Reload to refresh your session.You switched accounts on another tab or window. Reload to refresh your session.Dismiss alert
Why is looking at runtime not a reliable method of calculating time complexity?
Not all computers are made equal( some may be stronger and therefore boost our runtime speed )
How many background processes ran concurrently with our program that was being tested?
We also need to ask if our code remains performant if we increase the size of the input.
The real question we need to answering is: How does our performance scale?.
big ‘O’ notation
Big O Notation is a tool for describing the efficiency of algorithms with respect to the size of the input arguments.
Since we use mathematical functions in Big-O, there are a few big picture ideas that we’ll want to keep in mind:
The function should be defined by the size of the input.
Smaller Big O is better (lower time complexity)
Big O is used to describe the worst case scenario.
Big O is simplified to show only its most dominant mathematical term.
Simplifying Math Terms
We can use the following rules to simplify the our Big O functions:
Simplify Products : If the function is a product of many terms, we drop the terms that don't depend on n.
Simplify Sums : If the function is a sum of many terms, we drop the non-dominant terms.
n : size of the input
T(f) : unsimplified math function
O(f) : simplified math function.
Putting it all together
- First we apply the product rule to drop all constants.
- Then we apply the sum rule to select the single most dominant term.
Complexity Classes
Common Complexity Classes
There are 7 major classes in Time Complexity
#### `O(1) Constant`
The algorithm takes roughly the same number of steps for any input size.
O(log(n)) Logarithmic
In most cases our hidden base of Logarithmic time is 2, log complexity algorithm’s will typically display ‘halving’ the size of the input (like binary search!)
O(n) Linear
Linear algorithm’s will access each item of the input “once”.
O(nlog(n)) Log Linear Time
Combination of linear and logarithmic behavior, we will see features from both classes.
Algorithm’s that are log-linear will use both recursion AND iteration.
O(nc) Polynomial
C is a fixed constant.
O(c^n) Exponential
C is now the number of recursive calls made in each stack frame.
Algorithm’s with exponential time are VERY SLOW.
Memoization
Memoization : a design pattern used to reduce the overall number of calculations that can occur in algorithms that use recursive strategies to solve.
MZ stores the results of the sub-problems in some other data structure, so that we can avoid duplicate calculations and only ‘solve’ each problem once.
Two features that comprise memoization:
FUNCTION MUST BE RECURSIVE.
Our additional Data Structure is usually an object (we refer to it as our memo… or sometimes cache!)
### Memoizing Factorial
Our memo object is mapping out our arguments of factorial to it’s return value.
Keep in mind we didn’t improve the speed of our algorithm.
Memoizing Fibonacci
- Our time complexity for Fibonacci goes from O(2^n) to O(n) after applying memoization.
The Memoization Formula
Rules:
Write the unoptimized brute force recursion (make sure it works);
Add memo object as an additional argument .
Add a base case condition that returns the stored value if the function’s argument is in the memo.
Before returning the result of the recursive case, store it in the memo as a value and make the function’s argument it’s key.
Things to remember
When solving DP problems with Memoization, it is helpful to draw out the visual tree first.
When you notice duplicate sub-tree’s that means we can memoize.
Tabulation
Tabulation Strategy
Use When:
The function is iterative and not recursive.
The accompanying DS is usually an array.
Steps for tabulation
Create a table array based off the size of the input.
Initialize some values in the table to ‘answer’ the trivially small subproblem.
Iterate through the array and fill in the remaining entries.
Your final answer is usually the last entry in the table.
Memo and Tab Demo with Fibonacci
Normal Recursive Fibonacci
function fibonacci(n) {
  if (n <= 2) return 1;
  return fibonacci(n - 1) + fibonacci(n - 2);
}
Memoization Fibonacci 1
Memoization Fibonacci 2
Tabulated Fibonacci
Example of Linear Search
Worst Case Scenario: The term does not even exist in the array.
Meaning: If it doesn’t exist then our for loop would run until the end therefore making our time complexity O(n).
Sorting Algorithms
Bubble Sort
Time Complexity: Quadratic O(n^2)
The inner for-loop contributes to O(n), however in a worst case scenario the while loop will need to run n times before bringing all n elements to their final resting spot.
Space Complexity: O(1)
Bubble Sort will always use the same amount of memory regardless of n.
- The first major sorting algorithm one learns in introductory programming courses.
- Gives an intro on how to convert unsorted data into sorted data.
It’s almost never used in production code because:
It’s not efficient
It’s not commonly used
There is stigma attached to it
Bubbling Up* : Term that infers that an item is in motion, moving in some direction, and has some final resting destination.*
Bubble sort, sorts an array of integers by bubbling the largest integer to the top.
Worst Case & Best Case are always the same because it makes nested loops.
Double for loops are polynomial time complexity or more specifically in this case Quadratic (Big O) of: O(n²)
Selection Sort
Time Complexity: Quadratic O(n^2)
Our outer loop will contribute O(n) while the inner loop will contribute O(n / 2) on average. Because our loops are nested we will get O(n²);
Space Complexity: O(1)
Selection Sort will always use the same amount of memory regardless of n.
- Selection sort organizes the smallest elements to the start of the array.
Summary of how Selection Sort should work:
Set MIN to location 0
Search the minimum element in the list.
Swap with value at location Min
Increment Min to point to next element.
Repeat until list is sorted.
Insertion Sort
Time Complexity: Quadratic O(n^2)
Our outer loop will contribute O(n) while the inner loop will contribute O(n / 2) on average. Because our loops are nested we will get O(n²);
Space Complexity: O(n)
Because we are creating a subArray for each element in the original input, our Space Comlexity becomes linear.
### Merge Sort
Time Complexity: Log Linear O(nlog(n))
Since our array gets split in half every single time we contribute O(log(n)). The while loop contained in our helper merge function contributes O(n) therefore our time complexity is O(nlog(n)); Space Complexity: O(n)
We are linear O(n) time because we are creating subArrays.
### Example of Merge Sort
- **Merge sort is O(nlog(n)) time.**
- *We need a function for merging and a function for sorting.*
Steps:
If there is only one element in the list, it is already sorted; return the array.
Otherwise, divide the list recursively into two halves until it can no longer be divided.
Merge the smallest lists into new list in a sorted order.
Quick Sort
Time Complexity: Quadratic O(n^2)
Even though the average time complexity O(nLog(n)), the worst case scenario is always quadratic.
Space Complexity: O(n)
Our space complexity is linear O(n) because of the partition arrays we create.
QS is another Divide and Conquer strategy.
Some key ideas to keep in mind:
It is easy to sort elements of an array relative to a particular target value.
An array of 0 or 1 elements is already trivially sorted.
### Binary Search
Time Complexity: Log Time O(log(n))
Space Complexity: O(1)
*Recursive Solution*
Min Max Solution
Must be conducted on a sorted array.
Binary search is logarithmic time, not exponential b/c n is cut down by two, not growing.
Binary Search is part of Divide and Conquer.
Insertion Sort
Works by building a larger and larger sorted region at the left-most end of the array.
Steps:
If it is the first element, and it is already sorted; return 1.
Pick next element.
Compare with all elements in the sorted sub list
Shift all the elements in the sorted sub list that is greater than the value to be sorted.
Insert the value
Repeat until list is sorted.
If you found this guide helpful feel free to checkout my GitHub/gists where I host similar content:
- way we analyze how efficient algorithms are without getting too mired in details
- can model how much time any function will take given `n` inputs
- interested in order of magnitude of number of the exact figure
- O absorbs all fluff and n = biggest term
- Big O of `3x^2 +x + 1` = `O(n^2)`
recursive: as you add more terms, increase in time as you add input diminishes recursion: when you define something in terms of itself, a function that calls itself
used because of ability to maintain state at diffferent levels of recursion
inherently carries large footprint
every time function called, you add call to stack
iterative: use loops instead of recursion (preferred)
favor readability over performance
O(n log(n)) & O(log(n)): dividing/halving
if code employs recursion/divide-and-conquer strategy
what power do i need to power my base to get n
Time Definitions
constant: does not scale with input, will take same amount of time
for any input size n, constant time performs same number of operations every time
logarithmic: increases number of operations it performs as logarithmic function of input size n
function log n grows very slowly, so as n gets longer, number of operations the algorithm needs to perform doesn’t increase very much
halving
linear: increases number of operations it performs as linear function of input size n
number of additional operations needed to perform grows in direct proportion to increase in input size n
log-linear: increases number of operations it performs as log-linear function of input size n
looking over every element and doing work on each one
quadratic: increases number of operations it performs as quadratic function of input size n
exponential: increases number of operations it performs as exponential function of input size n
number of nested loops increases as function of n
polynomial: as size of input increases, runtime/space used will grow at a faster rate
factorial: as size of input increases, runtime/space used will grow astronomically even with relatively small inputs
rate of growth: how fast a function grows with input size
### Space Complexity
How does the space usage scale/change as input gets very large?
What auxiliary space does your algorithm use or is it in place (constant)?
Runtime stack space counts as part of space complexity unless told otherwise.
To connect your CSS sheet to your HTML page, use the link tag like so.
Many developers use External pre-written CSS stylesheets for consistent design.
You can connect multiple stylesheets.
CSS Selectors
CSS Selector : Applies styles to a specific DOM element(s), there are various types:
Type Selectors : Matches by node name.
- `Class Selectors` : Matches by class name.
- `ID Selectors` : Matches by ID name.
- `Universal Selectors` : Selects all HTML elements on a page.
- `Attribute Selectors` : Matches elements based on the prescence or value of a given attribute. (i.e. a\[title\] will match all a elements with a title attribute)
Used to select all elements of a certain class denoted with a .[class name]
You can assign multiple classes to a DOM element by separating them with a space.
Compound Class Selectors
- To get around accidentally selecting elements with multiple classes beyond what we want to grab we can chain dots.
- TO use a compound class selector just append the classes together when referencing them in the CSS.
- Uses the `+` symbol.
- Used for elements that directly follow one another and who both have the same parent.
h1 + h2 { font-style: italic;   }

//HTML:

<h1>Big header</h1> <h2>This one is styled because it is directly adjacent to the H1</h2> <h2>This one is NOT styled because there is no H1 right before it</h2>

h1 + h2 { font-style: italic;   }

<h1>Big header</h1> <h2>This one is styled because it is directly adjacent to the H1</h2> <h2>This one is NOT styled because there is no H1 right before it</h2>
Pseudo-Classes
courtesy of Pseudo-classes — CSS: Cascading Style Sheets | MDN (mozilla.org)- `Pseudo-Class` : Specifies a special state of the seleted element(s) and does not refer to any elements or attributes contained in the DOM.
- Format is a `Selector:Pseudo-Class Name` or `A:B`
Some common pseudo-classes that are frequently used are:
active : 'push down', when elements are activated.
checked : applies to things like radio buttons or checkbox inputs.
- `disabled` : any disabled element.
- `first-child` : first element in a group of children/siblings.
- `focus` : elements that have current focus.
- `hover` : elements that have cursor hovering over it.
- `invalid` : any form elements in an invalid state from client-side form validation.
- `last-child` : last element in a group of children/siblings.
- `not(selector)` : elements that do not match the provided selector.
- `required` : form elements that are required.
- `valid` : form elements in a valid state.
- `visited` : anchor tags of which the user has already visited the URL that the href points to.
Pseudo-Selectors
Used to create pseudo-elements as children of the elements to which the property applies.
::after
::before
<style>
  p::before {
    background-color: lightblue;
    border-right: 4px solid violet;
    content: ":-) ";
    margin-right: 4px;
    padding-left: 4px;
  }
</style>
<p>This is the first paragraph</p>
<p>This is the second paragraph</p>
<p>This is the third paragraph</p>
Will add some blue smiley faces before the p tag elements.
CSS Rules
CSS Rule : Collection of single or compound selectors, a curly brace, zero or more properties
CSS Rule Specificity : Sometimes CSS rules will contain multiple elements and may have overlapping properties rules for those same elements - there is an algorithm in CSS that calculates which rule takes precedence.
The Four Number Calculation** : listed in increasing order of importance.**
Coming back to our example where all the CSS Rules have tied, the last step 4 wins out so our element will have a purple border.
CSS: Type, Properties, and Imports
Typography
font-family : change the font.
- Remember that not all computers have the same fonts on them.
- You can import web fonts via an api by using
- `@import url('https://fonts.googleapis.com/css2?family=Liu+Jian+Mao+Cao&display=swap');` and pasting it st the top of your CSS file.
- And then reference it in your font-family.
- `font-size` : Changes the size of your font.
- Keep in mind the two kind of units CSS uses:
- `Absolute` : `Pixels`, Points, Inches, Centimeters.
- `Relative` : Em, Rem.
- Em: Calculating the size relative to the previous div (bubbles down)
- Rem: Calculates relative to the parent element always.
- `font-style` : Used to set a font to italics.
- `font-weight` : Used to make a font bold.
- `text-align` : Used to align your text to the left, center, or right.
- `text-decoration` : Use to put lines above, through, or under text. Lines can be solid, dashed, or wavy!
- `text-transform` : Used to set text to all lowercase, uppercase, or capitalize all words.
Background-Images
You can use the background-image property to set a background image for an element.
CSS: Colors, Borders, and Shadows
Colors
You can set colors in CSS in three popular ways: by name, by hexadecimal RGB value, and by their decimal RGB value.
rgba() is used to make an rbg value more transparent, the a is used to specify the alpha channel.
Color : Property used to change the color of text.
Background-Color : Property to change the backgrounf color of an element.
Borders
Borders take three values: The width of the border, the style (i.e. solid, dotted, dashed), color of the border.
Shadows
There are two kinds of shadows in CSS: box shadows and text shadows.
Box refers to HTML elements.
Text refers to text.
Shadows take values such as, the horizontal & vertical offsets of the shadow, the blur radius of the shadow, the spread radius, and of course the colors.
I have this innate desire to make everything available all in one place and it’s usually an unnecessary waste of time… but here I will…
All The Things You Can Embed In A Medium Article
I have this innate desire to make everything available all in one place and it’s usually an unnecessary waste of time… but here I will conduct and ‘experiment’ where I intentionally indulge that tendency.
Here you can see in just the first frame of my blog site 5 different embedded widgets that I inject onto nearly every page of the site using javascript to append my widgets to various anchor points in the html.
This topic is meant to give you a very basic overview of how Markdown works, showing only some of the most common operations you use most frequently. Keep in mind that you can also use the Edit menus to inject markdown using the toolbar, which serves as a great way to see how Markdown works. However, Markdown’s greatest strength lies in its simplicity and keyboard friendly approach that lets you focus on writing your text and staying on the keyboard.
What is Markdown
Markdown is very easy to learn and get comfortable with due it’s relatively small set of markup ‘commands’. It uses already familiar syntax to represent common formatting operations. Markdown understands basic line breaks so you can generally just type text.
Markdown also allows for raw HTML inside of a markdown document, so if you want to embed something more fancy than what Markdowns syntax can do you can always fall back to HTML. However to keep documents readable that’s generally not recommended.
Basic Markdown Syntax
The following are a few examples of the most common things you are likely to do with Markdown while building typical documentation.
Bold and Italic
markdown

This text **is bold**.
This text *is italic*.
By default Markdown adds paragraphs at double line breaks. Single line breaks by themselves are simply wrapped together into a single line. If you want to have soft returns that break a single line, add two spaces at the end of the line.
markdown

This line has a paragraph break at the end (empty line after).

Theses two lines should display as a single
line because there's no double space at the end.

The following line has a soft break at the end (two spaces at end)
This line should be following on the very next line.
This line has a paragraph break at the end (empty line after).
Theses two lines should display as a single line because there’s no double space at the end.
The following line has a soft break at the end (two spaces at end)
This line should be following on the very next line.
Links
markdown

[Help Builder Web Site](http://helpbuilder.west-wind.com/)
If you need additional image tags like targets or title attributes you can also embed HTML directly:
markdown

Go the Help Builder sitest Wind site: <a href="http://west-wind.com/" target="_blank">Help Builder Site</a>.
Images
markdown

### Block Quotes
Block quotes are callouts that are great for adding notes or warnings into documentation.
markdown

> ###  Headers break on their own
> Note that headers don't need line continuation characters
as they are block elements and automatically break. Only text
lines require the double spaces for single line breaks.
Headers break on their own
Note that headers don’t need line continuation characters as they are block elements and automatically break. Only text lines require the double spaces for single line breaks.
Fontawesome Icons
Help Builder includes a custom syntax for FontAwesome icons in its templates. You can embed a @ icon- followed by a font-awesome icon name to automatically embed that icon without full HTML syntax.
markdown

Gear:  Configuration
Configuration
HTML Markup
You can also embed plain HTML markup into the page if you like. For example, if you want full control over fontawesome icons you can use this:
markdown

This text can be **embedded** into Markdown:
<i class="fa fa-refresh fa-spin fa-lg"></i> Refresh Page
This text can be embedded into Markdown:
Refresh Page
Unordered Lists
markdown

* Item 1
* Item 2
* Item 3
This text is part of the third item. Use two spaces at end of the the list item to break the line.

A double line break, breaks out of the list.
Item 1
Item 2
Item 3
This text is part of the third item. Use two spaces at end of the the list item to break the line.
A double line break, breaks out of the list.
Ordered Lists
markdown

1. **Item 1**
Item 1 is really something
2. **Item 2**
Item two is really something else

If you want lines to break using soft returns use two spaces at the end of a line.
Item 1 Item 1 is really something
Item 2
Item two is really something else
If you want to lines to break using soft returns use to spaces at the end of a line.
Inline Code
If you want to embed code in the middle of a paragraph of text to highlight a coding syntax or class/member name you can use inline code syntax:
markdown

Structured statements like `for x =1 to 10` loop structures
can be codified using single back ticks.
Structured statements like for x =1 to 10 loop structures can be codified using single back ticks.
Code Blocks with Syntax Highlighting
Markdown supports code blocks syntax in a variety of ways:
markdown

The following code demonstrates:

    // This is code by way of four leading spaces
    // or a leading tab

More text here
The following code demonstrates:
pgsql

// This is code by way of four leading spaces
// or a leading tab
More text here
Code Blocks
You can also use triple back ticks plus an optional coding language to support for syntax highlighting (space injected before last ` to avoid markdown parsing):
markdown

`` `csharp
// this code will be syntax highlighted
for(var i=0; i++; i < 10)
{
    Console.WriteLine(i);
}
`` `

csharp

// this code will be syntax highlighted
for(var i=0; i++; i < 10)
{
    Console.WriteLine(i);
}
Many languages are supported: html, xml, javascript, css, csharp, foxpro, vbnet, sql, python, ruby, php and many more. Use the Code drop down list to get a list of available languages.
You can also leave out the language to get no syntax coloring but the code box:
Function that takes in a value and two callbacks. The function should return the result of the callback who’s invocation results in a larger value.
function greaterValue(value, cb1, cb2) {
    // compare cb1 invoked with value to cb2 invoked with value
    // return the greater result

    let res1 = cb1(value);
    let res2 = cb2(value);
    if (res1 > res2) {
        // if this is false, we move out of if statement
        return res1;
    }
    return res2;
}

let negate = function(num) {
    return num * -1;
};

let addOne = function(num) {
    return num + 1;
};

console.log(greaterValue(3, negate, addOne));
console.log(greaterValue(-2, negate, addOne));
Note: we do not invokenegateoraddOne(by using()to call them), we are passing the function itself.
Write a function, myMap, that takes in an array and a callback as arguments. The function should mimic the behavior of Array.prototype.map.
function myMap(arr, callback) {
    // iterate through the array, perform the cb on each element
    // return a new array with those new values
    let mapped = [];

    for (let i = 0; i < arr.length; i++) {
        // remember that map passes three args with each element.
        let val = callback(arr[i], i, arr);
        mapped.push(val);
    }

    return mapped;
}

let double = function(num) {
    return num * 2;
};
console.log(myMap([1, 2, 3], double));
Write a function, myFilter, that takes in an array and a callback as arguments. The function should mimic the behavior of Array.prototype.filter.
function myFilter(arr, callback) {
    let filtered = [];

    for (let i = 0; i < arr.length; i++) {
        let element = arr[i];

        if (callback(element, i, arr)) {
            filtered.push(element);
        }
    }

    return filtered;
}
Write a function, myEvery, that takes in an array and a callback as arguments. The function should mimic the behavior of Array.prototype.every.
function myEvery(arr, callback) {
    for (let i = 0; i < arr.length; i++) {
        let element = arr[i];

        if (callback(element, i, arr) === false) {
            return false;
        }
    }
    return true;
}
Further Examples of the above concepts
const createMeowValue = () => {
  console.log(this.name);
  let meow = function () {
    console.log(this);
    console.log(this.name + ' meows');
  }
  meow = meow.bind(this);
  return meow;
};

const name = 'Fluffy';

const cat = {
  name: name,
  age: 12,
  createMeow: function () {
    console.log(this.name);
    let meow = () => {
      const hello = 'hello';
      console.log(this.name + ' meows');
    };
    let world = '';
    if (true) {
      world = 'world';
    }
    console.log(world);
    // meow = meow.bind(this);
    return meow;
  }
};

cat.newKey = function () {
  const outermostContext = this;
  const innerFunc = () => {
    secondContext = this;
    console.log(secondContext === outermostContext)
    return function () {
      innermostContext = this;
    }
  };
  return innerFunc.bind(outermostContext);
};

const meow = cat.createMeow(); // method-style invocation
meow(); // function-style invocation

console.log('-------')

const createMeow = cat.createMeow;
const globalMeow = createMeow(); // function-style
globalMeow(); // function-style

function createSmoothie(ingredient) {
  const ingredients = [ingredient];
  return ingredients;
}

// console.log(createSmoothie('banana'));
// console.log(createSmoothie('apple'));

// one parameter only
// first argument is a string
// return an array
// DO NOT USE forEach
This is going to be a running list of youtube videos and channels that I discover as I learn web development. It will not be strictly…
Awesome Web Development Youtube Video Archive
This is going to be a running list of youtube videos and channels that I discover as I learn web development. It will not be strictly confined to web development but that will be it’s focus.
Tutorials:
Inspiration:
Channels:
Free Code Camp:
Our mission: to help people learn to code for free. We accomplish this by creating thousands of videos, articles, and interactive coding lessons — all freely available to the public. We also have thousands of freeCodeCamp study groups around the world.
Chris Coyier
This is the official YouTube channel for CSS-Tricks, a web design community curated by Chris Coyier. https://css-tricks.com
Computer History Museum:
Welcome to the Computer History Museum channel on YouTube. We’re committed to preserving and presenting the history and stories of the Information Age. Here on YouTube we offer videos of the many lectures and events at the museum and also historic computer films. We also feature video from our well–known Revolutionaries television series. Be sure to check out the Computer History Museum website for even more information including online exhibits, upcoming events and our collection of computing artifacts: http://www.computerhistory.org.
Computerphile
Videos all about computers and computer stuff. Sister channel of Numberphile.
Hello! My name is David Xiang. I am a software developer based in New York City. I am a self-proclaimed micro-influencer, focused on helping software developers understand their industry better. To see what I look like and get a feel for my content, please check out some of my YouTube videos. Besides coding, I also enjoy writing and am lucky enough to have some generous tech friends who have shared their experiences with me. I’ve published their stories — and some of my own — in my book, “Software Developer Life.”
Google TechTalks
Google Tech Talks is a grass-roots program at Google for sharing information of interest to the technical community. At its best, it’s part of an ongoing discussion about our world featuring top experts in diverse fields. Presentations range from the broadest of perspective overviews to the most technical of deep dives, on topics well-established to wildly speculative.
Hello World, it’s Siraj! I’m a technologist on a mission to spread data literacy. Artificial Intelligence, Mathematics, Science, Technology, I simplify these topics to help you understand how they work. Using this knowledge you can build wealth and live a happier, more meaningful life. I live to serve this community. We are the fastest growing AI community in the world! Co-Founder of Sage Health (www.sage-health.org) Twitter: http://www.twitter.com/sirajraval Instagram: https://instagram.com/sirajraval/ Facebook: https://www.facebook.com/sirajology/
suckerpinch
This is Tom 7’s youtube!
Scaler Academy
Scaler is a tech-focused upskilling and reskilling platform for all of us that may have written anywhere between zero to a few million lines of code but want to get better. The brainchild of Abhimanyu Saxena and Anshuman Singh, founders of InterviewBit, one of India’s largest interview preparation platforms for top tech companies, started out with Academy, a course for working professionals with more than 1 year of experience, and has now grown to include Edge which is for college students. Scaler’s courses have industry-relevant curriculums which are vetted by CTOs, regular doubt solving support through Teaching Assistants and 1:1 personal mentorship from people who currently work at some top tech companies and startups. True to our mission, we have already empowered thousands of students, with our alumni working in companies such as Google, Microsoft and Amazon. But we believe this is only the beginning. Come along, as we build a future together.
$ cat /var/log/maillog | grep 'lost connection after AUTH from unknown' | tail -n 5
May 10 11:19:49 srv4 postfix/smtpd[1486]: lost connection after AUTH from unknown[185.36.81.145]
May 10 11:21:41 srv4 postfix/smtpd[1762]: lost connection after AUTH from unknown[185.36.81.164]
May 10 11:21:56 srv4 postfix/smtpd[1762]: lost connection after AUTH from unknown[175.139.231.129]
May 10 11:23:51 srv4 postfix/smtpd[1838]: lost connection after AUTH from unknown[185.211.245.170]
May 10 11:24:02 srv4 postfix/smtpd[1838]: lost connection after AUTH from unknown[185.211.245.170]
$ for ip in $(cat /var/log/maillog | grep 'lost connection after AUTH from unknown' | cut -d'[' -f3 | cut -d ']' -f1 | sort | uniq); do iptables -I INPUT -s ${ip} -p tcp --dport 25 -j DROP; done
If Statements
Check if args are passed
if [[ $# -eq 0 ]] ; then
    echo 'need to pass args'
    exit 0
fi
Check if required variables exist
if [ $1 == "one" ] || [ $1 == "two" ]
then
  echo "argument 1 has the value one or two"
  exit 0
else
  echo "I require argument 1 to be one or two"
  exit 1
fi
Check if environment variables exists
if [ -z ${OWNER} ] || [ -z ${NAME} ]
then
  echo "does not meet requirements of both environment variables"
  exit 1
else
  echo "required environment variables exists"
fi
While Loops
Run process for 5 Seconds
set -ex
count=0
echo "boot"
ping localhost &
while [ $count -le 5 ]
  do
    sleep 1
    count=$((count + 1))
    echo $count
  done
ps aux | grep ping
echo "tear down"
kill $!
sleep 2
Redirecting Outputs
Stdout, Stderr
Redirect stderr to /dev/null:
grep -irl faker . 2>/dev/null
Redirect stdout to one file and stderr to another file:
grep -irl faker . > out 2>error
Redirect stderr to stdout (&1), and then redirect stdout to a file:
This article will be accompanied by the followinggithub repositorywhich will contain all the commands listed as well as folders that demonstrate before and after usage!
The readme for this git repo will provide a much more condensed list… whereas this article will break up the commands with explanations… images & links!
I will include the code examples as both github gists (for proper syntax highlighting) and as code snippets adjacent to said gists so that they can easily be copied and pasted… or … if you’re like me for instance; and like to use an extension to grab the markdown content of a page… the code will be included rather than just a link to the gist!
Here’s a Cheatsheet:
Getting Started (Advanced Users Skip Section):
✔ Check the Current Directory ➡ pwd:
On the command line, it’s important to know the directory we are currently working on. For that, we can use pwd command.
It shows that I’m working on my Desktop directory.
✔ Display List of Files ➡ ls:
To see the list of files and directories in the current directory use ls command in your CLI.
Shows all of my files and directories of my Desktop directory.
To show the contents of a directory pass the directory name to the ls command i.e. ls directory_name.
Some useful ls command options:-
OptionDescriptionls -alist all files including hidden file starting with ‘.’ls -llist with the long formatls -lalist long format including hidden files
✔ Create a Directory ➡ mkdir:
We can create a new folder using the mkdir command. To use it type mkdir folder_name.
Use `ls` command to see the directory is created or not.
I created a cli-practice directory in my working directory i.e. Desktop directory.
✔ Move Between Directories ➡ cd:
It’s used to change directory or to move other directories. To use it type cd directory_name.
Can use `pwd` command to confirm your directory name.
Changed my directory to the cli-practice directory. And the rest of the tutorial I’m gonna work within this directory.
✔ Parent Directory ➡ ..:
We have seen cd command to change directory but if we want to move back or want to move to the parent directory we can use a special symbol .. after cd command, like cd ..
✔ Create Files ➡ touch:
We can create an empty file by typing touch file_name. It's going to create a new file in the current directory (the directory you are currently in) with your provided name.
I created a hello.txt file in my current working directory. Again you can use `ls` command to see the file is created or not.
Now open your hello.txt file in your text editor and write Hello Everyone! into your hello.txt file and save it.
✔ Display the Content of a File ➡ cat:
We can display the content of a file using the cat command. To use it type cat file_name.
Shows the content of my hello.txt file.
✔ Move Files & Directories ➡ mv:
To move a file and directory, we use mv command.
By typing mv file_to_move destination_directory, you can move a file to the specified directory.
By entering mv directory_to_move destination_directory, you can move all the files and directories under that directory.
Before using this command, we are going to create two more directories and another txt file in our cli-practice directory.
mkdir html css touch bye.txt
Yes, we can use multiple directories & files names one after another to create multiple directories & files in one command.
Moved my bye.txt file into my css directory and then moved my css directory into my html directory.
✔ Rename Files & Directories ➡ mv:
mv command can also be used to rename a file and a directory.
You can rename a file by typing mv old_file_name new_file_name & also rename a directory by typing mv old_directory_name new_directory_name.
Renamed my hello.txt file to the hi.txt file and html directory to the folder directory.
✔ Copy Files & Directories ➡ cp:
To do this, we use the cp command.
You can copy a file by entering cp file_to_copy new_file_name.
Copied my hi.txt file content into hello.txt file. For confirmation open your hello.txt file in your text editor.
You can also copy a directory by adding the -r option, like cp -r directory_to_copy new_directory_name.
The-roption for "recursive" means that it will copy all of the files including the files inside of subfolders.
Here I copied all of the files from the folder to folder-copy.
✔ Remove Files & Directories ➡ rm:
To do this, we use the rm command.
To remove a file, you can use the command like rm file_to_remove.
Here I removed my hi.txt file.
To remove a directory, use the command like rm -r directory_to_remove.
I removed my folder-copy directory from my cli-practice directory i.e. current working directory.
✔ Clear Screen ➡ clear:
Clear command is used to clear the terminal screen.
✔ Home Directory ➡ ~:
The Home directory is represented by ~. The Home directory refers to the base directory for the user. If we want to move to the Home directory we can use cd ~ command. Or we can only use cd command.
MY COMMANDS:
1.) Recursively unzip zip files and then delete the archives when finished:
here is afolder containing the before and after… I had to change folder names slightly due to a limit on the length of file-paths in a github repo.
find . -name "*.zip" | while read filename; do unzip -o -d "`dirname "$filename"`" "$filename"; done;

find . -name "*.zip" -type f -print -delete
2.) Install node modules recursively:
npm i -g recursive-install

npm-recursive-install
3.) Clean up unnecessary files/folders in git repo:
find . -empty -type f -print -delete #Remove empty files

# -------------------------------------------------------
find . -empty -type d -print -delete #Remove empty folders

# -------------------------------------------------------

# This will remove .git folders...    .gitmodule files as well as .gitattributes and .gitignore files.

find . \( -name ".git" -o -name ".gitignore" -o -name ".gitmodules" -o -name ".gitattributes" \) -exec rm -rf -- {} +

# -------------------------------------------------------

# This will remove the filenames you see listed below that just take up space if a repo has been downloaded for use exclusively in your personal file system (in which case the following files just take up space)# Disclaimer... you should not use this command in a repo that you intend to use with your work as it removes files that attribute the work to their original creators!

find . \( -name "*SECURITY.txt" -o -name "*RELEASE.txt" -o -name "*CHANGELOG.txt" -o -name "*LICENSE.txt" -o -name "*CONTRIBUTING.txt" -name "*HISTORY.md" -o -name "*LICENSE" -o -name "*SECURITY.md" -o -name "*RELEASE.md" -o -name "*CHANGELOG.md" -o -name "*LICENSE.md" -o -name "*CODE_OF_CONDUCT.md" -o -name "\*CONTRIBUTING.md" \) -exec rm -rf -- {} +
In Action:
The following output from my bash shell corresponds to the directory:
The command seen below deletes most SECURITY, RELEASE, CHANGELOG, LICENSE, CONTRIBUTING, & HISTORY files that take up pointless space in repo’s you wish to keep exclusively for your own reference.
!!!Use with caution as this command removes the attribution of the work from it’s original authors!!!!!
!!!Use with caution as this command removes the attribution of the work from it’s original authors!!!!!find . \( -name "*SECURITY.txt" -o -name "*RELEASE.txt" -o -name "*CHANGELOG.txt" -o -name "*LICENSE.txt" -o -name "*CONTRIBUTING.txt" -name "*HISTORY.md" -o -name "*LICENSE" -o -name "*SECURITY.md" -o -name "*RELEASE.md" -o -name "*CHANGELOG.md" -o -name "*LICENSE.md" -o -name "*CODE_OF_CONDUCT.md" -o -name "*CONTRIBUTING.md" \) -exec rm -rf -- {} +
4.) Generate index.html file that links to all other files in working directory:
6.)Recursively remove lines of text containing the string badFolder from files in the working directory.
find . -type f -exec sed -i '/badFolder/d' ./* {} \;

# OR

find . -name 'result.md'  -type f -exec sed -i '/badFolder/d' ./* {} \;
As an example I will run this command on a file containing the text:
Hacks Blog

Read more at hacks.mozilla.org

badFolder

badFolder Implementing Private Fields for JavaScript

When implementing a language feature for JavaScript, an implementer must make decisions about how the language in the specification maps to the implementation. Private fields is an example of where the specification language and implementation reality diverge, at least in SpiderMonkey– the JavaScript engine which powers Firefox. To understand more, I’ll explain what private fields are, a couple of models for thinking about them, and explain why our implementation diverges from the specification language.The post Implementing Private Fields for JavaScript appeared first on Mozilla Hacks - the Web developer blog.

Posted Tuesday, June 8, 2021 by Matthew Gaudet

Looking fine with Firefox 89

Firefox 89 has smartened up and brings with it a slimmed-down, slightly more minimalist interface.badFolder Along with this new look, we get some great styling features including a force-colours feature for media queries and better control over how fonts are displayed. The long-awaited top-level await keyword for JavaScript modules is now enabled, as well as the PerformanceEventTiming interface, which is another addition to the performance suite of APIs: 89 really has been working out!The post Looking fine with Firefox 89 appeared first on Mozilla Hacks - the Web developer blog.

badFolder

Posted Tuesday, June 1, 2021 by Chris Mills

badFolder

Improving Firefox stability on Linux

Roughly a year ago at Mozilla we started an effort to improve Firefox stability on Linux. This effort quickly became an example of good synergies between FOSS projects.The post Improving Firefox stability on Linux appeared first on Mozilla Hacks - the Web developer blog.

Posted Wednesday, May 19, 2021 by Gabriele Svelto badFolder

Introducing Firefox’s new Site Isolation Security Architecture

Like any web browser, Firefox loads code from untrusted and potentially hostile websites and runs it on your computer. To protect you against new types of attacks from malicious sites and to meet the security principles of Mozilla, we set out to redesign Firefox on desktop.The post Introducing Firefox’s new Site Isolation Security Architecture appeared first on Mozilla Hacks - the Web developer blog.

Posted Tuesday, May 18, 2021 by Anny Gakhokidze

Pyodide Spin Out and 0.17 Release

We are happy to announce that Pyodide has become an independent and community-driven project. We are also pleased to announce the 0.17 release for Pyodide with many new features and improvements. Pyodide consists of the CPython 3.8 interpreter compiled to WebAssembly which allows Python to run in the browser.The post Pyodide Spin Out and 0.17 Release appeared first on Mozilla Hacks - the Web developer blog. badFolder

Posted Thursday, April 22, 2021 by Teon Brooks
I modified the command slightly to apply only to files called ‘result.md’:
The result is :
Hacks Blog

Read more at hacks.mozilla.org

When implementing a language feature for JavaScript, an implementer must make decisions about how the language in the specification maps to the implementation. Private fields is an example of where the specification language and implementation reality diverge, at least in SpiderMonkey– the JavaScript engine which powers Firefox. To understand more, I’ll explain what private fields are, a couple of models for thinking about them, and explain why our implementation diverges from the specification language.The post Implementing Private Fields for JavaScript appeared first on Mozilla Hacks - the Web developer blog.

Posted Tuesday, June 8, 2021 by Matthew Gaudet

Looking fine with Firefox 89

Posted Tuesday, June 1, 2021 by Chris Mills

Improving Firefox stability on Linux

Roughly a year ago at Mozilla we started an effort to improve Firefox stability on Linux. This effort quickly became an example of good synergies between FOSS projects.The post Improving Firefox stability on Linux appeared first on Mozilla Hacks - the Web developer blog.

Introducing Firefox’s new Site Isolation Security Architecture

Like any web browser, Firefox loads code from untrusted and potentially hostile websites and runs it on your computer. To protect you against new types of attacks from malicious sites and to meet the security principles of Mozilla, we set out to redesign Firefox on desktop.The post Introducing Firefox’s new Site Isolation Security Architecture appeared first on Mozilla Hacks - the Web developer blog.

Posted Tuesday, May 18, 2021 by Anny Gakhokidze

Pyodide Spin Out and 0.17 Release

Posted Thursday, April 22, 2021 by Teon Brooks
the test.txt and result.md files can be found here:
Here I have modified the command I wish to run recursively to account for the fact that the ‘find’ command already works recursively, by appending the -maxdepth 1 flag…
I am essentially removing the recursive action of the find command…
That way, if the command affects the more deeply nested folders we know the outer RecurseDirs function we are using to run the find/pandoc line once in every subfolder of the working directory… is working properly!
**Run in the folder shown to the left… we would expect every .md file to be accompanied by a newly generated html file by the same name.**
If you want to run any bash script recursively all you have to do is substitue out line #9 with the command you want to run once in every sub-folder.
function RecurseDirs ()
{
    oldIFS=$IFS
    IFS=$'\n'
    for f in "$@"
    do

#Replace the line below with your own command!

#find ./ -iname "*.md" -maxdepth 1 -type f -exec sh -c 'pandoc --standalone "${0}" -o "${0%.md}.html"' {} \;

#####################################################
# YOUR CODE BELOW!

#####################################################

if [[ -d "${f}" ]]; then
            cd "${f}"
            RecurseDirs $(ls -1 ".")
            cd ..
        fi
    done
    IFS=$oldIFS
}
RecurseDirs "./"
TBC….
Here are some of the other commands I will cover in greater detail… at a later time:
9. Copy any text between <script> tags in a file called example.html to be inserted into a new file: out.js
sed -n -e '/<script>/,/<\/script>/p' example.html >out.js
13. Add closing body and script tags to each html file in working directory.
for f in * ; do
  mv "$f" "$f.html"
doneecho "<form>
 <input type="button" value="Go back!" onclick="history.back()">
</form>
  </body></html>" | tee -a *.html
14. Batch Download Videos
#!/bin/bash

link="#insert url here#"
#links were a set of strings with just the index of the video as the variable

num=3
#first video was numbered 3 - weird.

ext=".mp4"

while [ $num -le 66 ]
do
      wget $link$num$ext -P ~/Downloads/
      num=$(($num+1))
done
15. Change File Extension from ‘.txt’ to .doc for all files in working directory.
Cheat sheet and in-depth explanations located below main article contents… The UNIX shell program interprets user commands, which are…
Bash Proficiency In Under 15 Minutes
Cheat sheet and in-depth explanations located below main article contents… The UNIX shell program interprets user commands, which are either directly entered by the user, or which can be read from a file called the shell script or shell program. Shell scripts are interpreted, not compiled. The shell reads commands from the script line per line and searches for those commands on the system while a compiler converts a program into machine readable form, an executable file.
LIFE SAVING PROTIP:
A nice thing to do is to add on the first line
#!/bin/bash -x
I will go deeper into the explanations behind some of these examples at the bottom of this article.
Here’s some previous articles I’ve written for more advanced users.
Apart from passing commands to the kernel, the main task of a shell is providing a user environment through which they can issue the computer commands via a command line instead of the graphical user interfaces most software consumers are familiar with.
fire meme
Here’s a REPL with some examples for you to practice….
Remember: learning is an effortful activity… it’s not comfortable… practice might be unpleasant but if you don’t you might as well skip reading too because without application… reading articles just provides a false sense of accomplishment….
cd <file path here>
# to go up a directory from your current directory
cd ..
List a directory’s contents
ls
# for more details, add -l (long)
ls -l
# this will output something like this:
# -rw-r--r--  1 cameronnokes  staff  1237 Jun  2 22:46 index.js
# in order, those columns are:
#   permissions for you, your group, all
#   number of links (hardlinks & softlinks)
#   owner user
#   owner group
#   file size
#   last modified time
#   file name

# to see hidden files/folders (like .git or .npmignore)
ls -a
# Note, flags can be combined like so
ls -la
cat <file name>
# shows it with line numbers
cat -n <file name>
View a file in bash
# view the file without dumping it all onto your screen
less <file name>
# Some useful shortcuts in less
#   Shift+g   (jump to end)
#   g         (go back to top)
#   /         (search)
#   q         (quit/close)
View file/folder in default application associated with it
open <file/folder name>
# view current directory in Finder
open .
# specify an application to use
open <file name> -a TextEdit
# set the file's contents
echo 'hi' > file.txt
# append to file's contents
echo 'hi' >> file.txt
# note that if you pass a file name that doesn't exist, it'll get created on the fly
Create a directory
mkdir <folder name>
# make intermediary directories as needed
mkdir -p parent/child/grandchild
Remove a file
# Note, this permanently deletes a file
rm <file name>
# Remove a folder and it's contents, recursively
rm -rf <folder name>
find# find all the PNGs in a folder
find -name "*.png"
# find all the JPGs (case insensitive) in a folder
find -iname "*.jpg"
# find only directories
find -type d
# delete all matching files
find -name "*.built.js" -delete
# execute an arbitrary action on each match
# remember `{}` will be replaced with the file name
find -name "*.png" -exec pngquant {} \;
httpThe test server is available in the `curl-practice-server` directory. Run `npm install && npm start` to run it.
curl <url>
# Useful flags
# -i    (show response headers only)
# -L    (follow redirects)
# -H    (header flag)
# -X    (set HTTP method)
# -d    (request body)
# -o    (output to a file)

# to POST JSON
# (technically you don't need -X POST because -d will make it POST automatically, but I like to be explicit)
curl -X POST -H "Content-Type: application/json" -d '{ "title": "Curling" }' http://localhost:3000/api/posts

# POST a url encoded form
curl -X POST --data-urlencode title="Curling again" http://localhost:3000/api/posts

# multiline curl (applies to any bash command)
curl -i -X PUT \
-d '{ "title": "Changed title" }' \
-H "Content-Type: application/json" \
http://localhost:3000/api/posts

# pretty print JSON with jsome
curl https://swapi.co/api/people/1/ | jsome
# no spaces between name, =, and value
var=123
echo $var
# to make it accessible to all child processes of current shell, export it
export var
# this deletes the variable
unset var
To see all environment variables
env
clone-to-temp.sh script:
temp=$(mktemp -d)
git clone --branch $1 $PWD $temp
echo "branch $1 cloned to $temp"
# run some tasks, tests, etc here
greet() {
  echo "$1 world"
}

greeting=$(greet "howdy")

echo "the greeting is $greeting"

global=123

test() {
  echo "global = $global"
  local local_var="i'm a local"
  echo "local_var = $local_var"
}

test

echo "global = $global"
echo "local_var = $local_var" # will be empty because it's out of scope
# Some conditional primaries that can be used in the if expression:
#   =, !=      string (in)equality
#   -eq, -ne   numeric (in)equality
#   -lt, -gt   less/greater than
#   -z         check variable is not set
#   -e         check file/folder exists

if [[ $USER = 'cameronnokes' ]]; then
  echo "true"
else
  echo "false"
fi
Conditionals can be used inline in a more ternary-like format
# ps ax will list all running processes
ps ax | grep Chrome | less
# get the file size after uglify + gzip
uglifyjs -c -m -- index.js | gzip -9 | wc -c
Redirection
# redirect stdout to a file
ls > ls.txt
# append stdout to a file
echo "hi" >> ls.txt
Update(Utility Commands):
Find files that have been modified on your system in the past 60 minutes
Pipes let you use the output of a program as the input of another one
simple pipe with sed
This is very simple way to use pipes.
ls -l | sed -e "s/[aeio]/u/g"
Here, the following happens: first the command ls -l is executed, and it’s output, instead of being printed, is sent (piped) to the sed program, which in turn, prints what it has to.
an alternative to ls -l *.txt
Probably, this is a more difficult way to do ls -l *.txt, but this is for educational purposes.
ls -l | grep "\.txt$"
Here, the output of the program ls -l is sent to the grep program, which, in turn, will print lines which match the regex “\.txt$”.
Variables
You can use variables as in any programming languages. There are no data types. A variable in bash can contain a number, a character, a string of characters.
You have no need to declare a variable, just assigning a value to its reference will create it.
Hello World! using variables
#!/bin/bash
            STR="Hello World!"
            echo $STR
Line 2 creates a variable called STR and assigns the string “Hello World!” to it. Then the VALUE of this variable is retrieved by putting the ‘$’ in at the beginning. Please notice (try it!) that if you don’t use the ‘$’ sign, the output of the program will be different, and probably not what you want it to be.
A very simple backup script (little bit better)
#!/bin/bash
           OF=/var/my-backup-$(date +%Y%m%d).tgz
           tar -cZf $OF /home/me/
This script introduces another thing. First of all, you should be familiarized with the variable creation and assignation on line 2. Notice the expression ‘$(date +%Y%m%d)’. If you run the script you’ll notice that it runs the command inside the parenthesis, capturing its output.
Notice that in this script, the output filename will be different every day, due to the format switch to the date command(+%Y%m%d). You can change this by specifying a different format.
examples:
echo ls
echo $(ls)
Local variables
Local variables can be created by using the keyword local.
#!/bin/bash
                HELLO=Hello
                function hello {
                        local HELLO=World
                        echo $HELLO
                }
                echo $HELLO
                hello
                echo $HELLO
Basic conditional example if .. then
#!/bin/bash
if [ "foo" = "foo" ]; then
echo expression evaluated as true
fi
The code to be executed if the expression within braces is true can be found after the ‘then’ word and before ‘fi’ which indicates the end of the conditionally executed code.
Basic conditional example if .. then … else
#!/bin/bash
            if [ "foo" = "foo" ]; then
               echo expression evaluated as true
            else
               echo expression evaluated as false
            fi
Conditionals with variables
#!/bin/bash
            T1="foo"
            T2="bar"
            if [ "$T1" = "$T2" ]; then
                echo expression evaluated as true
            else
                echo expression evaluated as false
            fi
Loops
for
while
(there’s another loop called until but I don’t use it so you can look it up if you’d like)
The until loop is almost equal to the while loop, except that the code is executed while thecontrol expressionevaluates to false.
The for loop is a little bit different from other programming languages. Basically, it let’s you iterate over a series of ‘words’ within a string.
The while executes a piece of code if the control expression is true, and only stops when it is false …or a explicit break is found within the executed code.
For
#!/bin/bash
        for i in $( ls ); do
            echo item: $i
        done
On the second line, we declare i to be the variable that will take the different values contained in $( ls ).
The third line could be longer if needed, or there could be more lines before the done (4).
‘done’ (4) indicates that the code that used the value of $i has finished and $i can take a new value.
A more useful way to use the for loop would be to use it to match only certain files on the previous example
While
#!/bin/bash
         COUNTER=0
         while [  $COUNTER -lt 10 ]; do
             echo The counter is $COUNTER
             let COUNTER=COUNTER+1
         done
Functions
As in almost any programming language, you can use functions to group pieces of code in a more logical way or practice the divine art of recursion.
Declaring a function is just a matter of writing function my_func { my_code }.
Calling a function is just like calling another program, you just write its name.
Functions ex.)
#!/bin/bash
           function quit {
               exit
           }
           function hello {
               echo Hello!
           }
           hello
           quit
           echo foo
Lines 2–4 contain the ‘quit’ function. Lines 5–7 contain the ‘hello’ function If you are not absolutely sure about what this script does, please try it!.
Notice that a functions don’t need to be declared in any specific order.
When running the script you’ll notice that first: the function ‘hello’ is called, second the ‘quit’ function, and the program never reaches line 10.
Functions with parameters
#!/bin/bash
                function quit {
                   exit
                }
                function e {
                    echo $1
                }
                e Hello
                e World
                quit
                echo foo
Backup Directory Script:
#!/bin/bash
            SRCD="/home/"
            TGTD="/var/backups/"
            OF=home-$(date +%Y%m%d).tgz
            tar -cZf $TGTD$OF $SRCD
File Renamer:
Bonus Commands:
Included in a gist below (so you can see them syntax highlighted..) I am also including them in text so that they might turn up as a result of google searches … I have a hunch that google’s SEO rankings don’t put much emphasis on the content of github gists.
CodeDescription${FOO%suffix}Remove suffix${FOO#prefix}Remove prefix------${FOO%%suffix}Remove long suffix${FOO##prefix}Remove long prefix------${FOO/from/to}Replace first match${FOO//from/to}Replace all------${FOO/%from/to}Replace suffix${FOO/#from/to}Replace prefix
Comments
# Single line comment

: '
This is a
multi line
comment
'
Substrings
ExpressionDescription${FOO:0:3}Substring (position, length)${FOO:(-3):3}Substring from the right
ExpressionDescription${FOO:-val}$FOO, or val if unset (or null)${FOO:=val}Set $FOO to val if unset (or null)${FOO:+val}val if $FOO is set (and not null)${FOO:?message}Show error message and exit if $FOO is unset (or null)
Omitting the : removes the (non)nullity checks, e.g. ${FOO-val} expands to val if unset otherwise $FOO.
Loops
{: .-three-column}
Basic for loop
for i in /etc/rc.*; do
  echo $i
done
C-like for loop
for ((i = 0 ; i < 100 ; i++)); do
  echo $i
done
Ranges
for i in {1..5}; do
    echo "Welcome $i"
done
With step size
for i in {5..50..5}; do
    echo "Welcome $i"
done
Reading lines
cat file.txt | while read line; do
  echo $line
done
Forever
while true; do
  ···
done
Functions
{: .-three-column}
Defining functions
myfunc() {
    echo "hello $1"
}

# Same as above (alternate syntax)
function myfunc() {
    echo "hello $1"
}

myfunc "John"
Returning values
myfunc() {
    local myresult='some value'
    echo $myresult
}

result="$(myfunc)"
Raising errors
myfunc() {
  return 1
}

if myfunc; then
  echo "success"
else
  echo "failure"
fi
Arguments
ExpressionDescription$#Number of arguments$*All postional arguments (as a single word)$@All postitional arguments (as separate strings)$1First argument$_Last argument of the previous command
Note: $@ and $* must be quoted in order to perform as described. Otherwise, they do exactly the same thing (arguments as separate strings).
Note that [[ is actually a command/program that returns either 0 (true) or 1 (false). Any program that obeys the same logic (like all base utils, such as grep(1) or ping(1)) can be used as condition, see examples.
ConditionDescription[[ -z STRING ]]Empty string[[ -n STRING ]]Not empty string[[ STRING == STRING ]]Equal[[ STRING != STRING ]]Not Equal------[[ NUM -eq NUM ]]Equal[[ NUM -ne NUM ]]Not equal[[ NUM -lt NUM ]]Less than[[ NUM -le NUM ]]Less than or equal[[ NUM -gt NUM ]]Greater than[[ NUM -ge NUM ]]Greater than or equal------[[ STRING =~ STRING ]]Regexp------(( NUM < NUM ))Numeric conditions
More conditions
ConditionDescription[[ -o noclobber ]]If OPTIONNAME is enabled------[[ ! EXPR ]]Not[[ X && Y ]]And`[[ X
File conditions
ConditionDescription[[ -e FILE ]]Exists[[ -r FILE ]]Readable[[ -h FILE ]]Symlink[[ -d FILE ]]Directory[[ -w FILE ]]Writable[[ -s FILE ]]Size is > 0 bytes[[ -f FILE ]]File[[ -x FILE ]]Executable------[[ FILE1 -nt FILE2 ]]1 is more recent than 2[[ FILE1 -ot FILE2 ]]2 is more recent than 1[[ FILE1 -ef FILE2 ]]Same files
Example
# String
if [[ -z "$string" ]]; then
  echo "String is empty"
elif [[ -n "$string" ]]; then
  echo "String is not empty"
else
  echo "This never happens"
fi

# Combinations
if [[ X && Y ]]; then
  ...
fi

# Equal
if [[ "$A" == "$B" ]]

# Regex
if [[ "A" =~ . ]]

if (( $a < $b )); then
   echo "$a is smaller than $b"
fi

if [[ -e "file.txt" ]]; then
  echo "file exists"
fi
echo ${Fruits[0]}           # Element #0
echo ${Fruits[-1]}          # Last element
echo ${Fruits[@]}           # All elements, space-separated
echo ${#Fruits[@]}          # Number of elements
echo ${#Fruits}             # String length of the 1st element
echo ${#Fruits[3]}          # String length of the Nth element
echo ${Fruits[@]:3:2}       # Range (from position 3, length 2)
echo ${!Fruits[@]}          # Keys of all elements, space-separated
Operations
Fruits=("${Fruits[@]}" "Watermelon")    # Push
Fruits+=('Watermelon')                  # Also Push
Fruits=( ${Fruits[@]/Ap*/} )            # Remove by regex match
unset Fruits[2]                         # Remove one item
Fruits=("${Fruits[@]}")                 # Duplicate
Fruits=("${Fruits[@]}" "${Veggies[@]}") # Concatenate
lines=(`cat "logfile"`)                 # Read from file
Iteration
for i in "${arrayName[@]}"; do
  echo $i
done
Dictionaries
{: .-three-column}
Defining
declare -A sounds

sounds[dog]="bark"
sounds[cow]="moo"
sounds[bird]="tweet"
sounds[wolf]="howl"
Declares sound as a Dictionary object (aka associative array).
Working with dictionaries
echo ${sounds[dog]} # Dog's sound
echo ${sounds[@]}   # All values
echo ${!sounds[@]}  # All keys
echo ${#sounds[@]}  # Number of elements
unset sounds[dog]   # Delete dog
Iteration
Iterate over values
for val in "${sounds[@]}"; do
  echo $val
done
Iterate over keys
for key in "${!sounds[@]}"; do
  echo $key
done
Options
Options
set -o noclobber  # Avoid overlay files (echo "hi" > foo)
set -o errexit    # Used to exit upon error, avoiding cascading errors
set -o pipefail   # Unveils hidden failures
set -o nounset    # Exposes unset variables
Set GLOBIGNORE as a colon-separated list of patterns to be removed from glob matches.
History
Commands
CommandDescriptionhistoryShow historyshopt -s histverifyDon't execute expanded result immediately
Expansions
ExpressionDescription!$Expand last parameter of most recent command!*Expand all parameters of most recent command!-nExpand nth most recent command!nExpand nth command in history!<command>Expand most recent invocation of command <command>
Operations
CodeDescription!!Execute last command again!!:s/<FROM>/<TO>/Replace first occurrence of <FROM> to <TO> in most recent command!!:gs/<FROM>/<TO>/Replace all occurrences of <FROM> to <TO> in most recent command!$:tExpand only basename from last parameter of most recent command!$:hExpand only directory from last parameter of most recent command
!! and !$ can be replaced with any valid expansion.
Slices
CodeDescription!!:nExpand only nth token from most recent command (command is 0; first argument is 1)!^Expand first argument from most recent command!$Expand last token from most recent command!!:n-mExpand range of tokens from most recent command!!:n-$Expand nth token to last from most recent command
!! can be replaced with any valid expansion i.e. !cat, !-2, !42, etc.
Miscellaneous
Numeric calculations
$((a + 200))      # Add 200 to $a

$(($RANDOM%200))  # Random number 0..199
Subshells
(cd somedir; echo "I'm now in $PWD")
pwd # still in first directory
Redirection
python hello.py > output.txt   # stdout to (file)
python hello.py >> output.txt  # stdout to (file), append
python hello.py 2> error.log   # stderr to (file)
python hello.py 2>&1           # stderr to stdout
python hello.py 2>/dev/null    # stderr to (null)
python hello.py &>/dev/null    # stdout and stderr to (null)

python hello.py < foo.txt      # feed foo.txt to stdin for python
Inspecting commands
command -V cd
#=> "cd is a function/alias/whatever"
Trap errors
trap 'echo Error at about $LINENO' ERR
or
traperr() {
  echo "ERROR: ${BASH_SOURCE[1]} at about ${BASH_LINENO[0]}"
}

set -o errtrace
trap traperr ERR
Case/switch
case "$1" in
  start | up)
    vagrant up
    ;;

  *)
    echo "Usage: $0 {start|stop|ssh}"
    ;;
esac
Source relative
source "${0%/*}/../share/foo.sh"
printf
printf "Hello %s, I'm %s" Sven Olga
#=> "Hello Sven, I'm Olga

printf "1 + 1 = %d" 2
#=> "1 + 1 = 2"

printf "This is how you print a float: %f" 2
#=> "This is how you print a float: 2.000000"
Directory of script
DIR="${0%/*}"
Getting options
while [[ "$1" =~ ^- && ! "$1" == "--" ]]; do case $1 in
  -V | --version )
    echo $version
    exit
    ;;
  -s | --string )
    shift; string=$1
    ;;
  -f | --flag )
    flag=1
    ;;
esac; shift; done
if [[ "$1" == '--' ]]; then shift; fi
Heredoc
cat <<END
hello world
END
Reading input
echo -n "Proceed? [y/n]: "
read ans
echo $ans

read -n 1 ans    # Just one character
Special variables
ExpressionDescription$?Exit status of last task$!PID of last background task$$PID of shell$0Filename of the shell script
This file contains bidirectional Unicode text that may be interpreted or compiled differently than what appears below. To review, open the file in an editor that reveals hidden Unicode characters.
Learn more about bidirectional Unicode characters
<h4class="mume-header" id="random-things-to-remember">Random Things to Remember</h4>
<p><ahref="https://bryanguner.medium.com/a-list-of-all-of-my-articles-to-link-to-future-posts-1f6f88ebdf5b" class="markup--anchor markup--mixtapeEmbed-anchor" title="https://bryanguner.medium.com/a-list-of-all-of-my-articles-to-link-to-future-posts-1f6f88ebdf5b"><strong>A list of all of my articles to link to future posts</strong><br><br>
<em>You should probably skip this one… seriously it’s just for internal use!</em>bryanguner.medium.com</a><ahref="https://bryanguner.medium.com/a-list-of-all-of-my-articles-to-link-to-future-posts-1f6f88ebdf5b" class="js-mixtapeImage mixtapeImage mixtapeImage--empty u-ignoreBlock"></a></p>
<h4class="mume-header" id="using-implicitly-returns-componentsrole-of-indexjs-is-to-render-your-applicationthe-reference-to-root-comes-from-a-div-in-the-body-of-your-public-html-filestate-of-a-component-is-simply-a-regular-js-objectclass-components-require-render-method-to-return-jsxfunctional-components-directly-return-jsxclass-is-classname-in-reactwhen-parsing-for-an-integer-just-chain-numberparseint123">Using <code>()</code> implicitly returns components.Role of <code>index.js</code> is to <em>render</em> your application.The reference to <code>root</code> comes from a div in the body of your public html file.State of a component is simply a regular JS Object.Class Components require <code>render()</code> method to return JSX.Functional Components directly return JSX.<code>Class</code> is <code>className</code> in React.When parsing for an integer just chain <code>Number.parseInt("123")</code></h4>
<figure><imgsrc="https://cdn-images-1.medium.com/max/800/0*16IltJu5wXjzgXyU.gif" class="graf-image"></figure>- <spanid="3b86">**Use ternary operator if you want to make a conditional inside a fragment.**</span>
<preclass="language-text">{ x === y ? <div>Naisu</div> : <div>Not Naisu</div>; }
Purpose of React.Fragment is to allow you to create groups of children without adding an extra dom element.
</pre>
<ul>
<li>
<p><spanid="5cbe"><strong>React</strong> manages the creation and updating of DOM nodes in your Web page.</span></p>
</li>
<li>
<p><spanid="d253">All it does is dynamically render stuff into your DOM.</span></p>
</li>
<li>
<p><spanid="093c">What it doesn’t do:</span></p>
</li>
<li>
<p><spanid="bd7d">Ajax</span></p>
</li>
<li>
<p><spanid="7f06">Services</span></p>
</li>
<li>
<p><spanid="b1b9">Local Storage</span></p>
</li>
<li>
<p><spanid="47a9">Provide a CSS framework</span></p>
</li>
<li>
<p><spanid="57d1"><strong>React</strong> is unopinionated</span></p>
</li>
<li>
<p><spanid="b277">Just contains a few rules for developers to follow, and it just works.</span></p>
</li>
<li>
<p><spanid="dafd"><strong>JSX</strong> : Javascript Extension is a language invented to help write React Applications (looks like a mixture of JS and HTML)</span></p>
</li>
<li>
<p><spanid="fc46">Here is an overview of the difference between rendering out vanilla JS to create elements, and JSX:</span></p>
</li>
<li>
<p><spanid="eec2">This may seem like a lot of code but when you end up building many components, it becomes nice to put each of those functions/classes into their own files to organize your code.<br>
<strong>Using tools with React</strong></span></p>
</li>
<li>
<p><spanid="6c32"><code>React DevTools</code> : New tool in your browser to see ow React is working in the browser</span></p>
</li>
<li>
<p><spanid="3f86"><code>create-react-app</code> : Extensible command-line tool to help generate standard React applications.</span></p>
</li>
<li>
<p><spanid="da3c"><code>Webpack</code> : In between tool for dealing with the extra build step involved.</span></p>
</li>
</ul>
<figure><imgsrc="https://cdn-images-1.medium.com/max/800/0*4O0NPGEa-1NcDOIA.png" class="graf-image"></figure>- <spanid="9d53">**HMR** : (Hot Module Replacement) When you make changes to your source code the changes are delivered in real-time.</span>
- <spanid="8d5b">React Developers created something called `Flux Architecture` to moderate how their web page consumes and modifies data received from back-end API's.</span>
<li><spanid="c587">React is declarative in nature, utilizing either it’s build in createElement method or the higher-level language known as JSX.</span></li>
<li><spanid="eff3">Create elements that can be re-used over and over.<br>
<strong>One-flow of data</strong></span></li>
<li><spanid="5c6e">React apps are built as a combination of parent and child components.</span></li>
<li><spanid="5a30">Parents can have one or more child components, all children have parents.</span></li>
<li><spanid="d6c8">Data is never passed from child to the parent.</span></li>
<li><spanid="dc54"><code>Virtual DOM</code> : React provides a Virtual DOM that acts as an agent between the real DOM and the developer to help debug, maintain, and provide general use.</span></li>
<li><spanid="90bf">Due to this usage, React handles web pages much more intelligently; making it one of the speediest Front End Libraries available.</span></li>
</ul>
<p>By <ahref="https://medium.com/@bryanguner" class="p-author h-card">Bryan Guner</a> on <ahref="https://medium.com/p/647ba595e607">July 1, 2021</a>.</p>
Using () implicitly returns components.Role of index.js is to render your application.The reference to root comes from a div in the body of your public html file.State of a component is simply a regular JS Object.Class Components require render() method to return JSX.Functional Components directly return JSX.Class is className in React.When parsing for an integer just chain Number.parseInt("123")
\- \*\*Use ternary operator if you want to make a conditional inside a fragment.\*\*
{ x === y ? <div>Naisu</div> : <div>Not Naisu</div>; }

Purpose of React.Fragment is to allow you to create groups of children without adding an extra dom element.
React manages the creation and updating of DOM nodes in your Web page.
All it does is dynamically render stuff into your DOM.
What it doesn’t do:
Ajax
Services
Local Storage
Provide a CSS framework
React is unopinionated
Just contains a few rules for developers to follow, and it just works.
JSX : Javascript Extension is a language invented to help write React Applications (looks like a mixture of JS and HTML)
Here is an overview of the difference between rendering out vanilla JS to create elements, and JSX:
This may seem like a lot of code but when you end up building many components, it becomes nice to put each of those functions/classes into their own files to organize your code. Using tools with React
React DevTools : New tool in your browser to see ow React is working in the browser
create-react-app : Extensible command-line tool to help generate standard React applications.
Webpack : In between tool for dealing with the extra build step involved.
\- \*\*HMR\*\* : (Hot Module Replacement) When you make changes to your source code the changes are delivered in real-time. - React Developers created something called \`Flux Architecture\` to moderate how their web page consumes and modifies data received from back-end API's.
\- \*\*Choosing React\*\* - Basically, React is super important to learn and master.
React Concepts and Features
There are many benefits to using React over just Vanilla JS.
Modularity
To avoid the mess of many event listeners and template strings, React gives you the benefit of a lot of modularity.
Easy to start
No specials tools are needed to use Basic React.
You can start working directly with createElement method in React.
Declarative Programming
React is declarative in nature, utilizing either it’s build in createElement method or the higher-level language known as JSX.
Reusability
Create elements that can be re-used over and over. One-flow of data
React apps are built as a combination of parent and child components.
Parents can have one or more child components, all children have parents.
Data is never passed from child to the parent.
Virtual DOM : React provides a Virtual DOM that acts as an agent between the real DOM and the developer to help debug, maintain, and provide general use.
Due to this usage, React handles web pages much more intelligently; making it one of the speediest Front End Libraries available.
Test if you have Ubuntu installed by typing “Ubuntu” in the search box in the bottom app bar that reads “Type here to search”. If you see a search result that reads **“Ubuntu 20.04 LTS”** with “App” under it, then you have it installed.
In the application search box in the bottom bar, type “PowerShell” to find the application named “Windows PowerShell”
Right-click on “Windows PowerShell” and choose “Run as administrator” from the popup menu
In the blue PowerShell window, type the following: Enable-WindowsOptionalFeature -Online -FeatureName Microsoft-Windows-Subsystem-Linux
Restart your computer
In the application search box in the bottom bar, type “Store” to find the application named “Microsoft Store”
Click “Microsoft Store”
Click the “Search” button in the upper-right corner of the window
Type in “Ubuntu”
Click “Run Linux on Windows (Get the apps)”
Click the orange tile labeled “Ubuntu” Note that there are 3 versions in the Microsoft Store… you want the one just entitled ‘Ubuntu’
Click “Install”
After it downloads, click “Launch”
If you get the option, pin the application to the task bar. Otherwise, right-click on the orange Ubuntu icon in the task bar and choose “Pin to taskbar”
When prompted to “Enter new UNIX username”, type your first name with no spaces
When prompted, enter and retype a password for this UNIX user (it can be the same as your Windows password)
Confirm your installation by typing the command whoami ‘as in who-am-i'followed by Enter at the prompt (it should print your first name)
You need to update your packages, so type sudo apt update (if prompted for your password, enter it)
You need to upgrade your packages, so type sudo apt upgrade (if prompted for your password, enter it)
Git
Git comes with Ubuntu, so there’s nothing to install. However, you should configure it using the following instructions.
Open an Ubuntu terminal if you don’t have one open already.
You need to configure Git, so type git config --global user.name "Your Name" with replacing "Your Name" with your real name.
You need to configure Git, so type git config --global user.email your@email.com with replacing "your@email.com" with your real email.
Note: if you want git to remember your login credentials type:
$ git config --global credential.helper store
Google Chrome
Test if you have Chrome installed by typing “Chrome” in the search box in the bottom app bar that reads “Type here to search”. If you see a search result that reads “Chrome” with “App” under it, then you have it installed. Otherwise, follow these instructions to install Google Chrome.
Open Microsoft Edge, the blue “e” in the task bar, and type in http://chrome.google.com. Click the “Download Chrome” button. Click the “Accept and Install” button after reading the terms of service. Click “Save” in the “What do you want to do with ChromeSetup.exe” dialog at the bottom of the window. When you have the option to “Run” it, do so. Answer the questions as you’d like. Set it as the default browser.
Right-click on the Chrome icon in the task bar and choose “Pin to taskbar”.
Node.js
Test if you have Node.js installed by opening an Ubuntu terminal and typing node --version. If it reports "Command 'node' not found", then you need to follow these directions.
In the Ubuntu terminal, type sudo apt update and press Enter
In the Ubuntu terminal, type sudo apt install build-essential and press Enter
In the Ubuntu terminal, type curl -o- https://raw.githubusercontent.com/nvm-sh/nvm/v0.35.2/install.sh | bash and press Enter
In the Ubuntu terminal, type . ./.bashrc and press Enter
In the Ubuntu terminal, type nvm install --lts and press Enter
Confirm that node is installed by typing node --version and seeing it print something that is not "Command not found"!
Unzip
You will often have to download a zip file and unzip it. It is easier to do this from the command line. So we need to install a linux unzip utility.
In the Ubuntu terminal type: sudo apt install unzip and press Enter
Mocha.js
Test if you have Mocha.js installed by opening an Ubuntu terminal and typing which mocha. If it prints a path, then you're good. Otherwise, if it prints nothing, install Mocha.js by typing npm install -g mocha.
Python 3
Ubuntu does not come with Python 3. Install it using the command sudo apt install python3. Test it by typing python3 --version and seeing it print a number.
Note about WSL
As of the time of writing of this document, WSL has an issue renaming or deleting files if Visual Studio Code is open. So before doing any linux commands which manipulate files, make sure you close Visual Studio Code before running those commands in the Ubuntu terminal.
As I learn to build web applications in React I will blog about it in this series in an attempt to capture the questions that a complete…
Beginner’s Guide To React Part 2
As I learn to build web applications in React I will blog about it in this series in an attempt to capture the questions that a complete beginner might encounter that a more seasoned developer would take for granted!
Here I will walk through a demo…. skip down below for more fundamental examples and resources…
React Demo
ex1 — A Basic React Component
ex2 — A Basic React Class Component
ex3 — A Class Component with State
ex4 — A Class Component that Updates State
ex5 — A Class Component that Iterates through State
ex6 — An Example of Parent and Child Components
With regards to converting an existing HTML, CSS, and JS site into React, first you’ll want to think about how to break up your site into components,
as well as think about what the general hierarchical component structure of your site will look like.
From there, it’s a simple matter of copying the relevant HTML for that component and throwing it into the render method of your component file.
Any methods that are needed for that component to function properly can added onto your new component.
Once you’ve refactored your HTML components into React components, you’ll want to lay them out in the desired hierarchical structure
with children components being rendered by their parents, as well as ensuring that the parent components are passing down the necessary data as props to their children components.
ex.)
<!-- Hello world -->
<div class="awesome" style="border: 1px solid red">
  <label for="name">Enter your name: </label>
  <input type="text" id="name" />
</div>
<p>Enter your HTML here</p>
Is equivalent to:
A Basic Component
A component is some thing that is being rendered in the browser. It could be a button, a form with a bunch of fields in it…etc.…
React doesn’t place any restrictions on how large or small a component can be.
You could have an entire static site encapsulated in a single React component, but that would defeat the purpose of using React.
So the first thing to remember about a component is that a component must render something.
If nothing is being rendered from a component, then React will throw an error.
Inside of BasicComponent.js , first import React at the top of the file. Our most basic of components looks like this:
This is a component that simply returns a div tag with the words Hello World! inside.
The last line simply exports our component so that it can be imported
by another file.
Notice that this component looks exactly like an anonymous arrow function that we’ve named BasicComponent .
In fact, that is literally what this is.
The arrow function then is simply returning the div tag. When a component is written as a function like this one is, it is called a functional component.
A Basic Class Component
The above component is an example of a functional component, which is appropriate since that component is literally nothing more than a function that returns some HTML.
Functional components are great when all you want a component to do is to render some stuff.
Components can also be written as classes (although this paradigm is becoming outdated and you should strive to write your components functionally!
For this exercise, we’re going to write a class component that does exactly the same thing as the functional component we just wrote.
We’ll again need to import React at the top of the file, but we’ll also need to add a little something. Our import statement will look like this:
import React, { Component } from 'react';
So, in addition to importing React, we’re also importing the base Component class that is included in the React library.
React lets you define components as classes or functions.
Components defined as classes currently provide more features . To define a React component class, you need to extend React.Component:
The only method you must define in aReact.Componentsubclass is calledrender().
render()
The render() method is the only required method in a class component.
When called, it should examine this.props and this.state and return one of the following types:
React elements. Typically created via JSX. For example, <div /> and <MyComponent /> are React elements that instruct React to render a DOM node, or another user-defined component, respectively.
Arrays and fragments. Let you return multiple elements from render. See the documentation on fragments for more details.
Portals. Let you render children into a different DOM subtree. See the documentation on portals for more details.
String and numbers. These are rendered as text nodes in the DOM.
Booleans ornull. Render nothing. (Mostly exists to support return test && <Child /> pattern, where test is boolean.)
The render() function should be pure, meaning that it does not modify component state, it returns the same result each time it’s invoked, and it does not directly interact with the browser.
If you need to interact with the browser, perform your work in componentDidMount() or the other lifecycle methods instead. Keeping render() pure makes components easier to think about.
Note
render()will not be invoked ifshouldComponentUpdate()returns false.
The export statement at the bottom of the file also stays, completely unchanged. Our class component will thus look like this:
Notice that ourBasicClassComponentinherits from the baseComponentclass that we imported from the React library, by virtue of the 'extends' keyword.
That being said, there's nothing in this minimal component that takes advantage of any of those inherited methods.
All we have is a method on our component class calledrenderthat returns the same div tag.
If we really were deciding between whether to use a functional component versus a class component to render a simple div tag, then the functional style is more appropriate to use.
This is because class components are much better suited for handling component state and triggering events based on the component’s lifecycle.
The important takeaways at this point are that there are two types of components, functional and class components, and that functional components are well-suited if you’re just looking to render some HTML.
Class components, on the other hand, are much better suited for handling components that require more complex functionality, need to exhibit more varied behavior, and/or need to keep track of some state that may change throughout said component’s lifecycle.
A Class Component with Some State
Component state is any dynamic data that we want the component to keep track of.
For example, let’s say we have a form component. This form has some input fields that we’d like users to fill out. When a user types characters into an input field, how is that input persisted from the point of view of our form component?
The answer is by using component state!
There are a few important concepts regarding component state, such as how to update it, pass it to another component, render it, etc.
Only class components have the ability to persist state, so if at any time you realize that a component needs to keep track of some state, you know that you’ll automatically need a class component instead of a functional component.
It is possible to handle state with functional components but that requires the use of something called the useState() hook. Hooks were added in React 16.8; prior to this release, there was no mechanism to add state to functional components.
Here’s what the above component looks like as a functional component:
Our class component with state will look a lot like the basic class component we just wrote, but with some exceptions:
So far, the only new thing going on here is the constructor block. If you recall how classes in JavaScript work, classes need constructors.
Additionally, if a class is extending off of another class and wants access to its parent class’s methods and properties, then thesuperfunction needs to be called inside the class's constructor function.
Point being, the constructor function and the call to the super function are not associated with React, they are associated with all JavaScript classes.
Then there is the this.stateproperty inside the constructor function that is set as an empty object.
We're adding a property called state to our class and setting it to an empty object.
State objects in React are always just plain old objects.
So why is it that the basic class component we wrote in the previous exercise had no constructor function within its body?
That is because we had no need for them since all our class component was doing was rendering some HTML.
The constructor is needed here because that is where we need to initialize our state object.
The call tosuperis needed because we can't referencethisinside of our constructor without a call tosuperfirst.
Ok, now let’s actually use this state object.
One very common application of state objects in React components is to render the data being stored inside them within our component’s render function.
Refactoring our component class to do that:
We added a key-value pair to our state object inside our constructor.
Then we changed the contents of the render function.
Now, it’s actually rendering the data that we have inside the state object.
Notice that inside the div tags we’re using a template string literal so that we can access the value of this.state.someData straight inside of our rendered content.
With Reacts newest version, we can actually now add state to a component without explicitly defining a constructor on the class. We can refactor our class component to look like this:
This new syntax is what is often referred to as ‘syntactic sugar’: under the hood, the React library translates this back into the old constructor code that we first started with, so that the JavaScript remains valid to the JavaScript interpreter.
The clue to this is the fact that when we want to access some data from the state object, we still need to call it with this.state.someData ; changing it to just state.someData does not work.
Class Component Updating State
Great, so we can render some state that our component persists for us.
However, we said an important use case of component state is to handle dynamic data.
A single static number isn’t very dynamic at all.
So now let’s walk through how to update component state.
Notice that we’ve added two methods to our class: increment and decrement .
increment and decrement are methods that we are adding to our class component.
Unlike the render method, increment and decrement were not already a part of our class component.
This is why increment and decrement are written as arrow functions, so that they are automatically bound to our class component.
The alternative is using a declaration syntax function with the bind method to bind the context of our methods to the class component.
The more interesting thing is what is going on within the bodies of these methods.
Each calls the setState function.
setState in fact is provided to us by React.
It is the standard way to update a component's state.
It's the only way you should ever update a component's state. It may seem more verbose than necessary, but there are good reasons for why you should be doing it this way.
So the way to use setState to update a component's state is to pass it an object with each of the state keys you wish to update, along with the updated value.
In our increment method we said "I would like to update the aNumber property on my component state by adding one to it and then setting the new value as my new aNumber ".
The same thing happens in our decrement method, only we're subtracting instead of adding.
Then the other new concept we’re running into here is how to actually call these methods we’ve added to our class.
We added two HTML button tags within our `render` function, then in their respective `onClick` handlers, we specify the method that should be called whenever this button gets clicked. So whenever we click either of the buttons, our state gets updated appropriately and our component will re-render to show the correct value we're expecting.
Class Component Iterating State
Another common state pattern you’ll see being used in React components is iterating over an array in our state object and rendering each array element in its own tag.
This is often used in order to render lists.
Additionally, we want to be able to easily update lists and have React re-render our updated list.
We’ll see how both of these are done and how they work together within a single component in order to create the behavior of a dynamic list.
The first change to note is that our state object now has an ‘ingredients’ array, and a ‘newIngredient’ field that has been initialized to an empty string.
The ingredients array contains the elements that we’ll want to render in our list.
The addIngredient and handleIngredientInput methods we've added to our class receives a parameter called 'event'.
This event object is part of the browser's API.
When we interact with some DOM element, such as clicking on an HTML button, the function that is invoked upon that button being clicked actually receives the event object.
So when we type some input into an input tag, we're able grab each character that was typed into the input field through the event object parameter.
The handleIngredientInput method is what gets invoked every time the user presses a key to enter text in the input box for adding a new ingredient.
Every character the user types gets persisted in the newIngredient field on the state object.
We're able to grab the text in the input box using event.target.value
Which holds the value of the string text that is currently in the input box.
We use that to update our newIngredient string field.
Breaking down the addIngredient method, we see this event.preventDefault() invocation.
This is because this method will be used upon submitting a form, and it turns out that submitting a form triggers some default form behavior that we don't want to trigger when we submit the form (namely refreshing the entire page).
event.preventDefault() will prevent this default form behavior, meaning our form will only do what we want it to do when it is submitted.
Next, we store a reference to `this.state.ingredients` in a variable called `ingredientsList` .
So we now have a copy of the array that is stored in our state object.
We want to update the copy of the ingredients array first instead of directly updating the actual array itself in state.
Now we push whatever value is being stored at our newIngredient field onto the ingredientsList array so that our ingredientsList array is now more up-to-date than our this.state.ingredients array.
So all we have to do now is call setState appropriately in order to update the value in our state object.
Additionally, we also set the newIngredient field back to an empty string in order to clear out the input field once we submit a new ingredient.
Now it's ready to accept more user input!
Looking at our render function, first note the `this.state.ingredients.map` call.
This is looping through each ingredient in our ingredients array and returning each one within its own div tag.
This is a very common pattern for rendering everything inside an array.
Then we have an HTML form which contains an input field.
The purpose of this form is to allow a user to add new ingredients to the list. Note that we’re passing our addIngredient method to the form's onSubmit handler.
This means that our addIngredient method gets invoked whenever our form is submitted.
Lastly, the input field has an onChange handler that invokes our handleIngredientInput method whenever there is some sort of change in the input field, namely when a user types into it.
Notice that the `value` field in our input tag reads off of `this.state.newIngredient` in order to know what value to display.
So when a user enters text into the input field, the onChange handler is invoked every time, which updates our this.state.newIngredient field, which the input field and then renders.
Parent and Child Components
A single isolated component isn’t going to do us much good.
The beauty of React lies in the fact that it allows us to compose modular components together.
Let’s start off with the component we just saw, but let’s change its name to ParentComponent .
The only two other differences in this component are that we’re importing a ChildComponent and then using it inside our this.state.ingredients.map call.
ChildComponent is another React component.
Notice that we're using it just as if it were any other HTML tag.
This is how we lay out our component hierarchy: the ChildComponent is rendered within the ParentComponent.
We can see this to be the case if we open up the developer console and inspect these elements.
child-left: parent-right
Note also that we’re passing each ingredient as a ‘thing’ to the ChildComponent component.
This is how a parent component passes data to a child component. It doesn’t need to be called ‘thing’; you can call it whatever you want.
Conceptually though, every piece of data that a parent component passes down to a child component is called a ‘prop’ in React lingo.
Let’s take a look now at the Child Component. It serves two purposes:
to render the props data that it gets from a parent component,
to add the ability for a user to click on it and have it toggle a strikethrough, indicating that the item is ‘complete’.
The overall structure of the child component is nothing we haven’t seen. It’s just another class component with its own state object and a method calledhandleClick** .**
A component accesses its props via thethis.propsobject.
Any prop a parent component passes down to a child component is accessible inside the child component'sthis.propobject.
So our child component keeps its own state that tracks whether the component has been clicked or not.
Then at the top of the render function, it uses a ternary condition to determine whether the div tag that is being rendered should have a strikethrough or not.
The handleClick method is then invoked via an onClick handler on the div tag; it does the work of toggling the this.state.clicked Boolean.
The overall structure of React applications can be represented as a hierarchical tree structure, just like how the DOM itself is structure. There is an overarching root component at the top of the hierarchy that every other component sits underneath. Specifying that a component should be a child of some parent component is as simple as throwing it in the parent component’s render function, just like how we did it in this example
### **Core Concepts:**
1. What is react?
React is a declarative, efficient, and flexible JavaScript library for building user interfaces. It uses components to update and render as your data changes.
React manages the creation and continuous updating of DOM nodes in your Web page.
It does not handleAJAXrequests, Local Storage or style your website. IT is just a tool to dynamically render content on a webpage as a result of changes in ‘state’. Because it’s function is so limited in scope you may hear it referred to as a library… (not a framework … like Angular for example) and you may also hear it described as unopinionated.
2. Why use react?
Works for teams and helps UI workflow patterns
The components can be reusable
Componentized UI is the future of web dev
### Declarative programming
In the same way that you use HTML to declare what the user interface should
look like, React provides the same mechanism in its createElement method or the higher-level language known as JSX.
Declarative programming is a non-imperative style of programming in which programs describe their desired results without explicitly listing commands or steps that must be performed.
Its return value is only determined by its input values
Its return value is always the same for the same input values
A React component is considered pure if it renders the same output for the same state and props. For class components like this, React provides the PureComponent base class. Class components that extend the React.PureComponent class are treated as pure components.
Pure components have some performance improvements and render optimizations since React implements the shouldComponentUpdate() method for them with a shallow comparison for props and state.
Are React functional components pure?
Functional components are very useful in React, especially when you want to isolate state management from the component. That’s why they are often called stateless components.
However, functional components cannot leverage the performance improvements and render optimizations that come with React.PureComponent since they are not classes by definition.
If you want React to treat a functional component as a pure component, you’ll have to convert the functional component to a class component that extends React.PureComponent.
Reusability
React encourages you to think in terms of reusability as you construct the user
interface from elements and components that you create. When you
make a list or a button, you can then reuse those components to show different data ‘state’ in the same UI structure as you have built for different data previously.
#### Component-Based
Build encapsulated components that manage their own state, then compose them to make complex UIs.
Since component logic is written in JavaScript instead of templates, you can easily pass rich data through your app and keep state out of the DOM.
Learn Once, Write Anywhere
We don’t make assumptions about the rest of your technology stack, so you can develop new features in React without rewriting existing code.
React can also render on the server using Node and power mobile apps using React Native.
Speed
Due to the use of a virtual DOM, React handles changes to a Web page more
intelligently than just string manipulation. It is constantly monitors the
virtual DOM for changes. It very efficiently reconciles changes in the virtual
DOM with what it has already produced in the real DOM. This is what
makes React one of the speediest front-end libraries available.
#### 3. Who uses react?
Companies such as Facebook app for android and Instagram
Here is a link to a list of other companies who use react.
Who uses react#### 4. Setting up react
React can be set up in CodePen for quick practice development by adding react.js, react-dom and babel.
It can also be set up by downloading a react starter project from GitHub installing node and following these instructions.
Alternatively it can be set up through NPM like this.
5. Intro to eco system
Composition, being able to wrap up sections of code into there own containers so they can be re used.
How to make a large application? by combining small components to create a larger complex application.
They are similar to a collection of HTML,CSS, JS and data specific to that component.
They can be defined in pure JavaScript or JSX.
Data is either received from a component’s parent component, or it’s contained in the component itself.
Applications can be separated into smaller components like this…
React components can be created using ES6 class like this.
import React from 'react';

class Hello extends React.Component {
  render () {
    return <h1>Hello, {this.props.name}!</h1>;
  }
}

export default Hello;
At the top with have the code to bring react and react dom libraries in.
React library is used for the react syntax.
React DOM is used to update the DOM.
We then have the Class section which creates the component.
Render() describes the specific UI for the component.
Return is used to return the JSX
And Finally ReactDOM.render is used to update the DOM.
8. Data flow with props
Small examples of data flow, see if you can get the code to work.
9. Creating lists with map
The parent component passes down to the child component as props.
Using props to access names and map to loop through each list item. Then passing this by using props.
Checking data to see if Boolean is true then adding detail to the list.
10. Prop types
PropTypes allow you to declare the type (string, number, function, etc) of each prop being passed to a component. Then if a prop passed in isn’t of the declared type you’ll get a warning in the console.
Excerpt from the React website:
React — A JavaScript library for building user interfaces
A JavaScript library for building user interfaces
Declarative
React makes it painless to create interactive UIs. Design simple views for each state in your application, and React will efficiently update and render just the right components when your data changes.
Declarative views make your code more predictable and easier to debug.
A Simple Component
React components implement a render() method that takes input data and returns what to display. This example uses an XML-like syntax called JSX. Input data that is passed into the component can be accessed by render() via this.props.
JSX is optional and not required to use React. Try the Babel REPL to see the raw JavaScript code produced by the JSX compilation step.
In addition to taking input data (accessed via this.props), a component can maintain internal state data (accessed via this.state). When a component’s state data changes, the rendered markup will be updated by re-invoking render().
An Application
Using props and state, we can put together a small Todo application. This example uses state to track the current list of items as well as the text that the user has entered. Although event handlers appear to be rendered inline, they will be collected and implemented using event delegation.
A Component Using External Plugins
React allows you to interface with other libraries and frameworks. This example uses remarkable, an external Markdown library, to convert the <textarea>’s value in real time.
My favorite language for maintainability is Python. It has simple, clean syntax, object encapsulation, good library support, and optional…
Beginners Guide To Python
My favorite language for maintainability is Python. It has simple, clean syntax, object encapsulation, good library support, and optional named parameters.
Bram Cohen
Article on basic web development setup… it is geared towards web but VSCode is an incredibly versatile editor and this stack really could suit just about anyone working in the field of computer science.
the high-level data types allow you to express complex operations in a single statement;
statement grouping is done by indentation instead of beginning and ending brackets;
no variable or argument declarations are necessary.
Installing Python:
Windows
To determine if your Windows computer already has Python 3:
Open a command prompt by entering command prompt in the Windows 10 search box and selecting the Command Prompt App in the Best match section of the results.
Enter the following command and then select the Enter key:
ConsoleCopy
python --version
1. Running `python --version` may not return a value, or may return an error message stating *'python' is not recognized as an internal or external command, operable program or batch file.* This indicates Python is not installed on your Windows system.
2. If you see the word `Python` with a set of numbers separated by `.` characters, some version of Python is installed.
i.e.
Python 3.8.0
As long as the first number is3, you have Python 3 installed.
if condition:
        pass
    elif condition2:
        pass
    else:
        pass
Loops
Python has two primitive loop commands:
while loops
for loops
While loop
With the while loop we can execute a set of statements as long as a condition is true.
Example: Print i as long as i is less than 6
i = 1
while i < 6:
  print(i)
  i += 1
The while loop requires relevant variables to be ready, in this example we need to define an indexing variable, i, which we set to 1.
With the break statement we can stop the loop even if the while condition is true
With the continue statement we can stop the current iteration, and continue with the next.
With the else statement we can run a block of code once when the condition no longer is true.
For loop
A for loop is used for iterating over a sequence (that is either a list, a tuple, a dictionary, a set, or a string).
This is less like the for keyword in other programming languages, and works more like an iterator method as found in other object-orientated programming languages.
With the for loop we can execute a set of statements, once for each item in a list, tuple, set etc.
fruits = ["apple", "banana", "cherry"]
for x in fruits:
  print(x)
The for loop does not require an indexing variable to set beforehand.
To loop through a set of code a specified number of times, we can use the range() function.
The range() function returns a sequence of numbers, starting from 0 by default, and increments by 1 (by default), and ends at a specified number.
The range() function defaults to increment the sequence by 1, however it is possible to specify the increment value by adding a third parameter: range(2, 30, 3).
The else keyword in a for loop specifies a block of code to be executed when the loop is finished.
A nested loop is a loop inside a loop.
The “inner loop” will be executed one time for each iteration of the “outer loop”:
adj = ["red", "big", "tasty"]
fruits = ["apple", "banana", "cherry"]

for x in adj:
  for y in fruits:
    print(x, y)
for loops cannot be empty, but if you for some reason have a for loop with no content, put in the pass statement to avoid getting an error.
for x in [0, 1, 2]:
  pass
Function definition
def function_name():
    return
Function call
function_name()
We need not to specify the return type of the function.
Functions by default return None
We can return any datatype.
Python Syntax
Python syntax was made for readability, and easy editing. For example, the python language uses a : and indented code, while javascript and others generally use {} and indented code.
First Program
Lets create a python 3 repl, and call it Hello World. Now you have a blank file called main.py. Now let us write our first line of code:
print('Hello world!')
Brian Kernighan actually wrote the first “Hello, World!” program as part of the documentation for the BCPL programming language developed by Martin Richards.
Now, press the run button, which obviously runs the code. If you are not using replit, this will not work. You should research how to run a file with your text editor.
Command Line
If you look to your left at the console where hello world was just printed, you can see a >, >>>, or $ depending on what you are using. After the prompt, try typing a line of code.
Python 3.6.1 (default, Jun 21 2017, 18:48:35)
[GCC 4.9.2] on linux
Type "help", "copyright", "credits" or "license" for more information.
> print('Testing command line')
Testing command line
> print('Are you sure this works?')
Are you sure this works?
>
The command line allows you to execute single lines of code at a time. It is often used when trying out a new function or method in the language.
New: Comments!
Another cool thing that you can generally do with all languages, are comments. In python, a comment starts with a #. The computer ignores all text starting after the #.
# Write some comments!
If you have a huge comment, do not comment all the 350 lines, just put ''' before it, and ''' at the end. Technically, this is not a comment but a string, but the computer still ignores it, so we will use it.
New: Variables!
Unlike many other languages, there is no var, let, or const to declare a variable in python. You simply go name = 'value'.
Remember, there is a difference between integers and strings. Remember: String ="". To convert between these two, you can put an int in a str() function, and a string in a int() function. There is also a less used one, called a float. Mainly, these are integers with decimals. Change them using the float() command.
x = 5
x = str(x)
b = '5'
b = int(b)
print('x = ', x, '; b = ', str(b), ';') # => x = 5; b = 5;
Instead of using the , in the print function, you can put a + to combine the variables and string.
Operators
There are many operators in python:
+
-
/
*
These operators are the same in most languages, and allow for addition, subtraction, division, and multiplicaiton.
Now, we can look at a few more complicated ones:
*simpleops.py*
x = 4
a = x + 1
a = x - 1
a = x * 2
a = x / 2
You should already know everything shown above, as it is similar to other languages. If you continue down, you will see more complicated ones.
complexop.py
a += 1
a -= 1
a *= 2
a /= 2
The ones above are to edit the current value of the variable.
Sorry to JS users, as there is no i++; or anything.
Fun Fact: The python language was named after Monty Python.
If you really want to know about the others, view Py Operators
More Things With Strings
Like the title?
Anyways, a ' and a " both indicate a string, but do not combine them!
quotes.py
x = 'hello' # Good
x = "hello" # Good
x = "hello' # ERRORRR!!!
slicing.py
String Slicing
You can look at only certain parts of the string by slicing it, using [num:num].
The first number stands for how far in you go from the front, and the second stands for how far in you go from the back.
Input is a function that gathers input entered from the user in the command line. It takes one optional parameter, which is the users prompt.
inp.py
print('Type something: ')
x = input()
print('Here is what you said: ', x)
If you wanted to make it smaller, and look neater to the user, you could do…
inp2.py
print('Here is what you said: ', input('Type something: '))
Running: inp.py
Type something:
Hello World
Here is what you said: Hello World
inp2.py
Type something: Hello World
Here is what you said: Hello World
New: Importing Modules
Python has created a lot of functions that are located in other .py files. You need to import these modules to gain access to the,, You may wonder why python did this. The purpose of separate modules is to make python faster. Instead of storing millions and millions of functions, , it only needs a few basic ones. To import a module, you must write input <modulename>. Do not add the .py extension to the file name. In this example , we will be using a python created module named random.
module.py
import random
Now, I have access to all functions in the random.py file. To access a specific function in the module, you would do <module>.<function>. For example:
module2.py
import random
print(random.randint(3,5)) # Prints a random number between 3 and 5
Pro Tip:
Dofrom random import randintto not have to dorandom.randint(), justrandint()*
To import all functions from a module, you could do* from random import *
New: Loops!
Loops allow you to repeat code over and over again. This is useful if you want to print Hi with a delay of one second 100 times.
for Loop
The for loop goes through a list of variables, making a seperate variable equal one of the list every time.
Let’s say we wanted to create the example above.
loop.py
from time import sleep
for i in range(100):
     print('Hello')
     sleep(.3)
This will print Hello with a .3 second delay 100 times. This is just one way to use it, but it is usually used like this:
loop2.py
import time
for number in range(100):
     print(number)
     time.sleep(.1)
The while loop runs the code while something stays true. You would put while <expression>. Every time the loop runs, it evaluates if the expression is True. It it is, it runs the code, if not it continues outside of the loop. For example:
while.py
while True: # Runs forever
     print('Hello World!')
Or you could do:
while2.py
import random
position = '<placeholder>'
while position != 1: # will run at least once
    position = random.randint(1, 10)
    print(position)
New: if Statement
The if statement allows you to check if something is True. If so, it runs the code, if not, it continues on. It is kind of like a while loop, but it executes only once. An if statement is written:
if.py
import random
num = random.randint(1, 10)
if num == 3:
     print('num is 3. Hooray!!!')
if num > 5:
     print('Num is greater than 5')
if num == 12:
     print('Num is 12, which means that there is a problem with the python language, see if you can figure it out. Extra credit if you can figure it out!')
Now, you may think that it would be better if you could make it print only one message. Not as many that are True. You can do that with an elif statement:
elif.py
import random
num = random.randint(1, 10)
if num == 3:
    print('Num is three, this is the only msg you will see.')
elif num > 2:
    print('Num is not three, but is greater than 1')
Now, you may wonder how to run code if none work. Well, there is a simple statement called else:
else.py
import random
num = random.randint(1, 10)
if num == 3:
    print('Num is three, this is the only msg you will see.')
elif num > 2:
    print('Num is not three, but is greater than 1')
else:
    print('No category')
New: Functions (def)
So far, you have only seen how to use functions other people have made. Let use the example that you want to print the a random number between 1 and 9, and print different text every time.
It is quite tiring to type:
Characters: 389
nofunc.py
import random
print(random.randint(1, 9))
print('Wow that was interesting.')
print(random.randint(1, 9))
print('Look at the number above ^')
print(random.randint(1, 9))
print('All of these have been interesting numbers.')
print(random.randint(1, 9))
print("these random.randint's are getting annoying to type")
print(random.randint(1, 9))
print('Hi')
print(random.randint(1, 9))
print('j')
Now with functions, you can seriously lower the amount of characters:
Characters: 254
functions.py
import random
def r(t):
     print(random.randint(1, 9))
     print(t)
r('Wow that was interesting.')
r('Look at the number above ^')
r('All of these have been interesting numbers.')
r("these random.randint's are getting annoying to type")
r('Hi')
r('j')
Project Based Learning:
The following is a modified version of a tutorial posted By: InvisibleOne
I would cite the original tutorial it’s self but at the time of this writing I can no longer find it on his repl.it profile and so the only reference I have are my own notes from following the tutorial when I first found it.
1. Adventure Story
The first thing you need with an adventure story is a great storyline, something that is exciting and fun. The idea is, that at each pivotal point in the story, you give the player the opportunity to make a choice.
First things first, let’s import the stuff that we need, like this:
import os   #very useful for clearing the screen
import random
Now, we need some variables to hold some of the player data.
name = input(“Name Please:  “) #We’ll use this to get the name from the user
nickname = input(“Nickname: “)
Ok, now we have the player’s name and nickname, let’s welcome them to the game
print(“Hello and welcome “ + name)
Now for the story. The most important part of all stories is the introduction, so let’s print our introduction
print(“Long ago, there was a magical meal known as Summuh and Spich Atip”) #We can drop a line by making a new print statement, or we can use the escape code \n
print(“It was said that this meal had the power to save lives, restore peace, and stop evil\nBecuase it was so powerful, it was hidden away on a mountain that could not be climbed\nBut it’s power brought unwanted attention, and a great war broke out.\nFinally, the leaders of the good side chose a single hero to go and find the Summah and Spich Atip, that hero was “ + name + “\n so ” + nickname + ‘ headed out to find this great power, and stop the war…’)
Now, we’ll give the player their first choice
print(“After hiking through the wastelands for a long time, you come to a massive ravine, there is only a single way across\nA rickety old bridge, taking that could be very dangerous, but… maybe you could jump across?”)
choice1 = input(“[1]  Take the bridge     [2] Try and jump over”)
#Now we check to see what the player chose
If choice1 == ‘1’:
  print(“You slowly walk across the bride, it creakes ominously, then suddenly breaks! You flail through the air before hitting the ground a thousand feet below. Judging by the fact that you hit the ground with the equivalent force of being hit by a cement truck moving at 125 miles an hour, you are dead…”)
  #The player lost, so now we’ll boot them out of the program with the exit command
  exit()
#Then we check to see if they made the other choice, we can do with with else if, written as elif
elif choice1 == ‘2’:
  print(“You make the jump! You see a feather hit the bridge, the weight breakes it and sends it to the bottom of the ravine\nGood thing you didn’t use that bridge.”)
#Now we can continue the story
print(“A few more hours of travel and you come to the unclimbable mountain.”)
choice2 == input(“[1]   Give up    [2]    Try and climb the mountain”)
if choice2 == ‘1’:
  print(“You gave up and lost…”)
  #now we exit them again
  exit()
elif choice2 == ‘1’:
  print(“you continue up the mountain. Climbing is hard, but finally you reach the top.\nTo your surprise there is a man standing at the top of the mountain, he is very old.”)
  print(“Old Man: Hey “ + nickname)
  print(“You: How do you know my name!?!”)
  print(“Old Man: Because you have a name tag on…”)
  print(“You: Oh, well, were is the Summuh and Spich Atip?”)
  print(“Old Man: Summuh and Spich Atip? You must mean the Pita Chips and Hummus”)
  print(“You: Pita…chips…humus, what power do those have?”)
  print(“Old Man: Pretty simple kid, their organic…”)
  #Now let’s clear the screen
  os.system(‘clear’)
  print(“YOU WON!!!”)
There you have it, a pretty simple choose your own ending story. You can make it as complex or uncomplex as you like.
2. TEXT ENCODER
Ever make secret messages as a kid? I used to. Anyways, here’s the way you can make a program to encode messages! It’s pretty simple. First things first, let’s get the message the user wants to encode, we’ll use input() for that:
message = input(“Message you would like encoded: “)
Now we need to split that string into a list of characters, this part is a bit more complicated.
#We’ll make a function, so we can use it later
def split(x):
  return (char for char in x)
#now we’ll call this function with our text
L_message = message.lower() #This way we can lower any of their input
encode = split(l_message)
Now we need to convert the characters into code, well do this with a for loop:
out = []
for x in encode:
  if x == ‘a’:
    out.append(‘1’)
  elif x == ‘b’:
    out.append(‘2’)
#And we’ll continue on though this with each letter of the alphabet
Once we’ve encoded the text, we’ll print it back for the user
x = ‘ ‘.join(out)
#this will turn out into a string that we can print
print(x)
And if you want to decode something, it is this same process but in reverse!
3. Guess my Number
Number guessing games are fun and pretty simple, all you need are a few loops. To start, we need to import random.
import random
That is pretty simple. Now we’ll make a list with the numbers were want available for the game
num_list = [1,2,3,4,5,6,7,8,9,10]
Next, we get a random number from the list
num = random.choice(num_list)
Now, we need to ask the user for input, we’ll to this with a while loop
while True:
  # We could use guess = input(“What do you think my number is?   “), but that would produce a string, and numbers are integers, so we’ll convert the input into an integer
  guess = int(input(“What do you think my number is?   “))
  #Next, we’ll check if that number is equal to the number we picked
  if guess == num:
    break   #this will remove us from the loop, so we can display the win message
  else:
    print(“Nope, that isn’t it”)
#outside our loop, we’ll have the win message that is displayed if the player gets the correct number.
print(“You won!”)
Have fun with this!
4. Notes
Here is a more advanced project, but still pretty easy. This will be using a txt file to save some notes. The first thing we need to do is to create a txt file in your repl, name it ‘notes.txt’
Now, to open a file in python we use open(‘filename’, type) The type can be ‘r’ for read, or ‘w’ for write. There is another option, but we won’t be using that here. Now, the first thing we are going to do is get what the user would like to save:
message = input(“What would you like to save?”)
Now we’ll open our file and save that text
o = open(‘notes.txt’, ‘w’)
o.write(message)
#this next part is very important, you need to always remember to close your file or what you wrote to it won’t be saved
o.close()
There we go, now the information is in the file. Next, we’ll retrieve it
read = open(‘notes.txt’, ‘r’)
out = read.read()
# now we need to close the file
read.close()
# and now print what we read
print(out)
There we go, that’s how you can open files and close files with python
5. Random Dare Generator
Who doesn’t love a good dare? Here is a program that can generate random dares. The first thing we’ll need to do is as always, import random. Then we’ll make some lists of dares
import random
list1 = [‘jump on’, ‘sit on’, ‘rick roll on’, ‘stop on’, ‘swing on’]
list2 = [‘your cat’, ‘your neighbor’, ‘a dog’, ‘a tree’, ‘a house’]
list3 = [‘your mom’, ‘your best friend’, ‘your dad’, ‘your teacher’]
#now we’ll generate a dare
while True:
  if input() == ‘’: #this will trigger if they hit enter
    print(“I dare you to “ + random.choice(list1) + ‘ ‘ + random.choice(list2) + ‘ in front of ‘  + random.choice(list3)
#### Q1. In the following example, which selector has the highest specificity ranking for selecting the anchor link element?
ul li a
a
.example a
div a
[x] .example a
[ ] div a
[ ] a
[ ] ul li a
Q2. Using an attribute selector, how would you select an <a> element with a "title" attribute?
[x] a[title]{…}
[ ] a > title {…}
[ ] a.title {…}
[ ] a=title {…}
Q3. CSS grid and flexbox are now becoming a more popular way to create page layouts. However, floats are still commonly used, especially when working with an older code base, or it you need to support older browser version. What are two valid techniques used to clear floats?
[ ] Use the “clearfix hack” on the floated element and add a float to the parent element.
[ ] Use the overflow property on the floated element or the “clearfix hack” on either the floated or parent element.
[ ] Use the “clearfix hack” on the floated element or the overflow property on the parent element.
[x] Use the “clearfix hack” on the parent element or use the overflow property with a value other than “visible.”
Q4. What element(s) do the following selectors match to?
1) .nav {...}2) nav {...}3) #nav {...}
[ ]
1. An element with an ID of "nav"
2. A nav element
3. An element with a class of "nav"
[ ]
They all target the same nav element.
[x]
1. An element with an class of "nav"
2. A nav element
3. An element with a id of "nav"
[ ]
1. An element with an class of "nav"
2. A nav element
3. An div with a id of "nav"
Q5. When adding transparency styles, what is the difference between using the opacity property versus the background property with an rgba() value?
[ ] Opacity specifies the level of transparency of the child elements. Background with an rgba() value applies transparency to the background color only.
[ ] Opacity applies transparency to the background color only. Background with an rgba() value specifies the level of transparency of an element, as a whole, including its content.
[x] Opacity specifies the level of transparency of an element, including its content. Background with an rgba() value applies transparency to the background color only.
[ ] Opacity applies transparency to the parent and child elements. Background with an rgba() value specifies the level of transparency of the parent element only.
Q6. What is true of block and inline elements? (Alternative: Which statement about block and inline elements is true?)
[ ] By default, block elements are the same height and width as the content container between their tags; inline elements span the entire width of its container.
[x] By default, block elements span the entire width of its container; inline elements are the same height and width as the content contained between their tags.
[ ] A <nav> element is an example of an inline element. <header> is an example of a block element.
[ ] A <span> is an example of a block element. <div> is an example of an inline element.
Q7. CSS grid introduced a new length unit, fr, to create flexible grid tracks. Referring to the code sample below, what will the widths of the three columns be?
[ ] The first column will have a width of 50px. The second column will be 50px wide and the third column will be 100px wide.
[x] The first column will have a width of 50px. The second column will be 150px wide and the third column will be 300px wide.
[ ] The first column will have a width of 50px. The second column will be 300px wide and the third column will be 150px wide.
[ ] The first column will have a width of 50px. The second column will be 500px wide and the third column will be 1000px wide.
Q8. What is the line-height property primarily used for?
[x] to control the height of the space between two lines of content
[ ] to control the height of the space between heading elements
[ ] to control the height of the character size
[ ] to control the width of the space between characters
Q9. Three of these choices are true about class selectors. Which is NOT true?
[ ] Multiple classes can be used within the same element.
[ ] The same class can be used multiple times per page.
[ ] Class selectors with a leading period
[x] Classes can be used multiple times per page but not within the same element.
Q10. There are many properties that can be used to align elements and create page layouts such as float, position, flexbox and grid. Of these four properties, which one should be used to align a global navigation bar which stays fixed at the top of the page?
[x] position
[ ] flexbox
[ ] grid
[ ] float
Q11. In the shorthand example below, which individual background properties are represented?
background: blue url(image.jpg) no-repeat scroll 0px 0px;
Q12. In the following example, according to cascading and specificity rules, what color will the link be?
.example {
  color: yellow;
}
ul li a {
  color: blue;
}
ul a {
  color: green;
}
a {
  color: red;
}

<ul>
  <li><a href="#" class="example">link</a></li>
  <li>list item</li>
  <li>list item</li>
</ul>
[ ] green
[x] yellow
[ ] blue
[ ] red
Q13. When elements overlap, they are ordered on the z-axis (i.e., which element covers another). The z-index property can be used to specify the z-order of overlapping elements. Which set of statements about the z-index property are true?
[x] Larger z-index values appear on top of elements with a lower z-index value. Negative and positive numbers can be used. z-index can only be used on positioned elements.
[ ] Smaller z-index values appear on top of elements with a larger z-index value. Negative and positive numbers can be used. z-index must also be used with positioned elements.
[ ] Larger z-index values appear on top of elements with a lower z-index value. Only positive numbers can be used. z-index must also be used with positioned elements.
[ ] Smaller z-index values appear on top of elements with a larger z-index value. Negative and positive numbers can be used. z-index can be used with or without positioned elements.
Q14. What is the difference between the following line-height settings?
line-height: 20px
line-height: 2
[x] The value of 20px will set the line-height to 20px. The value of 2 will set the line-height to twice the size of the corresponding font-size value.
[ ] The value of 20px will set the line-height to 20px. The value of 2 is not valid.
[ ] The value of 20px will set the line-height to 20px. The value of 2 will default to a value of 2px.
[ ] The value of 20px will set the line-height to 20px. The value of 2 will set the line-height to 20% of the corresponding font-size value.
Q15. In the following example, what color will paragraph one and paragraph two be? (Alternative: In this example, what color will paragraphs one and two be?)
<section>
  <p>paragraph one</p>
</section>

<p>paragraph two</p>

section p {
  color: red;
}
section + p {
  color: blue;
}
[ ] Paragraph one will be blue, paragraph two will be red.
[ ] Both paragraphs will be blue.
[x] Paragraphs one will be red, paragraph two will be blue.
[ ] Both paragraphs will be red.
Q16.What are three valid ways of adding CSS to an HTML page?
[ ]
1. External; CSS is written in a separate file.
2. Inline; CSS is added to the <head> of the HTML page.
3. Internal; CSS is included within the HTML tags.
[ ]
1. External; CSS is written in a separate file and is linked within the <header> element of the HTML file.
2. Inline; CSS is added to the HTML tag.
3. Internal; CSS is included within the <header> element of the HTML file.
[ ]
1. External; CSS is written in a separate file and is linked within the <head> element of the HTML file.
2. Internal; CSS is included within the <header> element of the HTML file.
3. Inline; CSS is added to the HTML tag.
[x]
1. External; CSS is written in a separate file and is linked within the <head> element of the HTML file .
2. Inline; CSS is added to the HTML tag.
3. Internal; CSS is included within the <head> element of the HTML file.
Q17. Which of the following is true of the SVG image format? (Alternative: Which statement about the SVG image format is true?)
[ ] CSS can be applied to SVGs but JavaScript cannot be.
[ ] SVGs work best for creating 3D graphics.
[x] SVGs can be created as a vector graphic or coded using SVG specific elements such as <svg>, <line>, and <ellipse>.
[ ] SVGs are a HAML-based markup language for creating vector graphics.
Q18. In the example below, when will the color pink be applied to the anchor element?
a:active {
color: pink;
}
[ ] The color of the link will display as pink after its been clicked or if the mouse is hovering over the link.
[ ] The color of the link will display as pink on mouse hover.
[x] The color of the link will display as pink while the link is being clicked but before the mouse click is released.
[ ] The color of the link will display as pink before it has been clicked.
Q19. To change the color of an SVG using CSS, which property is used?
[ ] Use background-fill to set the color inside the object and stroke or border to set the color of the border.
[ ] The color cannot be changed with CSS.
[ ] Use fill or background to set the color inside the object and stroke to set the color of the border.
[x] Use fill to set the color inside the object and stroke to set the color of the border.
Q20. When using position: fixed, what will the element always be positioned relative to?
[ ] the closest element with position: relative
[x] the viewport
[ ] the parent element
[ ] the wrapper element
Q21. By default, a background image will repeat \_\_\_
[ ] only if the background-repeat property is set to repeat
[x] indefinitely, vertically, and horizontally
[ ] indefinitely on the horizontal axis only
[ ] once, on the x and y axis
Q22. When using media queries, media types are used to target a device category. Which choice lists current valid media types?
[ ] print, screen, aural
[ ] print, screen, television
[x] print, screen, speech
[ ] print, speech, device
Q23. How would you make the first letter of every paragraph on the page red?
[x] p::first-letter { color: red; }
[ ] p:first-letter { color: red; }
[ ] first-letter::p { color: red; }
[ ] first-letter:p { color: red; }
Q24. In this example, what is the selector, property, and value?
p {
color: #000000;
}
[ ]
"p" is the selector
"#000000" is the property
"color" is the value
[x]
"p" is the selector
"color" is the property
"#000000" is the value
[ ]
"color" is the selector
"#000000" is the property
"#p" is the value
[ ]
"color" is the selector
"p" is the property
"#000000" is the value
Q25. What is the rem unit based on?
[ ] The rem unit is relative to the font-size of the p element.
[ ] You have to set the value for the rem unit by writing a declaration such as rem { font-size: 1 Spx; }
[ ] The rem unit is relative to the font-size of the containing (parent) element.
[x] The rem unit is relative to the font-size of the root element of the page.
Q26.Which of these would give a block element rounded corners?
[ ] corner-curve: 10px
[ ] border-corner: 10px
[x] border-radius: 10px
[ ] corner-radius: 10px
Q27. In the following media query example, what conditions are being targeted?
@media (min-width: 1024px), screen and (orientation: landscape) { … }
[x] The rule will apply to a device that has either a width of 1024px or wider, or is a screen device in landscape mode.
[ ] The rule will apply to a device that has a width of 1024px or narrower and is a screen device in landscape mode.
[ ] The rule will apply to a device that has a width of 1024px or wider and is a screen device in landscape mode.
[ ] The rule will apply to a device that has a width of 1024px or narrower, or is a screen device in landscape mode.
Q28. CSS transform properties are used to change the shape and position of the selected objects. The transform-origin property specifies the location of the element’s transformation origin. By default, what is the location of the origin?
[x] the top left corner of the element
[ ] the center of the element
[ ] the top right corner of the element
[ ] the bottom left of the element
Q29. Which of the following is not a valid color value?
[ ] color: #000
[ ] color: rgb(0,0,0)
[ ] color: #000000
[x] color: 000000
Q30. What is the vertical gap between the two elements below?
Q31. When using the Flexbox method, what property and value is used to display flex items in a column?
[x] flex-flow: column; or flex-direction: column
[ ] flex-flow: column;
[ ] flex-column: auto;
[ ] flex-direction: column;
Q32. Which type of declaration will take precedence?
[ ] any declarations in user-agent stylesheets
[x] important declarations in user stylesheets
[ ] normal declarations in author stylesheets
[ ] important declarations in author stylesheets
Q33. The flex-direction property is used to specify the direction that flex items are displayed. What are the values used to specify the direction of the items in the following examples?
[x] Example 1: flex-direction: row; Example 2: flex-direction: row-reverse; Example 3: flex-direction: column; Example 4: flex-direction: column-reverse;
[ ] Example 1: flex-direction: row-reverse; Example 2: flex-direction: row; Example 3: flex-direction: column-reverse; Example 4: flex-direction: column;
[ ] Example 1: flex-direction: row; Example 2: flex-direction: row-reverse; Example 3: flex-direction: column; Example 4: flex-direction: reverse-column;
[ ] Example 1: flex-direction: column; Example 2: flex-direction: column-reverse; Example 3: flex-direction: row; Example 4: flex-direction: row-reverse;
Q34. There are two sibling combinators that can be used to select elements contained within the same parent element; the general sibling combinator (~) and the adjacent sibling combinator (+). Referring to example below, which elements will the styles be applied to?
[ ] Paragraphs 2 and 3 will be blue. The h2 and paragraph 2 will have a beige background.
[x] Paragraphs 2, and 3 will be blue, and paragraph 2 will have a beige background.
[x] Paragraphs 2 and 3 will be blue. Paragraph 2 will have a beige background.
[ ] Paragraph 2 will be blue. Paragraphs 2 and 3 will have a beige background.
Q35. When using flexbox, the “justify-content” property can be used to distribute the space between the flex items along the main axis. Which value should be used to evenly distribute the flex items within the container shown below?
[x] justify-content: space-around;
[ ] justify-content: center;
[ ] justify-content: auto;
[ ] justify-content: space-between;
Q36. There are many advantages to using icon fonts. What is one of those advantages?
[ ] Icon fonts increase accessibility.
[ ] Icon fonts can be used to replace custom fonts.
[x] Icon fonts can be styled with typography related properties such as font-size and color.
[ ] Icon fonts are also web safe fonts.
Q37. What is the difference between display:none and visibility:hidden?
[ ] Both will hide the element on the page, but display:none has greater browser support. visibility:hidden is a new property and does not have the best browser support
[ ] display:none hides the elements but maintains the space it previously occupied. visibility:hidden will hide the element from view and remove it from the normal flow of the document
[x] display:none hides the element from view and removes it from the normal flow of the document. visibility:hidden will hide the element but maintains the space it previously occupied.
[ ] There is no difference; both will hide the element on the page
Q38. What selector and property would you use to scale an element to be 50% smaller on hover?
[ ] element:hover {scale: 0.5;}
[x] element:hover {transform: scale(0.5);}
[ ] element:hover {scale: 50%;}
[ ] element:hover {transform: scale(50%);}
Q39. Which statement regarding icon fonts is true?
[ ] Icon fonts can be inserted only using JavaScript.
[ ] Icon fonts are inserted as inline images.
[ ] Icon fonts require browser extensions.
[x] Icon fonts can be styled with typography-related properties such as font-size and color.
Q40. The values for the font-weight property can be keywords or numbers. For each numbered value below, what is the associated keyword?
font-weight: 400; font-weight: 700;
[ ] bold; normal
[x] normal; bold
[ ] light; normal
[ ] normal; bolder
Q41. If the width of the container is 500 pixels, what would the width of the three columns be in this layout?
Q42. Using the :nth-child pseudo class, what would be the most efficient way to style every third item in a list, no matter how many items are present, starting with item 2?
Q53. What is the ::placeholder pseudo-element used for?
[x] It is used to format the appearance of placeholder text within a form control.
[ ] It specifies the default input text for a form control.
[ ] It writes text content into a hyperlink tooltip.
[ ] It writes text content into any page element.
Q54. Which statement is true of the single colon (:) or double colon (::) notations for pseudo-elements-for example, ::before and :before?
[ ] All browsers support single and double colons for new and older pseudo-elements. So you can use either but it is convention to use single colons for consistency.
[ ] In CSS3, the double colon notation (::) was introduced to create a consistency between pseudo-elements from pseudo-classes. For newer browsers, use the double colon notation. For IE8 and below, using single colon notation (:).
[ ] Only the new CSS3 pseudo-elements require the double colon notation while the CSS2 pseudo-elements do not.
[x] In CSS3, the double colon notation (::) was introduced to differentiate pseudo-elements from pseudo-classes. However, modern browsers support both formats. Older browsers such as IE8 and below do not.
Q55. Which choice is not valid value for the font-style property?
[ ] normal
[ ] italic
[x] none
[ ] oblique
Q56. When would you use the @font-face method?
[ ] to set the font size of the text
[x] to load custom fonts into stylesheet
[ ] to change the name of the font declared in the font-family
[ ] to set the color of the text
Q57. When elements within a container overlap, the z-index property can be used to indicate how those items are stacked on top of each other. Which set of statements is true?
[x]
1. Larger z-index values appear on top elements with a lower z-index value.
2. Negative and positive number can be used.
3. z-index can be used only on positioned elements.
[ ]
1. Smaller z-index values appear on top of elements with a larger z-index value.
2. Negative and positive numbers can be used.
3. z-index can be used with or without positioned elements.
[ ]
1. Smaller z-index values appear on top of elements with a larger z-index value.
2. Negative and positive number can be used.
3. z-index must also be used with positioned elements.
[ ]
1. Larger z-index values appear on top of elements with a lower z-index value.
2. Only positive number can be used.
3. z-index must also be used with positioned elements.
Q58. You have a large image that needs to fit into a 400 x 200 pixel area. What should you resize the image to if your users are using Retina displays?
[ ] 2000 x 1400 pixels
[ ] 200 x 100 pixels
[x] 800 x 400 pixels
[ ] 400 x 200 pixels
Q59. In Chrome’s Developer Tools view, where are the default styles listed?
[x] under the User Agent Stylesheet section on the right
[ ] in the third panel under the Layout tab
[ ] under the HTML view on the left
[ ] in the middle panel
Q60. While HTML controls document structure, CSS controls _.
[ ] semantic meaning
[ ] content meaning
[ ] document structure
[x] content appearance
Q61. What is the recommended name you should give the folder that holds your project’s images?
[x] images
[ ] #images
[ ] Images
[ ] my images
Q62. What is an advantage of using inline CSS?
[ ] It is easier to manage.
[x] It is easier to add multiple styles through it.
[ ] It can be used to quickly test local CSS overrides.
[ ] It reduces conflict with other CSS definition methods.
Q63.Which W3C status code represents a CSS specification that is fully implemented by modern browsers?
[ ] Proposed Recommendation
[ ] Working Draft
[x] Recommendation
[ ] Candidate Recommendation
Q64. Are any of the following declarations invalid?
color: red; /* declaration A */
font-size: 1em; /* declaration B */
padding: 10px 0; /* declaration C */
[ ] Declaration A is invalid.
[ ] Declaration B is invalid.
[ ] Declaration C is invalid.
[x] All declarations are valid.
Q65. Which CSS will cause your links to have a solid blue background that changes to semitransparent on hover?
Q66. Which CSS rule takes precedence over the others listed?
[ ] div.sidebar {}
[ ] * {}
[x] div#sidebar2 p {}
[ ] .sidebar p {}
Q67. The body of your page includes some HTML sections. How will it look with the following CSS applied?
body {
background: #ffffff; /* white */
}
section {
background: #0000ff; /* blue */
height: 200px;
}
[x] blue sections on a white background
[ ] Yellow sections on a blue background
[ ] Green sections on a white background
[ ] blue sections on a red background
Q68. Which CSS keyword can you use to override standard source order and specificity rules?
[ ] !elevate!
[ ] *prime
[ ] override
[x] !important
Q69. You can use the _ pseudo-class to set a different color on a link if it was clicked on.
[x] a:visited
[ ] a:hover
[ ] a:link
[ ] a:focus
Q70. Which color will look the brightest on your screen, assuming the background is white?
[ ] background-color: #aaa;
[ ] background-color: #999999;
[ ] background-color: rgba(170,170,170,0.5);
[x] background-color: rgba(170,170,170,0.2);
Q71. Which CSS selector can you use to select all elements on your page associated with the two classes header and clear?
[ ] ."header clear" {}
[ ] header#clear {}
[x] .header.clear {}
[ ] .header clear {}
Q72. A universal selector is specified using a(n) _.
[ ] “h1” string
[ ] “a” character
[ ] “p” character
[x] “*” character
Q73. In the following CSS code, 'h1' is the _, while 'color' is the _.
h1 {
color: red;
}
[ ] property; declaration
[ ] declaration; rule
[ ] “p” character
[x] selector; property
Q74. What is an alternate way to define the following CSS rule?
font-weight: bold;
[ ] font-weight: 400;
[ ] font-weight: medium;
[x] font-weight: 700;
[ ] font-weight: Black;
Q75. You want your styling to be based on a font stack consisting of three fonts. Where should the generic font for your font family be specified?
[ ] It should be the first one on the list.
[ ] Generic fonts are discouraged from this list.
[x] It should be the last one on the list.
[ ] It should be the second one on the list.
Q76. What is one disadvantage of using a web font service?
[ ] It requires you to host font files on your own server.
[ ] It uses more of your site’s bandwidth.
[ ] It offers a narrow selection of custom fonts.
[x] It is not always a free service.
Q77. How do you add Google fonts to your project?
[x] by using an HTML link element referring to a Google-provided CSS
[ ] by embedding the font file directly into the project’s master JavaScript
[ ] by using a Google-specific CSS syntax that directly links to the desired font file
[ ] by using a standard font-face CSS definition sourcing a font file on Google’s servers
Q78. which choice is not a valid color?
[ ] color: #000;
[ ] color: rgb(0,0,0);
[ ] color: #000000;
[x] color: 000000;
Q79. Using the following HTML and CSS example, what will equivalent pixel value be for .em and .rem elements?
html {font-size: 10px}
body {font-size: 2rem;}
.rem {font-size: 1.5rem;}
.em {font-size: 2em;}
<body>
<p class="rem"></p>
<p class="em"></p>
</body>
[ ] The .rem will be equivalent to 25px; the .em value will be 20px.
[ ] The .rem will be equivalent to 15px; the .em value will be 20px.
[ ] The .rem will be equivalent to 15px; the .em value will be 40px.
[ ] The .rem will be equivalent to 20px; the .em value will be 40px.
Q80. In this example, according to cascading and specificity rules, what color will the link be?
.example {color: yellow;}
ul li a {color: blue;}
ul a {color: green;}
a {color: red;}
<ul>
<li><a href="#" class="example">link</a></li>
<li>list item</li>
<li>list item</li>
</ul>
[ ] blue
[ ] red
[x] yellow
[ ] green
Q81. What property is used to adjust the space between text characters?
[ ] font-style
[ ] text-transform
[ ] font-variant
[x] letter-spacing
#### Q82. What is the correct syntax for changing the curse from an arrow to a pointing hand when it interacts with a named element?
Since node 3 has edges to nodes 1 and 2, graph[3][1] and graph[3][2] have value 1.
a = LinkedListNode(5) b = LinkedListNode(1) c = LinkedListNode(9) a.next = b b.next = c
Arrays
Ok, so we know how to store individual numbers. Let’s talk about storing several numbers.
That’s right, things are starting to heat up.
Suppose we wanted to keep a count of how many bottles of kombucha we drink every day.
Let’s store each day’s kombucha count in an 8-bit, fixed-width, unsigned integer. That should be plenty — we’re not likely to get through more than 256 (2⁸) bottles in a single day, right?
And let’s store the kombucha counts right next to each other in RAM, starting at memory address 0:
Bam. That’s an **array**. RAM is *basically* an array already.
Just like with RAM, the elements of an array are numbered. We call that number the index of the array element (plural: indices). In this example, each array element’s index is the same as its address in RAM.
But that’s not usually true. Suppose another program like Spotify had already stored some information at memory address 2:
We’d have to start our array below it, for example at memory address 3. So index 0 in our array would be at memory address 3, and index 1 would be at memory address 4, etc.:
Suppose we wanted to get the kombucha count at index 4 in our array. How do we figure out what *address in memory* to go to? Simple math:
Take the array’s starting address (3), add the index we’re looking for (4), and that’s the address of the item we’re looking for. 3 + 4 = 7. In general, for getting the nth item in our array:
\text{address of nth item in array} = \text{address of array start} + n
This works out nicely because the size of the addressed memory slots and the size of each kombucha count are both 1 byte. So a slot in our array corresponds to a slot in RAM.
But that’s not always the case. In fact, it’s usually not the case. We usually use 64-bit integers.
So how do we build an array of 64-bit (8 byte) integers on top of our 8-bit (1 byte) memory slots?
We simply give each array index 8 address slots instead of 1:
So we can still use simple math to grab the start of the nth item in our array — just gotta throw in some multiplication:
\text{address of nth item in array} = \text{address of array start} + (n * \text{size of each item in bytes})
Don’t worry — adding this multiplication doesn’t really slow us down. Remember: addition, subtraction, multiplication, and division of fixed-width integers takes time. So all the math we’re using here to get the address of the nth item in the array takes time.
And remember how we said the memory controller has a direct connection to each slot in RAM? That means we can read the stuff at any given memory address in time.
**Together, this means looking up the contents of a given array index is time.** This fast lookup capability is the most important property of arrays.
But the formula we used to get the address of the nth item in our array only works if:
Each item in the array is the same size (takes up the same
number of bytes).
The array is uninterrupted (contiguous) in memory. There can’t
be any gaps in the array…like to “skip over” a memory slot Spotify was already using.
These things make our formula for finding the nth item work because they make our array predictable. We can predict exactly where in memory the nth element of our array will be.
But they also constrain what kinds of things we can put in an array. Every item has to be the same size. And if our array is going to store a lot of stuff, we’ll need a bunch of uninterrupted free space in RAM. Which gets hard when most of our RAM is already occupied by other programs (like Spotify).
That’s the tradeoff. Arrays have fast lookups ( time), but each item in the array needs to be the same size, and you need a big block of uninterrupted free memory to store the array.
## Pointers
Remember how we said every item in an array had to be the same size? Let’s dig into that a little more.
Suppose we wanted to store a bunch of ideas for baby names. Because we’ve got some really cute ones.
Each name is a string. Which is really an array. And now we want to store those arrays in an array. Whoa.
Now, what if our baby names have different lengths? That’d violate our rule that all the items in an array need to be the same size!
We could put our baby names in arbitrarily large arrays (say, 13 characters each), and just use a special character to mark the end of the string within each array…
“Wigglesworth” is a cute baby name, right?
But look at all that wasted space after “Bill”. And what if we wanted to store a string that was more than 13 characters? We’d be out of luck.
There’s a better way. Instead of storing the strings right inside our array, let’s just put the strings wherever we can fit them in memory. Then we’ll have each element in our array hold the address in memory of its corresponding string. Each address is an integer, so really our outer array is just an array of integers. We can call each of these integers a pointer, since it points to another spot in memory.
The pointers are marked with a \* at the beginning.
Pretty clever, right? This fixes both the disadvantages of arrays:
The items don’t have to be the same length — each string can be as
long or as short as we want.
We don’t need enough uninterrupted free memory to store all our
strings next to each other — we can place each of them separately, wherever there’s space in RAM.
We fixed it! No more tradeoffs. Right?
Nope. Now we have a new tradeoff:
Remember how the memory controller sends the contents of nearby memory addresses to the processor with each read? And the processor caches them? So reading sequential addresses in RAM is faster because we can get most of those reads right from the cache?
Our original array was very **cache-friendly**, because everything was sequential. So reading from the 0th index, then the 1st index, then the 2nd, etc. got an extra speedup from the processor cache.
But the pointers in this array make it not cache-friendly, because the baby names are scattered randomly around RAM. So reading from the 0th index, then the 1st index, etc. doesn’t get that extra speedup from the cache.
That’s the tradeoff. This pointer-based array requires less uninterrupted memory and can accommodate elements that aren’t all the same size, but it’s slower because it’s not cache-friendly.
This slowdown isn’t reflected in the big O time cost. Lookups in this pointer-based array are still time.
Linked lists
Our word processor is definitely going to need fast appends — appending to the document is like the main thing you do with a word processor.
Can we build a data structure that can store a string, has fast appends, and doesn’t require you to say how long the string will be ahead of time?
Let’s focus first on not having to know the length of our string ahead of time. Remember how we used pointers to get around length issues with our array of baby names?
What if we pushed that idea even further?
What if each character in our string were a two-index array with:
the character itself 2. a pointer to the next character
We would call each of these two-item arrays a **node** and we’d call this series of nodes a **linked list**.
Here’s how we’d actually implement it in memory:
Notice how we’re free to store our nodes wherever we can find two open slots in memory. They don’t have to be next to each other. They don’t even have to be *in order*:
“But that’s not cache-friendly, “ you may be thinking. Good point! We’ll get to that.
The first node of a linked list is called the head, and the last node is usually called the tail.
Confusingly, some people prefer to use “tail” to refer to everything after the head of a linked list. In an interview it’s fine to use either definition. Briefly say which definition you’re using, just to be clear.
It’s important to have a pointer variable referencing the head of the list — otherwise we’d be unable to find our way back to the start of the list!
We’ll also sometimes keep a pointer to the tail. That comes in handy when we want to add something new to the end of the linked list. In fact, let’s try that out:
Suppose we had the string “LOG” stored in a linked list:
Suppose we wanted to add an “S” to the end, to make it “LOGS”. How would we do that?
Easy. We just put it in a new node:
And tweak some pointers:
1. Grab the last letter, which is “G”. Our tail pointer lets us do this in time.
2. Point the last letter’s next to the letter we’re appending (“S”).
3. Update the tail pointer to point to our *new* last letter, “S”.
That’s time.
Why is it time? Because the runtime doesn’t get bigger if the string gets bigger. No matter how many characters are in our string, we still just have to tweak a couple pointers for any append.
Now, what if instead of a linked list, our string had been a dynamic array? We might not have any room at the end, forcing us to do one of those doubling operations to make space:
So with a dynamic array, our append would have a *worst-case* time cost of .
Linked lists have worst-case -time appends, which is better than the worst-case time of dynamic arrays.
That worst-case part is important. The average case runtime for appends to linked lists and dynamic arrays is the same: .
Now, what if we wanted to *pre*pend something to our string? Let’s say we wanted to put a “B” at the beginning.
For our linked list, it’s just as easy as appending. Create the node:
And tweak some pointers:
Point “B”’s next to “L”. 2. Point the head to “B”.
Bam. time again.
But if our string were a dynamic array…
And we wanted to add in that “B”:
Eep. We have to *make room* for the “B”!
We have to move each character one space down:
*Now* we can drop the “B” in there:
What’s our time cost here?
It’s all in the step where we made room for the first letter. We had to move all n characters in our string. One at a time. That’s time.
So linked lists have faster *pre*pends ( time) than dynamic arrays ( time).
No “worst case” caveat this time — prepends for dynamic arrays are always time. And prepends for linked lists are always time.
These quick appends and prepends for linked lists come from the fact that linked list nodes can go anywhere in memory. They don’t have to sit right next to each other the way items in an array do.
So if linked lists are so great, why do we usually store strings in an array? Becausearrays have -time lookups. And those constant-time lookups come from the fact that all the array elements are lined up next to each other in memory.
Lookups with a linked list are more of a process, because we have no way of knowing where the ith node is in memory. So we have to walk through the linked list node by node, counting as we go, until we hit the ith item.
def get_ith_item_in_linked_list(head, i): if i < 0: raise ValueError(“i can’t be negative: %d” % i) current_node = head current_position = 0 while current_node: if current_position == i: # Found it! return current_node # Move on to the next node current_node = current_node.next current_position += 1 raise ValueError(‘List has fewer than i + 1 (%d) nodes’ % (i + 1))
That’s i + 1 steps down our linked list to get to the ith node (we made our function zero-based to match indices in arrays). So linked lists have -time lookups. Much slower than the -time lookups for arrays and dynamic arrays.
Not only that — walking down a linked list is not cache-friendly. Because the next node could be anywhere in memory, we don’t get any benefit from the processor cache. This means lookups in a linked list are even slower.
So the tradeoff with linked lists is they have faster prepends and faster appends than dynamic arrays, but they have slower lookups.
## Doubly Linked Lists
In a basic linked list, each item stores a single pointer to the next element.
In a doubly linked list, items have pointers to the next and the previous nodes.
Doubly linked lists allow us to traverse our list *backwards*. In a *singly* linked list, if you just had a pointer to a node in the *middle* of a list, there would be *no way* to know what nodes came before it. Not a problem in a doubly linked list.
Array items are always located right next to each other in computer memory, but linked list nodes can be scattered all over.
So iterating through a linked list is usually quite a bit slower than iterating through the items in an array, even though they’re both theoretically time.
Hash tables
Quick lookups are often really important. For that reason, we tend to use arrays (-time lookups) much more often than linked lists (-time lookups).
For example, suppose we wanted to count how many times each ASCII character appears in Romeo and Juliet. How would we store those counts?
We can use arrays in a clever way here. Remember — characters are just numbers. In ASCII (a common character encoding) ‘A’ is 65, ‘B’ is 66, etc.
So we can use the character(‘s number value) as the index in our array, and store the count for that character at that index in the array:
With this array, we can look up (and edit) the count for any character in constant time. Because we can access any index in our array in constant time.
Something interesting is happening here — this array isn’t just a list of values. This array is storing two things: characters and counts. The characters are implied by the indices.
So we can think of an array as a table with two columns…except you don’t really get to pick the values in one column (the indices) — they’re always 0, 1, 2, 3, etc.
But what if we wanted to put any value in that column and still get quick lookups?
Suppose we wanted to count the number of times each word appears in Romeo and Juliet. Can we adapt our array?
Translating a character into an array index was easy. But we’ll have to do something more clever to translate a word (a string) into an array index…
Here’s one way we could do it:
Grab the number value for each character and add those up.
The result is 429. But what if we only have *30* slots in our array? We’ll use a common trick for forcing a number into a specific range: the modulus operator (%). Modding our sum by 30 ensures we get a whole number that’s less than 30 (and at least 0):
429 \: \% \: 30 = 9
Bam. That’ll get us from a word (or any string) to an array index.
This data structure is called a hash table or hash map. In our hash table, the counts are the values and the words (“lies, “ etc.) are the keys (analogous to the indices in an array). The process we used to translate a key into an array index is called a hashing function.
![A blank array except for a 20, labeled as the value, stored at index
To the left the array is the word “lies,” labeled as the key, with an
The hashing functions used in modern systems get pretty complicated — the one we used here is a simplified example.
Note that our quick lookups are only in one direction — we can quickly get the value for a given key, but the only way to get the key for a given value is to walk through all the values and keys.
Same thing with arrays — we can quickly look up the value at a given index, but the only way to figure out the index for a given value is to walk through the whole array.
One problem — what if two keys hash to the same index in our array? Look at “lies” and “foes”:
They both sum up to 429! So of course they’ll have the same answer when we mod by 30:
429 \: \% \: 30 = 9
So our hashing function gives us the same answer for “lies” and “foes.” This is called a hash collision. There are a few different strategies for dealing with them.
Here’s a common one: instead of storing the actual values in our array, let’s have each array slot hold a pointer to a linked list holding the counts for all the words that hash to that index:
One problem — how do we know which count is for “lies” and which is for “foes”? To fix this, we’ll store the *word* as well as the count in each linked list node:
“But wait!” you may be thinking, “Now lookups in our hash table take time in the worst case, since we have to walk down a linked list.” That’s true! You could even say that in the worst case *every* key creates a hash collision, so our whole hash table *degrades to a linked list*.
In industry though, we usually wave our hands and say collisions are rare enough that on average lookups in a hash table are time. And there are fancy algorithms that keep the number of collisions low and keep the lengths of our linked lists nice and short.
But that’s sort of the tradeoff with hash tables. You get fast lookups by key…except some lookups could be slow. And of course, you only get those fast lookups in one direction — looking up the key for a given value still takes time
Breadth-First Search (BFS) and Breadth-First Traversal
Breadth-first search (BFS) is a method for exploring a tree or graph. In a BFS, you first explore all the nodes one step away, then all the nodes two steps away, etc.
Breadth-first search is like throwing a stone in the center of a pond. The nodes you explore “ripple out” from the starting point.
Here’s a how a BFS would traverse this tree, starting with the root:
We’d visit all the immediate children (all the nodes that’re one step away from our starting node):
Then we’d move on to all *those* nodes’ children (all the nodes that’re *two steps* away from our starting node):
And so on:
Until we reach the end.
Breadth-first search is often compared with depth-first search.
Advantages:
A BFS will find the shortest path between the starting point and
any other reachable node. A depth-first search will not necessarily find the shortest path.
Disadvantages
A BFS on a binary tree generally requires more memory than a DFS.
### Binary Search Tree
A binary tree is a tree where <==(every node has two or fewer children)==>.
The children are usually called left and right.
class BinaryTreeNode(object):
This lets us build a structure like this:
That particular example is special because every level of the tree is completely full. There are no “gaps.” We call this kind of tree “**perfect**.”
Binary trees have a few interesting properties when they’re perfect:
Property 1: the number of total nodes on each “level” doubles as we move down the tree.
**Property 2: the number of nodes on the last level is equal to the sum of the number of nodes on all other levels (plus 1).** In other words, about *half* of our nodes are on the last level.
<==(*Let’s call the number of nodes n, *)==>
<==(**_**and the height of the tree h. _)==>
h can also be thought of as the “number of levels.”
If we had h, how could we calculate n?
Let’s just add up the number of nodes on each level!
If we zero-index the levels, the number of nodes on the xth level is exactly 2^x.
Level 0: 2⁰ nodes,
2. Level 1: 2¹ nodes,
3. Level 2: 2² nodes,
4. Level 3: 2³ nodes,
5. etc
So our total number of nodes is:
n = 2⁰ + 2¹ + 2² + 2³ + … + 2^{h-1}
Why only up to 2^{h-1}?
Notice that we started counting our levels at 0.
So if we have h levels in total,
the last level is actually the “h-1”-th level.
That means the number of nodes on the last level is 2^{h-1}.
But we can simplify.
Property 2 tells us that the number of nodes on the last level is (1 more than) half of the total number of nodes,
so we can just take the number of nodes on the last level, multiply it by 2, and subtract 1 to get the number of nodes overall.
We know the number of nodes on the last level is 2^{h-1},
So:
n = 2^{h-1} * 2–1
n = 2^{h-1} * 2¹ — 1
n = 2^{h-1+1}- 1
n = 2^{h} — 1
So that’s how we can go from h to n. What about the other direction?
We need to bring the h down from the exponent.
That’s what logs are for!
First, some quick review.
<==(log_{10} (100) )==>
simply means,
“What power must you raise 10 to in order to get 100?”.
Which is 2,
because .
<==(10² = 100 )==>
Graph Data Structure: Directed, Acyclic, etc
Graph =====
Binary numbers
Let’s put those bits to use. Let’s store some stuff. Starting with numbers.
The number system we usually use (the one you probably learned in elementary school) is called base 10, because each digit has ten possible values (1, 2, 3, 4, 5, 6, 7, 8, 9, and 0).
But computers don’t have digits with ten possible values. They have bits with two possible values. So they use base 2 numbers.
Base 10 is also called decimal. Base 2 is also called binary.
To understand binary, let’s take a closer look at how decimal numbers work. Take the number “101” in decimal:
Notice we have two “1”s here, but they don’t *mean* the same thing. The leftmost “1” *means* 100, and the rightmost “1” *means* 1. That’s because the leftmost “1” is in the hundreds place, while the rightmost “1” is in the ones place. And the “0” between them is in the tens place.
**So this “101” in base 10 is telling us we have “1 hundred, 0 tens, and 1 one.”**
Notice how the *places* in base 10 (ones place, tens place, hundreds place, etc.) are *sequential powers of 10*:
10⁰=1 * 10¹=10 * 10²=100 * 10³=1000 * etc.
The places in binary (base 2) are sequential powers of 2:
2⁰=1 * 2¹=2 * 2²=4 * 2³=8 * etc.
So let’s take that same “101” but this time let’s read it as a binary number:
Reading this from right to left: we have a 1 in the ones place, a 0 in the twos place, and a 1 in the fours place. So our total is 4 + 0 + 1 which is 5.
Deploy React App To Heroku Using Postgres & Express
Heroku is an web application that makes deploying applications easy for a beginner.
Deploy React App To Heroku Using Postgres & Express
Heroku is an web application that makes deploying applications easy for a beginner.
Before you begin deploying, make sure to remove any console.log's or debugger's in any production code. You can search your entire project folder if you are using them anywhere.
You will set up Heroku to run on a production, not development, version of your application. When a Node.js application like yours is pushed up to Heroku, it is identified as a Node.js application because of the package.json file. It runs npm install automatically. Then, if there is a heroku-postbuild script in the package.json file, it will run that script. Afterwards, it will automatically run npm start.
In the following phases, you will configure your application to work in production, not just in development, and configure the package.json scripts for install, heroku-postbuild and start scripts to install, build your React application, and start the Express production server.
Phase 1: Heroku Connection
If you haven’t created a Heroku account yet, create one here.
Add a new application in your Heroku dashboard named whatever you want. Under the “Resources” tab in your new application, click “Find more add-ons” and add the “Heroku Postgres” add-on with the free Hobby Dev setting.
In your terminal, install the Heroku CLI. Afterwards, login to Heroku in your terminal by running the following:
heroku login
Add Heroku as a remote to your project’s git repository in the following command and replace <name-of-Heroku-app> with the name of the application you created in the Heroku dashboard.
heroku git:remote -a <name-of-Heroku-app>
Next, you will set up your Express + React application to be deployable to Heroku.
Phase 2: Setting up your Express + React application
Right now, your React application is on a different localhost port than your Express application. However, since your React application only consists of static files that don’t need to bundled continuously with changes in production, your Express application can serve the React assets in production too. These static files live in the frontend/build folder after running npm run build in the frontend folder.
Add the following changes into your backend/routes.index.js file.
At the root route, serve the React application’s static index.html file along with XSRF-TOKEN cookie. Then serve up all the React application's static files using the express.static middleware. Serve the index.html and set the XSRF-TOKEN cookie again on all routes that don't start in /api. You should already have this set up in backend/routes/index.js which should now look like this:
// backend/routes/index.js
const express = require('express');
const router = express.Router();
const apiRouter = require('./api');
router.use('/api', apiRouter);
// Static routes
// Serve React build files in production
if (process.env.NODE_ENV === 'production') {
const path = require('path');
// Serve the frontend's index.html file at the root route
router.get('/', (req, res) => {
res.cookie('XSRF-TOKEN', req.csrfToken());
res.sendFile(
path.resolve(__dirname, '../../frontend', 'build', 'index.html')
);
});
// Serve the static assets in the frontend's build folder
router.use(express.static(path.resolve("../frontend/build")));
// Serve the frontend's index.html file at all other routes NOT starting with /api
router.get(/^(?!\/?api).*/, (req, res) => {
res.cookie('XSRF-TOKEN', req.csrfToken());
res.sendFile(
path.resolve(__dirname, '../../frontend', 'build', 'index.html')
);
});
}
// Add a XSRF-TOKEN cookie in development
if (process.env.NODE_ENV !== 'production') {
router.get('/api/csrf/restore', (req, res) => {
res.cookie('XSRF-TOKEN', req.csrfToken());
res.status(201).json({});
});
}
module.exports = router;
Your Express backend’s package.json should include scripts to run the sequelize CLI commands.
The backend/package.json's scripts should now look like this:
Initialize a package.json file at the very root of your project directory (outside of both the backend and frontend folders). The scripts defined in this package.json file will be run by Heroku, not the scripts defined in the backend/package.json or the frontend/package.json.
When Heroku runs npm install, it should install packages for both the backend and the frontend. Overwrite the install script in the root package.json with:
This will run npm install in the backend folder then run npm install in the frontend folder.
Next, define a heroku-postbuild script that will run the npm run build command in the frontend folder. Remember, Heroku will automatically run this script after running npm install.
Define a sequelize script that will run npm run sequelize in the backend folder.
Finally, define a start that will run npm start in the `backend folder.
The root package.json's scripts should look like this:
The dev:backend and dev:frontend scripts are optional and will not be used for Heroku.
Finally, commit your changes.
Phase 3: Deploy to Heroku
Once you’re finished setting this up, navigate to your application’s Heroku dashboard. Under “Settings” there is a section for “Config Vars”. Click the Reveal Config Vars button to see all your production environment variables. You should have a DATABASE_URL environment variable already from the Heroku Postgres add-on.
Add environment variables for JWT_EXPIRES_IN and JWT_SECRET and any other environment variables you need for production.
You can also set environment variables through the Heroku CLI you installed earlier in your terminal. See the docs for Setting Heroku Config Variables.
Push your project to Heroku. Heroku only allows the master branch to be pushed. But, you can alias your branch to be named master when pushing to Heroku. For example, to push a branch called login-branch to master run:
git push heroku login-branch:master
If you do want to push the master branch, just run:
git push heroku master
You may want to make two applications on Heroku, the master branch site that should have working code only. And your staging site that you can use to test your work in progress code.
Now you need to migrate and seed your production database.
Using the Heroku CLI, you can run commands inside of your production application just like in development using the heroku run command.
For example to migrate the production database, run:
heroku run npm run sequelize db:migrate
To seed the production database, run:
heroku run npm run sequelize db:seed:all
Note: You can interact with your database this way as you’d like, but beware that db:drop cannot be run in the Heroku environment. If you want to drop and create the database, you need to remove and add back the "Heroku Postgres" add-on.
Another way to interact with the production application is by opening a bash shell through your terminal by running:
heroku bash
In the opened shell, you can run things like npm run sequelize db:migrate.
Open your deployed site and check to see if you successfully deployed your Express + React application to Heroku!
If you see an Application Error or are experiencing different behavior than what you see in your local environment, check the logs by running:
heroku logs
If you want to open a connection to the logs to continuously output to your terminal, then run:
heroku logs --tail
The logs may clue you into why you are experiencing errors or different behavior.
If you found this guide helpful feel free to checkout my github/gists where I host similar content:
Numbering can be done using $
You can use this inside tag or contents.
h${This is so awesome $}*6
<h1>This is so awesome 1</h1>
<h2>This is so awesome 2</h2>
<h3>This is so awesome 3</h3>
<h4>This is so awesome 4</h4>
<h5>This is so awesome 5</h5>
<h6>This is so awesome 6</h6>
Many developers and aspiring students misinterpret React to be a fully functional framework. It is because we often compare React with major frameworks such as Angular and Ember. This comparison is not to compare the best frameworks but to focus on the differences and similarities of React and Angular’s approach that makes their offerings worth studying. Angular works on the MVC model to support the Model, View, and Controller layers of an app. React focuses only on the ‘V,’ which is the view layer of an application and how to make handling it easier to integrate smoothly into a project.
React’s Virtual DOM is faster than DOM.
React uses a Virtual DOM, which is essentially a tree of JavaScript objects representing the actual browser DOM. The advantage of using this for the developers is that they don’t manipulate the DOM directly as developers do with jQuery when they write React apps. Instead, they would tell React how they want the DOM to make changes to the state object and allow React to make the necessary updates to the browser DOM. This helps create a comprehensive development model for developers as they don’t need to track all DOM changes. They can modify the state object, and React would use its algorithms to understand what part of UI changed compared to the previous DOM. Using this information updates the actual browser DOM. Virtual DOM provides an excellent API for creating UI and minimizes the update count to be made on the browser DOM.
However, it is not faster than the actual DOM. You just read that it needs to pull extra strings to figure out what part of UI needs to be updated before actually performing those updates. Hence, Virtual DOM is beneficial for many things, but it isn’t faster than DOM.
1. Explain how React uses a tree data structure called the virtual DOM to model the DOM
The virtual DOM is a copy of the actual DOM tree. Updates in React are made to the virtual DOM. React uses a diffing algorithm to reconcile the changes and send the to the DOM to commit and paint.
2. Create virtual DOM nodes using JSX To create a React virtual DOM node using JSX, define HTML syntax in a JavaScript file.
Here, the JavaScript hello variable is set to a React virtual DOM h1 element with the text “Hello World!”.
You can also nest virtual DOM nodes in each other just like how you do it in HTML with the real DOM.
3. Use debugging tools to determine when a component is rendering
#### We use the React DevTools extension as an extension in our Browser DevTools to debug and view when a component is rendering
4. Describe how JSX transforms into actual DOM nodes
To transfer JSX into DOM nodes, we use the ReactDOM.render method. It takes a React virtual DOM node’s changes allows Babel to transpile it and sends the JS changes to commit to the DOM.
5. Use theReactDOM.rendermethod to have React render your virtual DOM nodes under an actual DOM node
6. Attach an event listener to an actual DOM node using a virtual node
The virtual DOM (VDOM) is a programming concept where an ideal, or “virtual”, representation of a UI is kept in memory and synced with the “real” DOM by a library such as ReactDOM. This process is called reconciliation.
This approach enables the declarative API of React: You tell React what state you want the UI to be in, and it makes sure the DOM matches that state. This abstracts out the attribute manipulation, event handling, and manual DOM updating that you would otherwise have to use to build your app.
Since “virtual DOM” is more of a pattern than a specific technology, people sometimes say it to mean different things. In React world, the term “virtual DOM” is usually associated with React elements since they are the objects representing the user interface. React, however, also uses internal objects called “fibers” to hold additional information about the component tree. They may also be considered a part of “virtual DOM” implementation in React.
Is the Shadow DOM the same as the Virtual DOM?
No, they are different. The Shadow DOM is a browser technology designed primarily for scoping variables and CSS in web components. The virtual DOM is a concept implemented by libraries in JavaScript on top of browser APIs.
To add an event listener to an element, define a method to handle the event and associate that method with the element event you want to listen for:
7. Usecreate-react-appto initialize a new React app and import required dependencies
Create the default create-react-application by typing in our terminal
npm (node package manager) is the dependency/package manager you get out of the box when you install Node.js. It provides a way for developers to install packages both globally and locally.
Sometimes you might want to take a look at a specific package and try out some commands. But you cannot do that without installing the dependencies in your local node_modules folder.
npm the package manager
npm is a couple of things. First and foremost, it is an online repository for the publishing of open-source Node.js projects.
Second, it is a CLI tool that aids you to install those packages and manage their versions and dependencies. There are hundreds of thousands of Node.js libraries and applications on npm and many more are added every day.
npm by itself doesn’t run any packages. If you want to run a package using npm, you must specify that package in your package.json file.
When executables are installed via npm packages, npm creates links to them:
local installs have links created at the ./node_modules/.bin/ directory
global installs have links created from the global bin/ directory (for example: /usr/local/bin on Linux or at %AppData%/npm on Windows)
To execute a package with npm you either have to type the local path, like this:
$ ./node_modules/.bin/your-package
or you can run a locally installed package by adding it into your package.json file in the scripts section, like this:
You can see that running a package with plain npm requires quite a bit of ceremony.
Fortunately, this is where npx comes in handy.
npx the package runner
Since npm version 5.2.0 npx is pre-bundled with npm. So it’s pretty much a standard nowadays.
npx is also a CLI tool whose purpose is to make it easy to install and manage dependencies hosted in the npm registry.
It’s now very easy to run any sort of Node.js-based executable that you would normally install via npm.
You can run the following command to see if it is already installed for your current npm version:
$ which npx
If it’s not, you can install it like this:
$ npm install -g npx
Once you make sure you have it installed, let’s see a few of the use cases that make npx extremely helpful.
Run a locally installed package easily
If you wish to execute a locally installed package, all you need to do is type:
$ npx your-package
npx will check whether <command> or <package> exists in $PATH, or in the local project binaries, and if so it will execute it.
Execute packages that are not previously installed
Another major advantage is the ability to execute a package that wasn’t previously installed.
Sometimes you just want to use some CLI tools but you don’t want to install them globally just to test them out. This means you can save some disk space and simply run them only when you need them. This also means your global variables will be less polluted.
Now, where were we?
npx create-react-app <name of app> --use-npm
npx gives us the latest version. --use-npm just means to use npm instead of yarn or some other package manager
8. Pass props into a React component
props is an object that gets passed down from the parent component to the child component. The values can be of any data structure including a function (which is an object)
Set a variable to the string, “world”, and replace the string of “world” in the NavLinks JSX element with the variable wrapped in curly braces:
Accessing props:
To access our props object in another component we pass it the props argument and React will invoke the functional component with the props object.
Reminder:
Conceptually, components are like JavaScript functions. They accept arbitrary inputs (called “props”) and return React elements describing what should appear on the screen.
Function and Class Components
The simplest way to define a component is to write a JavaScript function:
function Welcome(props) {
return <h1>Hello, {props.name}</h1>;
}
This function is a valid React component because it accepts a single “props” (which stands for properties) object argument with data and returns a React element. We call such components “function components” because they are literally JavaScript functions.
You can also use an ES6 class to define a component:
The above two components are equivalent from React’s point of view.
You can pass down as many props keys as you want.
9. Destructure props
You can destructure the props object in the function component’s parameter.
10. Create routes using components from the react-router-dom package
a. Import the react-router-dom package:
npm i react-router-dom
In your index.js:
Above you import your BrowserRouter with which you can wrap your entire route hierarchy. This makes routing information from React Router available to all its descendent components.
Then in the component of your choosing, usually top tier such as App.js, you can create your routes using the Route and Switch Components
fetch('/data.json', {
method: 'post',
body: new FormData(form), // post body
body: JSON.stringify(...),
headers: {
'Accept': 'application/json'
},
credentials: 'same-origin', // send cookies
credentials: 'include', // send cookies, even in CORS
})
Catching errors
fetch('/data.json')
.then(checkStatus)
function checkStatus (res) {
if (res.status >= 200 && res.status < 300) {
return res
} else {
let err = new Error(res.statusText)
err.response = res
throw err
}
}
Non-2xx responses are still successful requests. Use another function to turn them to errors.
1. DESCRIBE A WEB DEVELOPMENT PROJECT YOU WORKED ON FROM START TO FINISH. WHAT APPROACH DID YOU TAKE, WHAT CHALLENGES DID YOU FACE, AND HOW WERE YOU SUCCESSFUL?
Tip: Be transparent about what a real web development project looks like for you. Highlight your wins, of course, but don’t shy away from being real about the challenges. Interviewers aren’t looking to hear that you never have setbacks (that’s not realistic). They want to hear how you get past setbacks and ultimately succeed.
2. DESCRIBE A PROJECT THAT WENT OFF THE RAILS. WHY DID IT GO WRONG AND HOW DID YOU REACT?
Tip: Similar to the last question, interviewers are looking for honesty here. Sometimes projects go badly, and that’s OK. What’s important is how you respond to failures and learn from them so they don’t happen next time.
3. WHICH PROGRAMMING LANGUAGES ARE YOU PROFICIENT IN? ARE THERE ANY LANGUAGES YOU’RE NOT FAMILIAR WITH THAT YOU FEEL LIKE YOU NEED TO LEARN?
Tip: This question is pretty straightforward — -let the interviewer know which languages you’re familiar with and how you use them. Ideally, you’ve scoped out the job beforehand and know that your experience syncs with what the employer needs. At the same time, have some new languages in mind that you’d like to learn. This highlights your willingness to keep growing professionally.
4. WHY ARE YOU DRAWN TO WEB DEVELOPMENT?
Tip: It’s a common pitfall to interview for a job and never explicitly say WHY you want to work in this specific field or for this particular employer/company. Even if the question doesn’t get asked, find a way to touch on it during the interview.
5. WHAT KIND OF TEAM ENVIRONMENT DO YOU THRIVE IN?
Tip: You may be tempted to say whatever you think the interviewer is looking for, but it’s way better to be honest. If the team you’ll be working with has a work style that’s completely outside of your comfort zone, then this particular job might not be a good fit for you. That being said, most development teams are dynamic and flexible, and if your employer knows what kind of environment suits you best, they can help find a spot on the team that WILL work for you.
6. HOW DO YOU KEEP ON TOP OF INDUSTRY NEWS AND TRENDS, AND HOW DO YOU APPLY THIS TO YOUR WORK?
Tip: You DO keep up with industry news, don’t you? If so, simply rattle off your list of favorite news sources and why they’re effective for keeping you in the know. And if tech news is something you’ve overlooked while being in the weeds of learning tech skills, take a few minutes to find a few suitable news blogs and tech Twitter accounts to put in your hip pocket (and be ready to bust them out at your next interview).
7. HOW DO YOU COMMUNICATE YOUR PROGRESS TO CLIENTS AND/OR STAKEHOLDERS?
Tip: The gist here is to demonstrate that you understand the importance of keeping clients and stakeholders up to date, and that you have ideas for establishing systems of communication (or that you’re willing to work with systems like Agile or Scrum if they’re used by your employer).
8. WHAT DO YOU DO IF A CLIENT OR STAKEHOLDER IS UNHAPPY WITH A PROJECT?
Tip: Having an effective communication strategy with stakeholders doesn’t mean you won’t sometimes receive negative feedback. So how do you respond? Do you get defensive? Shut down? Give up? Or do you find creative ways to accept that feedback and address client or shareholder concerns? Interviewers are looking for candidates who can adapt to and recover from hard times, so either think of a real example that you can share, or develop a client appeasement gameplan that you’ll use when the time comes.
9. GIVE ME AN EXAMPLE OF HOW YOU’D DESCRIBE WEB DEVELOPMENT (WHAT IT IS, WHY IT IS IMPORTANT) TO SOMEONE WHO IS COMPLETELY NEW TO TECH.
Tip: As a web developer you’ll find yourself in situations where you need to talk “tech” with non-techies. Making your work make sense to people who have no idea what it is you actually do is a valuable skill. Take off your developer hat for a day and think of some ways to describe web development to someone who doesn’t know Java from JavaScript.
10. GIVE AN EXAMPLE OF A WEBSITE OR WEB APPLICATION THAT YOU DON’T LIKE, POINT OUT WHAT’S WRONG WITH IT AND WHAT YOU WOULD CHANGE.
Tip: Interviewers may ask you to provide an example of a website you think is less than stellar, then ask you to describe what you think is lacking and what you’d do to improve it. It’s a good idea to have examples and explanations on hand (as well as examples of sites you think are super effective) going into an interview. Answering this question comprehensively shows interviewers that you aren’t signing on to mindlessly write code — -you understand what makes good sites good and how to make bad sites better.
11. WHAT KIND OF MANAGEMENT STYLE DO YOU RESPOND TO BEST?
Tip: This question is another one where you might be tempted to make the interviewer happy. But you know what’s guaranteed to make YOU unhappy? Working for a manager whose style you can’t stand. Be as flexible and as open minded as you can when describing your preferred management style, but if there’s something that’s a complete deal-breaker for you (or that you particularly appreciate), don’t be shy about making it known.
12. HOW WOULD YOU DESCRIBE THE ROLE OF A WEB DEVELOPER? WHAT ARE THE MOST IMPORTANT ASPECTS OF THE JOB AND WHY?
Tip: Your clear and concise summary of a web developer role shows how you think about the web development process in general, and lets interviewers know what specific developer strengths and interests you bring to the job.
13. HOW DO YOU MANAGE YOUR TIME DURING A DEVELOPMENT CYCLE, AND WHAT METHODS DO YOU USE FOR ESTIMATING HOW LONG SPECIFIC DEVELOPMENT TASKS WILL TAKE?
Tip: Managing your time and estimating how long individual tasks will take is critical to your success as a web developer. If you’re already good at time management and estimation, revisit what works for you and build on it ahead of this question. And if your current time management approach isn’t working? Now’s a great time to implement a new system and get the most out of your work day.
14. WHAT SOFT SKILLS WILL YOU BRING TO THE JOB, AND HOW DO YOU ENVISION USING THEM?
Tip: Soft skills can be a difference maker. If it’s a choice between a skilled programmer and a skilled programmer who can write well or who has experience with project management, most employers will pick the latter. So have a list of your own soft skills ready, but also have examples of how they’ll be relevant to a web developer job. It’s not enough to say you’re good at written and verbal communication. You need to explain how your excellent written and verbal communication skills will help you relay project details to team members and stakeholders.
15. GIVE AN EXAMPLE OF A NON-CODING/WEB DEVELOPMENT PROBLEM THAT YOU’VE SOLVED, AND WHAT YOUR PROBLEM SOLVING PROCESS INVOLVED.
Tip: Yes, you’re interviewing for a web developer job, but remember to look to other experiences in your life for inspiration. Examples like the time you helped improve the ordering system at the cafe you worked at or put together a volunteer fundraising effort to save the music program at your kids’ school all speak to the breadth of your problem solving abilities and experiences.
If you were to describe semantic HTML to the next cohort of students, what would you say?
Semantic HTML is markup that conveys meaning, not appearance, to search engines to make everything easier to identify.
Name two big differences between display: block; and display: inline;.
block starts on a new line and takes up the full width of the content.
inline starts on the same line as previous content, in line with other content, and takes up only the space needed for the content.
· What are the 4 areas of the box model?
content, padding, border, margin
· While using flexbox, what axis does the following property work on: align-items: center?
cross-axis
· Explain why git is valuable to a team of developers.
Allows you to dole out tiny pieces of a large project to many developers who can all work towards the same goal on their own chunks, allows roll back if you make a mistake; version control.
· What is the difference between an adaptive website and a fully responsive website?
An adaptive website “adapts” to fit a pre-determined set of screen sizes/devices, and a responsive one changes to fit all devices.
· Describe what it means to be mobile first vs desktop first.
It means you develop/code the site with mobile in mind first and work your way outward in screen size.
· What does font-size: 62.5% in the html tag do for us when using rem units?
This setting makes it so that 1 rem = 10 px for font size, easier to calculate.
· How would you describe preprocessing to someone new to CSS?
Preprocessing is basically a bunch of functions and variables you can use to store CSS settings in different ways that make it easier to code CSS.
· What is your favorite concept in preprocessing? What is the concept that gives you the most trouble?
Favorite is (parametric) mixins; but I don’t have a lot of trouble with preprocessing. What gives me the most trouble is knowing ahead of time what would be good to go in a mixin for a given site.
· Describe the biggest difference between .forEach & .map.
forEach iterates over an array item by item, and map calls a function on each array item, but returns another/additional array, unlike forEach.
· What is the difference between a function and a method?
Every function is an object. If a value is a function, it is a method. Methods have to be ‘received’ by something; functions do not.
· What is closure?
It is code identified elsewhere that we can use later; gives the ability to put functions together. If a variable isn’t defined, a function looks outward for context.
· Describe the four rules of the ‘this’ keyword.
Window/global binding — this is the window/console object. ‘use strict’; to prevent window binding.
Implicit binding — when a function is called by a dot, the object preceding the dot is the ‘this’. 80 percent of ‘this’ is from this type of binding.
New binding — points to new object created & returned by constructor function
Explicit binding — whenever call, bind, or apply are used.
· Why do we need super() in an extended class?
Super ties the parent to the child.
What is the DOM?
Document object model, the ‘window’ or container that holds all the page’s elements
What is an event?
An event is something happening on or to the page, like a mouse click, doubleclick, key up/down, pointer out of element/over element, things like this. There are tons of “events” that javascript can detect.
What is an event listener?
Javascript command that ‘listens’ for an event to happen on the page to a given element and then runs a function when that event happens
Why would we convert a NodeList into an Array?
A NodeList isn’t a real array, so it won’t have access to array methods such as slice or map.
What is a component?
Reusable pieces of code to display info in a consistent repeatable way
· What is React JS and what problems does it try and solve? Support your answer with concepts introduced in class and from your personal research on the web.
ReactJS is a library used to build large applications. It’s very good at assisting developers in manipulating the DOM element to create rich user experiences. We need a way to off-load the state/data that our apps use, and React helps us do that.
· What does it mean to think in react?
It makes you think about how to organize/build apps a little differently because it’s very scalable and allows you to build huge apps. React’s one-way data flow makes everything modular and fast. You can build apps top-down or bottom-up.
· Describe state.
Some data we want to display.
· Describe props.
Props are like function arguments in JS and attributes in HTML.
· What are side effects, and how do you sync effects in a React component to state or prop changes?
Side effects are anything that affects something outside the executed function’s scope like fetching data from an API, a timer, or logging.
· Explain benefit(s) using client-side routing?
Answer: It’s much more efficient than the traditional way, because a lot of data isn’t being transmitted unnecessarily.
· Why would you use class component over function components (removing hooks from the question)?
Because some companies still use class components and don’t want to switch their millions of dollars’ worth of code over to all functional hooks, and also there’s currently a lot more troubleshooting content out there for classes that isn’t out there for hooks. Also, functional components are better when you don’t need state, presentational components.
· Name three lifecycle methods and their purposes.
componentDidMount = do the stuff inside this ‘function’ after the component mounted
componentDidUpdate = do the stuff inside this function after the component updated
componentWillUnmount = clean-up in death/unmounting phase
· What is the purpose of a custom hook?
allow you to apply non-visual behavior and stateful logic throughout your components by reusing the same hook over and over again
· Why is it important to test our apps?
Gets bugs fixed faster, reduces regression risk, makes you consider/work out the edge cases, acts as documentation, acts as safety net when refactoring, makes code more trustworthy
· What problem does the context API help solve?
You can store data in a context object instead of prop drilling.
· In your own words, describe actions, reducers and the store and their role in Redux. What does each piece do? Why is the store known as a ‘single source of truth’ in a redux application?
Everything that changes within your app is represented by a single JS object called the store. The store contains state for our application. When changes are made to our application state, we never write to our store object but rather clone the state object, modify the clone, and replace the original state with the new copy, never mutating the original object. Reducers are the only place we can update our state. Actions tell our reducers “how” to update the state, and perhaps with what data it should be updated, but only a reducer can actually update the state.
· What is the difference between Application state and Component state? When would be a good time to use one over the other?
App state is global, component state is local. Use component state when you have component-specific variables.
· Describe redux-thunk, what does it allow us to do? How does it change our action-creators?
Redux Thunk is middleware that provides the ability to handle asynchronous operations inside our Action Creators, because reducers are normally synchronous.
· What is your favorite state management system you’ve learned and this sprint? Please explain why!
Redux, because I felt it was easier to understand than the context API.
· Explain what a token is used for.
Many services out in the wild require the client (our React app, for example) to provide proof that it’s authenticated with them. The server running these services can issue a JWT (JSON Web Token) as the authentication token, in exchange for correct login credentials.
· What steps can you take in your web apps to keep your data secure?
As we build our web apps, we will most likely have some “protected” routes — routes that we only want to render if the user has logged in and been authenticated by our server. The way this normally works is we make a login request, sending the server the user’s username and password. The server will check those credentials against what is in the database, and if it can authenticate the user, it will return a token. Once we have this token, we can add two layers of protection to our app. One with protected routes, the other by sending an authentication header with our API calls (as we learned in the above objective).
· Describe how web servers work.
The “world wide web” (which we’ll refer to as “the web”) is just a part of the internet — which is itself a network of interconnected computers. The web is just one way to share data over the internet. It consists of a body of information stored on web servers, ready to be shared across the world. The term “web server” can mean two things:
· a computer that stores the code for a website
· a program that runs on such a computer
The physical computer device that we call a web server is connected to the internet, and stores the code for different websites to be shared across the world at all times. When we load the code for our websites, or web apps, on a server like this, we would say that the server is “hosting” our website/app.
· Which HTTP methods can be mapped to the CRUD acronym that we use when interfacing with APIs/Servers.
Create, Read, Update, Delete
· Mention two parts of Express that you learned about this week.
Routing/router, Middleware, convenience helpers
· Describe Middleware?
array of functions that get executed in the order they are introduced into the server code
· Describe a Resource?
o everything is a resource.
o each resource is accessible via a unique URI.
o resources can have multiple representations.
o communication is done over a stateless protocol (HTTP).
o management of resources is done via HTTP methods.
· What can the API return to help clients know if a request was successful?
200 status code/201 status code
· How can we partition our application into sub-applications?
By dividing the code up into multiple files and ‘requiring’ them in the main server file.
· Explain the difference between Relational Databases and SQL.
SQL is the language used to access a relational database.
· Why do tables need a primary key?
To uniquely identify each record/row.
· What is the name given to a table column that references the primary key on another table.
Foreign key
· What do we need in order to have a many to many relationship between two tables.
An intermediary table that holds foreign keys that reference the primary key on the related tables.
· What is the purpose of using sessions?
The purpose is to persist data across requests.
· What does bcrypt do to help us store passwords in a secure manner?
o password hashing function.
o implements salting both manual and automatically.
o accumulative hashing rounds.
· What does bcrypt do to slow down attackers?
Having an algorithm that hashes the information multiple times (rounds) means an attacker needs to have the hash, know the algorithm used, and how many rounds were used to generate the hash in the first place. So it basically makes it a lot more difficult to get somebody’s password.
· What are the three parts of the JSON Web Token?
Header, payload, signature
If you found this guide helpful feel free to checkout my GitHub/gists where I host similar content:
primitives: strings, booleans, numbers, null and undefined
primitives are immutable
refereces: objects (including arrays)
references are mutable
Identify when to use . vs [] when accessing values of an object
dot syntax object.key
easier to read
easier to write
cannot use variables as keys
keys cannot begin with a number
bracket notation object["key]
allows variables as keys
strings that start with numbers can be use as keys
Write an object literal with a variable key using interpolation
put it in brackets to access the value of the variable, rather than just making the value that string
Use the obj[key] !== undefined pattern to check if a given variable that contains a key exists in an object
can also use (key in object) syntax interchangeably (returns a boolean)
Utilize Object.keys and Object.values in a function
Object.keys(obj) returns an array of all the keys in obj
Object.values(obj) returns an array of the values in obj
Iterate through an object using a for in loop
Define a function that utilizes ...rest syntax to accept an arbitrary number of arguments
...rest syntax will store all additional arguments in an array
array will be empty if there are no additional arguments
Use ...spread syntax for Object literals and Array literals
Destructure an array to reference specific elements
Write a function that accepts a array as an argument and returns an object representing the count of each character in the array
Callbacks Lesson Concepts
Given multiple plausible reasons, identify why functions are called “First Class Objects” in JavaScript.
they can be stored in variables, passed as arguments to other functions, and serve as return value for a function
supports same basic operations as other types (strings, bools, numbers)
higher-order functions take functions as arguments or return functions as values
Given a code snippet containing an anonymous callback, a named callback, and multiple console.logs, predict what will be printed
what is this referring to?
Write a function that takes in a value and two callbacks. The function should return the result of the callback that is greater.
Write a function, myMap, that takes in an array and a callback as arguments. The function should mimic the behavior of Array#map.
Write a function, myFilter, that takes in an array and a callback as arguments. The function should mimic the behavior of Array#filter.
Write a function, myEvery, that takes in an array and a callback as arguments. The function should mimic the behavior of Array#every.
Scope Lesson Concepts
- Identify the difference between `const`, `let`, and `var` declarations
const- cannot reassign variable, scoped to block
let- can reassign variable, scoped to block
var- outdated, may or may not be reassigned, scoped to function. can be not just reassigned, but also redeclared!
a variable will always evaluate to the value it contains regardless of how it was declared
Explain the difference between const, let, and var declarations
varis function scoped—so if you declare it anywhere in a function, the declaration(but not assignment…the fact that it exists is known to the javascript engine but the value assigned to it is a mystery until the code is run line by line!) is "hoisted"so it willexist in memory as “undefined”which is bad and unpredictable
varwill also allow you to redeclare a variable, whileletorconstwill raise a syntax error. you shouldn't be able to do that!
!!constwon't let you reassign a variable!!
but if it points to a mutable object, you will still be able to change the value by mutating the object
block-scoped variables allow new variables with the same name in new scopes
block-scoped still performs hoisting of all variables within the block, but it doesn’t initialize to the value ofundefinedlikevardoes, so it throws a specific reference error if you try to access the value before it has been declared
if you do not usevarorletorconstwhen initializing, it will be declared as global—THIS IS BAD(pretend that’s something you didn’t even know you could do)
if you assign a value without a declaration*(la la la la….I’m not listening)*, it exists in the global scope (so then it would be accessible by all outer scopes, so bad). however, there’s no hoisting, so it doesn’t exist in the scope until after the line is run.
Predict the evaluation of code that utilizes function scope, block scope, lexical scope, and scope chaining
- **scope of a program means the set of variables that are available for use within the program**
- **global scope is represented by the** `window` **object in the browser and the** `global` **object in Node.js**
- *global variables are available everywhere, and so increase the risk of name collisions*
local scope is the set of variables available for use within the function
when we enter a function, we enter a new scope
includes functions arguments, local variables declared inside function, and any variables that were already declared when the function is defined (hmm about that last one)
for blocks (denoted by curly braces {}, as in conditionals or for loops), variables can be block scoped
inner scope does not have access to variables in the outer scope
scope chaining — if a given variable is not found in immediate scope, javascript will search all accessible outer scopes until variable is found
so an inner scope can access outer scope variables
but an outer scope can never access inner scope variables
Define an arrow function
Given an arrow function, deduce the value of this without executing the code
arrow functions are automatically bound to the context they were declared in.
unlike regular function which use the context they are invoked in (unless they have been bound using Function#bind).
if you implement an arrow function as a method in an object the context it will be bound to is NOT the object itself, but the global context.
so you can’t use an arrow function to define a method directly
Implement a closure and explain how the closure effects scope
a closure is “the combination of a function and the lexical environment within which that function was declared”
alternatively, “when an inner function uses or changes variables in an outer function”
closures have access to any variables within their own scope + scope of outer functions + global scope
the set of all these available variables is “lexical environemnt”
closure keeps reference to all variables ** even if the outer function has returned
Without a closure to access the variables of an outer function from within a call to an inner function the outer function ‘closed’ over …each function has a private mutable state that cannot be accessed externally
The inner function will maintain a reference to the scope in which it was declared.so it has access to variables that were initialized in any outer scope- even if that scope
The inner function will maintain a reference to the scope in which it was declared.so it has access to variables that were initialized in any outer scope- even if that scope
Q:
if a variable exists in the scope of what could have been accessed by a function(e.g.global scope, outer function, etc), does that variable wind up in the closure even if it never got accessed ?
A:
if you change the value of a variable(e.g.i++) you will change the value of that variable in the scope that it was declared in
Define a method that references this on an object literal
when we use this in a method it refers to the object that the method is invoked on
it will let you access other pieces of information from within that object, or even other methods
method style invocation — object.method(args) (e.g. built in examples like Array#push, or String#toUpperCase)
context is set every time we invoke a function
function style invocation sets the context to the global object no matter what
being inside an object does not make the context that object! you still have to use method-style invocation
Utilize the built in Function#bind on a callback to maintain the context of this
when we call bind on a function, we get an exotic function back — so the context will always be the same for that new function
can also work with arguments, so you can have a version of a function with particular arguments and a particular context.the first arg will be the context aka the `this` you want it to use.the next arguments will be the functions arguments that you are binding — if you just want to bind it to those arguments in particular, you can use `null` as the first argument, so the context won ‘t be bound, just the arguments — Given a code snippet, identify what `this` refers to
Important to recognize the difference between scope and context
scope works like a dictionary that has all the variables that are available within a given block, plus a pointer back the next outer scope(which itself has pointers to new scopes until you reach the global scope.so you can think about a whole given block ‘s scope as a kind of linked list of dictionaries) (also, this is not to say that scope is actually implemented in this way, that is just the schema that i can use to understand it)
- **context refers to the value of the \`this\` keyword**
- the keyword \`this\` exists in every function and it evaluates to the object that is currently invoking that function
- so the context is fairly straightforward when we talk about methods being called on specific objects
- you could, however, call an object ‘s method on something other than that object, and then this would refer to the context where/how it was called, e.g.
CALLING SOMETHING IN THE WRONG CONTEXT CAN MESS YOU UP!
could throw an error if it expects this to have some other method or whatever that doesn’t exist
you could also overwrite values or assign values to exist in a space where they should not exist
if you call a function as a callback, it will set this to be the outer function itself, even if the function you were calling is a method that was called on a particular object
we can use strict mode with "use strict"; this will prevent you from accessing the global object with this in functions, so if you try to call this in the global context and change a value, you will get a type error, and the things you try to access will be undefined
CALLING SOMETHING IN THE WRONG CONTEXT CAN MESS YOU UP!
could throw an error if it expects this to have some other method or whatever that doesn’t exist
you could also overwrite values or assign values to exist in a space where they should not exist
if you call a function as a callback, it will set this to be the outer function itself, even if the function you were calling is a method that was called on a particular object
we can use strict mode with"use strict";this will prevent you from accessing the global object withthisin functions, so if you try to callthisin the global context and change a value, you will get a type error, and the things you try to access will be undefined
POJOs
POJOs
1. Label variables as either Primitive vs. Reference
Javascript considers most data types to be ‘primitive’, these data types are immutable, and are passed by value. The more complex data types: Array and Object are mutable, are considered ‘reference’ data types, and are passed by reference.
Boolean — Primitive
Null — Primitive
Undefined — Primitive
Number — Primitive
String — Primitive
Array — Reference
Object — Reference
Function — Reference
2. Identify when to use . vs [] when accessing values of an object
3. Write an object literal with a variable key using interpolation
4. Use the obj[key] !== undefined pattern to check if a given variable that contains a key exists in an object
5. Utilize Object.keys and Object.values in a function
6. Iterate through an object using a for in loop
7. Define a function that utilizes …rest syntax to accept an arbitrary number of arguments
8. Use …spread syntax for Object literals and Array literals
9. Destructure an array to reference specific elements
10. Destructure an object to reference specific values
11. Write a function that accepts a string as an argument and returns an object representing the count of each character in the array
Review of Concepts
1. Identify the difference between const, let, and var declarations
2. Explain the difference between const, let, and var declarations
var a = "a";
var is the historical keyword used for variable declaration.
var declares variables in function scope, or global scope if not inside a function.
We consider var to be deprecated and it is never used in this course.
let b = "b";
let is the keyword we use most often for variable declaration.
let declares variables in block scope.
variables declared with let are re-assignable.
const c = "c";
const is a specialized form of let that can only be used to initialize a variable.
Except when it is declared, you cannot assign to a const variable.
const scopes variables the same way that let does.
3. Predict the evaluation of code that utilizes function scope, block scope, lexical scope, and scope chaining
Consider this run function, inside which foo and bar have function scope . i and baz are scoped to the block expression.
Notice that referencing baz from outside it's block results in JavaScript throwing a ReferenceError.
Consider this run function, inside of which foo has function scope .
6. Implement a closure and explain how the closure effects scope
4. Define an arrow function
const returnValue = (val) => val;
This simple construct will create a function that accepts val as a parameter, and returns val immediately. We do not need to type return val , because this is a single-line function.
Identically, we could write
const returnValue = (val) => {
return val;
};
5. Given an arrow function, deduce the value of this without executing the code
If we use a function declaration style function, the this variable is set to the global object (i.e. Object [global] in Node. JS and Window in your browser).
Explain how React uses a tree data structure called the “virtual DOM” to model the DOM
↠The Virtual DOM is an in-memory tree representation of the browser’s Document Object Model. React’s philosophy is to interact with the Virtual DOM instead of the regular DOM for developer ease and performance.
↠By abstracting the key concepts from the DOM, React is able to expose additional tooling and functionality increasing developer ease.
↠By trading off the additional memory requirements of the Virtual DOM, React is able to optimize for efficient subtree comparisons, resulting in fewer, simpler updates to the less efficient DOM. The result of these tradeoffs is improved performance.
Describe how JSX transforms into React.createElement calls:
↠JSX is a special format to let you construct virtual DOM nodes using familiar HTML-like syntax. You can put the JSX directly into your .js files, however you must run the JSX through a pre-compiler like Babel in order for the browser to understand it.
↠ReactDOM.render is a simple function which accepts 2 arguments: what to render and where to render it:
Describe how JSX transforms into React.createElement calls:
↠JSX is a special format to let you construct virtual DOM nodes using familiar HTML-like syntax.
↠You can put the JSX directly into your .js files, however you must run the JSX through a pre-compiler like Babel in order for the browser to understand it.
Here we initialize a Clock component using JSX instead of React.createElement .
Using Babel this code is compiled to a series of recursively nested createElement calls:
A simple to follow guide to Lists Stacks and Queues, with animated gifs, diagrams, and code examples!
Fundamental Data Structures in JavaScript
A simple to follow guide to Lists Stacks and Queues, with animated gifs, diagrams, and code examples!
### Linked Lists
In the university setting, it’s common for Linked Lists to appear early on in an undergraduate’s Computer Science coursework. While they don’t always have the most practical real-world applications in industry, Linked Lists make for an important and effective educational tool in helping develop a student’s mental model on what data structures actually are to begin with.
Linked lists are simple. They have many compelling, reoccurring edge cases to consider that emphasize to the student the need for care and intent while implementing data structures. They can be applied as the underlying data structure while implementing a variety of other prevalent abstract data types, such as Lists, Stacks, and Queues, and they have a level of versatility high enough to clearly illustrate the value of the Object Oriented Programming paradigm.
They also come up in software engineering interviews quite often.
### What is a Linked List?
A Linked List data structure represents a linear sequence of “vertices” (or “nodes”), and tracks three important properties.
Linked List Properties:
The data being tracked by a particular Linked List does not live inside the Linked List instance itself. Instead, each vertex is actually an instance of an even simpler, smaller data structure, often referred to as a “Node”.
Depending on the type of Linked List (there are many), Node instances track some very important properties as well.
Linked List Node Properties:
Property Description `value`: The actual value this node represents.`next`The next node in the list (relative to this node).`previous`The previous node in the list (relative to this node).
NOTE: The previous property is for Doubly Linked Lists only!
Linked Lists contain ordered data, just like arrays. The first node in the list is, indeed, first. From the perspective of the very first node in the list, the next node is the second node. From the perspective of the second node in the list, the previous node is the first node, and the next node is the third node. And so it goes.
“So…this sounds a lot like an Array…”
Admittedly, this does sound a lot like an Array so far, and that’s because Arrays and Linked Lists are both implementations of the List ADT. However, there is an incredibly important distinction to be made between Arrays and Linked Lists, and that is how they physically store their data. (As opposed to how they represent the order of their data.)
Recall that Arrays contain contiguous data. Each element of an array is actually stored next to it’s neighboring element in the actual hardware of your machine, in a single continuous block in memory.
An Array’s contiguous data being stored in a continuous block of addresses in memory.
Unlike Arrays, Linked Lists contain non-contiguous data. Though Linked Lists represent data that is ordered linearly, that mental model is just that — an interpretation of the representation of information, not reality.
In reality, in the actual hardware of your machine, whether it be in disk or in memory, a Linked List’s Nodes are not stored in a single continuous block of addresses. Rather, Linked List Nodes live at randomly distributed addresses throughout your machine! The only reason we know which node comes next in the list is because we’ve assigned its reference to the current node’s next pointer.
A Singly Linked List’s non-contiguous data (Nodes) being stored at randomly distributed addresses in memory.
For this reason, Linked List Nodes have no indices, and no random access. Without random access, we do not have the ability to look up an individual Linked List Node in constant time. Instead, to find a particular Node, we have to start at the very first Node and iterate through the Linked List one node at a time, checking each Node’s next Node until we find the one we’re interested in.
So when implementing a Linked List, we actually must implement both the Linked List class and the Node class. Since the actual data lives in the Nodes, it’s simpler to implement the Node class first.
Types of Linked Lists
There are four flavors of Linked List you should be familiar with when walking into your job interviews.
Linked List Types:
***Note:*** *These Linked List types are not always mutually exclusive.*
For instance:
Any type of Linked List can be implemented Circularly (e.g. A Circular Doubly Linked List).
A Doubly Linked List is actually just a special case of a Multiply Linked List.
You are most likely to encounter Singly and Doubly Linked Lists in your upcoming job search, so we are going to focus exclusively on those two moving forward. However, in more senior level interviews, it is very valuable to have some familiarity with the other types of Linked Lists. Though you may not actually code them out, you will win extra points by illustrating your ability to weigh the tradeoffs of your technical decisions by discussing how your choice of Linked List type may affect the efficiency of the solutions you propose.
Linked List Methods
Linked Lists are great foundation builders when learning about data structures because they share a number of similar methods (and edge cases) with many other common data structures. You will find that many of the concepts discussed here will repeat themselves as we dive into some of the more complex non-linear data structures later on, like Trees and Graphs.
Time and Space Complexity Analysis
Before we begin our analysis, here is a quick summary of the Time and Space constraints of each Linked List Operation. The complexities below apply to both Singly and Doubly Linked Lists:
Before moving forward, see if you can reason to yourself why each operation has the time and space complexity listed above!
Time Complexity — Access and Search
Scenarios
We have a Linked List, and we’d like to find the 8th item in the list.
We have a Linked List of sorted alphabet letters, and we’d like to see if the letter “Q” is inside that list.
Discussion
Unlike Arrays, Linked Lists Nodes are not stored contiguously in memory, and thereby do not have an indexed set of memory addresses at which we can quickly lookup individual nodes in constant time. Instead, we must begin at the head of the list (or possibly at the tail, if we have a Doubly Linked List), and iterate through the list until we arrive at the node of interest.
In Scenario 1, we’ll know we’re there because we’ve iterated 8 times. In Scenario 2, we’ll know we’re there because, while iterating, we’ve checked each node’s value and found one that matches our target value, “Q”.
In the worst case scenario, we may have to traverse the entire Linked List until we arrive at the final node. This makes both Access & Search Linear Time operations.
Time Complexity — Insertion and Deletion
Scenarios
We have an empty Linked List, and we’d like to insert our first node.
We have a Linked List, and we’d like to insert or delete a node at the Head or Tail.
We have a Linked List, and we’d like to insert or delete a node from somewhere in the middle of the list.
Discussion
Since we have our Linked List Nodes stored in a non-contiguous manner that relies on pointers to keep track of where the next and previous nodes live, Linked Lists liberate us from the linear time nature of Array insertions and deletions. We no longer have to adjust the position at which each node/element is stored after making an insertion at a particular position in the list. Instead, if we want to insert a new node at position i, we can simply:
Create a new node.
Set the new node’s next and previous pointers to the nodes that live at positions i and i - 1, respectively.
Adjust the next pointer of the node that lives at position i - 1 to point to the new node.
Adjust the previous pointer of the node that lives at position i to point to the new node.
And we’re done, in Constant Time. No iterating across the entire list necessary.
“But hold on one second,” you may be thinking. “In order to insert a new node in the middle of the list, don’t we have to lookup its position? Doesn’t that take linear time?!”
Yes, it is tempting to call insertion or deletion in the middle of a Linked List a linear time operation since there is lookup involved. However, it’s usually the case that you’ll already have a reference to the node where your desired insertion or deletion will occur.
For this reason, we separate the Access time complexity from the Insertion/Deletion time complexity, and formally state that Insertion and Deletion in a Linked List are Constant Time across the board.
Note:Without a reference to the node at which an insertion or deletion will occur, due to linear time lookup, an insertion or deletion in the middle of a Linked List will still take Linear Time, sum total.
Space Complexity
Scenarios
We’re given a Linked List, and need to operate on it.
We’ve decided to create a new Linked List as part of strategy to solve some problem.
Discussion
It’s obvious that Linked Lists have one node for every one item in the list, and for that reason we know that Linked Lists take up Linear Space in memory. However, when asked in an interview setting what the Space Complexity of your solution to a problem is, it’s important to recognize the difference between the two scenarios above.
In Scenario 1, we are not creating a new Linked List. We simply need to operate on the one given. Since we are not storing a new node for every node represented in the Linked List we are provided, our solution is not necessarily linear in space.
In Scenario 2, we are creating a new Linked List. If the number of nodes we create is linearly correlated to the size of our input data, we are now operating in Linear Space.
Note*: Linked Lists can be traversed both iteratively and recursively. If you choose to traverse a Linked List recursively, there will be a recursive function call added to the call stack for every node in the Linked List. Even if you’re provided the Linked List, as in Scenario 1, you will still use Linear Space in the call stack, and that counts.*
Stacks and Queues
Stacks and Queues aren’t really “data structures” by the strict definition of the term. The more appropriate terminology would be to call them abstract data types (ADTs), meaning that their definitions are more conceptual and related to the rules governing their user-facing behaviors rather than their core implementations.
For the sake of simplicity, we’ll refer to them as data structures and ADTs interchangeably throughout the course, but the distinction is an important one to be familiar with as you level up as an engineer.
Now that that’s out of the way, Stacks and Queues represent a linear collection of nodes or values. In this way, they are quite similar to the Linked List data structure we discussed in the previous section. In fact, you can even use a modified version of a Linked List to implement each of them. (Hint, hint.)
These two ADTs are similar to each other as well, but each obey their own special rule regarding the order with which Nodes can be added and removed from the structure.
Since we’ve covered Linked Lists in great length, these two data structures will be quick and easy. Let’s break them down individually in the next couple of sections.
What is a Stack?
Stacks are a Last In First Out (LIFO) data structure. The last Node added to a stack is always the first Node to be removed, and as a result, the first Node added is always the last Node removed.
The name Stack actually comes from this characteristic, as it is helpful to visualize the data structure as a vertical stack of items. Personally, I like to think of a Stack as a stack of plates, or a stack of sheets of paper. This seems to make them more approachable, because the analogy relates to something in our everyday lives.
If you can imagine adding items to, or removing items from, a Stack of…literally anything…you’ll realize that every (sane) person naturally obeys the LIFO rule.
We add things to the top of a stack. We remove things from the top of a stack. We never add things to, or remove things from, the bottom of the stack. That’s just crazy.
Note: We can use JavaScript Arrays to implement a basic stack. Array#push adds to the top of the stack and Array#pop will remove from the top of the stack. In the exercise that follows, we’ll build our own Stack class from scratch (without using any arrays). In an interview setting, your evaluator may be okay with you using an array as a stack.
What is a Queue?
Queues are a First In First Out (FIFO) data structure. The first Node added to the queue is always the first Node to be removed.
The name Queue comes from this characteristic, as it is helpful to visualize this data structure as a horizontal line of items with a beginning and an end. Personally, I like to think of a Queue as the line one waits on for an amusement park, at a grocery store checkout, or to see the teller at a bank.
If you can imagine a queue of humans waiting…again, for literally anything…you’ll realize that most people (the civil ones) naturally obey the FIFO rule.
People add themselves to the back of a queue, wait their turn in line, and make their way toward the front. People exit from the front of a queue, but only when they have made their way to being first in line.
We never add ourselves to the front of a queue (unless there is no one else in line), otherwise we would be “cutting” the line, and other humans don’t seem to appreciate that.
Note: We can use JavaScript Arrays to implement a basic queue. Array#push adds to the back (enqueue) and Array#shift will remove from the front (dequeue). In the exercise that follows, we’ll build our own Queue class from scratch (without using any arrays). In an interview setting, your evaluator may be okay with you using an array as a queue.
Stack and Queue Properties
Stacks and Queues are so similar in composition that we can discuss their properties together. They track the following three properties:
Stack Properties | Queue Properties:
Notice that rather than having a `head` and a `tail` like Linked Lists, Stacks have a `top`, and Queues have a `front` and a `back` instead. Stacks don’t have the equivalent of a `tail` because you only ever push or pop things off the top of Stacks. These properties are essentially the same; pointers to the end points of the respective List ADT where important actions way take place. The differences in naming conventions are strictly for human comprehension.
Similarly to Linked Lists, the values stored inside a Stack or a Queue are actually contained within Stack Node and Queue Node instances. Stack, Queue, and Singly Linked List Nodes are all identical, but just as a reminder and for the sake of completion, these List Nodes track the following two properties:
Time and Space Complexity Analysis
Before we begin our analysis, here is a quick summary of the Time and Space constraints of each Stack Operation.
Data Structure Operation Time Complexity (Avg)Time Complexity (Worst)Space Complexity (Worst)AccessΘ(n)O(n)O(n)SearchΘ(n)O(n)O(n)InsertionΘ(1)O(1)O(n)DeletionΘ(1)O(1)O(n)
Before moving forward, see if you can reason to yourself why each operation has the time and space complexity listed above!
Time Complexity — Access and Search
When the Stack ADT was first conceived, its inventor definitely did not prioritize searching and accessing individual Nodes or values in the list. The same idea applies for the Queue ADT. There are certainly better data structures for speedy search and lookup, and if these operations are a priority for your use case, it would be best to choose something else!
Search and Access are both linear time operations for Stacks and Queues, and that shouldn’t be too unclear. Both ADTs are nearly identical to Linked Lists in this way. The only way to find a Node somewhere in the middle of a Stack or a Queue, is to start at the top (or the back) and traverse downward (or forward) toward the bottom (or front) one node at a time via each Node’s next property.
This is a linear time operation, O(n).
Time Complexity — Insertion and Deletion
For Stacks and Queues, insertion and deletion is what it’s all about. If there is one feature a Stack absolutely must have, it’s constant time insertion and removal to and from the top of the Stack (FIFO). The same applies for Queues, but with insertion occurring at the back and removal occurring at the front (LIFO).
Think about it. When you add a plate to the top of a stack of plates, do you have to iterate through all of the other plates first to do so? Of course not. You simply add your plate to the top of the stack, and that’s that. The concept is the same for removal.
Therefore, Stacks and Queues have constant time Insertion and Deletion via their push and pop or enqueue and dequeue methods, O(1).
Space Complexity
The space complexity of Stacks and Queues is very simple. Whether we are instantiating a new instance of a Stack or Queue to store a set of data, or we are using a Stack or Queue as part of a strategy to solve some problem, Stacks and Queues always store one Node for each value they receive as input.
For this reason, we always consider Stacks and Queues to have a linear space complexity, O(n).
When should we use Stacks and Queues?
At this point, we’ve done a lot of work understanding the ins and outs of Stacks and Queues, but we still haven’t really discussed what we can use them for. The answer is actually…a lot!
For one, Stacks and Queues can be used as intermediate data structures while implementing some of the more complicated data structures and methods we’ll see in some of our upcoming sections.
For example, the implementation of the breadth-first Tree traversal algorithm takes advantage of a Queue instance, and the depth-first Graph traversal algorithm exploits the benefits of a Stack instance.
Additionally, Stacks and Queues serve as the essential underlying data structures to a wide variety of applications you use all the time. Just to name a few:
Stacks
The Call Stack is a Stack data structure, and is used to manage the order of function invocations in your code.
Browser History is often implemented using a Stack, with one great example being the browser history object in the very popular React Router module.
Undo/Redo functionality in just about any application. For example:
When you’re coding in your text editor, each of the actions you take on your keyboard are recorded by pushing that event to a Stack.
When you hit [cmd + z] to undo your most recent action, that event is poped off the Stack, because the last event that occured should be the first one to be undone (LIFO).
When you hit [cmd + y] to redo your most recent action, that event is pushed back onto the Stack.
Queues
Printers use a Queue to manage incoming jobs to ensure that documents are printed in the order they are received.
Chat rooms, online video games, and customer service phone lines use a Queue to ensure that patrons are served in the order they arrive.
In the case of a Chat Room, to be admitted to a size-limited room.
In the case of an Online Multi-Player Game, players wait in a lobby until there is enough space and it is their turn to be admitted to a game.
In the case of a Customer Service Phone Line…you get the point.
As a more advanced use case, Queues are often used as components or services in the system design of a service-oriented architecture. A very popular and easy to use example of this is Amazon’s Simple Queue Service (SQS), which is a part of their Amazon Web Services (AWS) offering.
You would add this service to your system between two other services, one that is sending information for processing, and one that is receiving information to be processed, when the volume of incoming requests is high and the integrity of the order with which those requests are processed must be maintained.
If you found this guide helpful feel free to checkout my other articles:
Common Python Data Structures Data structures are the fundamental constructs around which you build your programs. Each data structure provides a particular way of organizing data so it can be accessed efficiently, depending on your use case. Python ships with an extensive set of data structures in its standard library.
The space complexity represents the memory consumption of a data structure. As for most of the things in life, you can’t have it all, so it is with the data structures. You will generally need to trade some time for space or the other way around.
time
The time complexity for a data structure is in general more diverse than its space complexity.
Several operations
In contrary to algorithms, when you look at the time complexity for data structures you need to express it for several operations that you can do with data structures. It can be adding elements, deleting elements, accessing an element or even searching for an element.
Dependent on data
Something that data structure and algorithms have in common when talking about time complexity is that they are both dealing with data. When you deal with data you become dependent on them and as a result the time complexity is also dependent of the data that you received. To solve this problem we talk about 3 different time complexity.
The best-case complexity: when the data looks the best
The worst-case complexity: when the data looks the worst
The average-case complexity: when the data looks average
Big O notation
The complexity is usually expressed with the Big O notation. The wikipedia page about this subject is pretty complex but you can find here a good summary of the different complexity for the most famous data structures and sorting algorithms.
The Array data structure
### Definition
An Array data structure, or simply an Array, is a data structure consisting of a collection of elements (values or variables), each identified by at least one array index or key. The simplest type of data structure is a linear array, also called one-dimensional array. From Wikipedia
Arrays are among the oldest and most important data structures and are used by every program. They are also used to implement many other data structures.
Complexity Average Access Search Insertion Deletion
O(1) O(n) O(1) O(n)
indexvalue0 … this is the first value, stored at zero position
The index of an array runs in sequence
This could be useful for storing data that are required to be ordered, such as rankings or queues
In JavaScript, array’s value could be mixed; meaning value of each index could be of different data, be it String, Number or even Objects
2. Objects
Think of objects as a logical grouping of a bunch of properties.
Properties could be some variable that it’s storing or some methods that it’s using.
I also visualize an object as a table.
The main difference is that object’s “index” need not be numbers and is not necessarily sequenced.
The Hash Table
### *Definition*
A Hash Table (Hash Map) is a data structure used to implement an associative array, a structure that can map keys to values. A Hash Table uses a hash function to compute an index into an array of buckets or slots, from which the desired value can be found. From Wikipedia
Hash Tables are considered the more efficient data structure for lookup and for this reason, they are widely used.
Complexity
Average
Access Search Insertion Deletion
O(1) O(1) O(1)
The code
Note, here I am storing another object for every hash in my Hash Table.
The Set
Sets
Sets are pretty much what it sounds like. It’s the same intuition as Set in Mathematics. I visualize Sets as Venn Diagrams.
### *Definition*
A Set is an abstract data type that can store certain values, without any particular order, and no repeated values. It is a computer implementation of the mathematical concept of a finite Set. From Wikipedia
The Set data structure is usually used to test whether elements belong to set of values. Rather then only containing elements, Sets are more used to perform operations on multiple values at once with methods such as union, intersect, etc…
Complexity
Average
Access Search Insertion Deletion
O(n) O(n) O(n)
The code
The Singly Linked List
### *Definition*
A Singly Linked List is a linear collection of data elements, called nodes pointing to the next node by means of pointer. It is a data structure consisting of a group of nodes which together represent a sequence. Under the simplest form, each node is composed of data and a reference (in other words, a link) to the next node in the sequence.
Linked Lists are among the simplest and most common data structures because it allows for efficient insertion or removal of elements from any position in the sequence.
Complexity
Average
Access Search Insertion Deletion
O(n) O(n) O(1) O(1)
The code
The Doubly Linked List
### *Definition*
A Doubly Linked List is a linked data structure that consists of a set of sequentially linked records called nodes. Each node contains two fields, called links, that are references to the previous and to the next node in the sequence of nodes. From Wikipedia
Having two node links allow traversal in either direction but adding or removing a node in a doubly linked list requires changing more links than the same operations on a Singly Linked List.
Complexity
Average
Access Search Insertion Deletion
O(n) O(n) O(1) O(1)
The code
The Stack
Definition
A Stack is an abstract data type that serves as a collection of elements, with two principal operations: push, which adds an element to the collection, and pop, which removes the most recently added element that was not yet removed. The order in which elements come off a Stack gives rise to its alternative name, LIFO (for last in, first out). From Wikipedia
A Stack often has a third method peek which allows to check the last pushed element without popping it.
Complexity
Average
Access Search Insertion Deletion
O(n) O(n) O(1) O(1)
The code
The Queue
### *Definition*
A Queue is a particular kind of abstract data type or collection in which the entities in the collection are kept in order and the principal operations are the addition of entities to the rear terminal position, known as enqueue, and removal of entities from the front terminal position, known as dequeue. This makes the Queue a First-In-First-Out (FIFO) data structure. In a FIFO data structure, the first element added to the Queue will be the first one to be removed.
As for the Stack data structure, a peek operation is often added to the Queue data structure. It returns the value of the front element without dequeuing it.
Complexity
Average
Access Search Insertion Deletion
O(n) O(n) O(1) O(n)
The code
The Tree
### *Definition*
A Tree is a widely used data structure that simulates a hierarchical tree structure, with a root value and subtrees of children with a parent node. A tree data structure can be defined recursively as a collection of nodes (starting at a root node), where each node is a data structure consisting of a value, together with a list of references to nodes (the “children”), with the constraints that no reference is duplicated, and none points to the root node. From Wikipedia
Complexity
Average
Access Search Insertion Deletion
O(n) O(n) O(n) O(n)
To get a full overview of the time and space complexity of the Tree data structure, have a look to this excellent Big O cheat sheet.
*The code*
The Graph
### *Definition*
A Graph data structure consists of a finite (and possibly mutable) set of vertices or nodes or points, together with a set of unordered pairs of these vertices for an undirected Graph or a set of ordered pairs for a directed Graph. These pairs are known as edges, arcs, or lines for an undirected Graph and as arrows, directed edges, directed arcs, or directed lines for a directed Graph. The vertices may be part of the Graph structure, or may be external entities represented by integer indices or references.
A graph is any collection of nodes and edges.
Much more relaxed in structure than a tree.
It doesn’t need to have a root node (not every node needs to be accessible from a single node)
It can have cycles (a group of nodes whose paths begin and end at the same node)
Cycles are not always “isolated”, they can be one part of a larger graph. You can detect them by starting your search on a specific node and finding a path that takes you back to that same node.
Any number of edges may leave a given node
A Path is a sequence of nodes on a graph
Cycle Visual
A Graph data structure may also associate to each edge some edge value, such as a symbolic label or a numeric attribute (cost, capacity, length, etc.).
Representation
There are different ways of representing a graph, each of them with its own advantages and disadvantages. Here are the main 2:
Adjacency list: For every vertex a list of adjacent vertices is stored. This can be viewed as storing the list of edges. This data structure allows the storage of additional data on the vertices and edges.
Adjacency matrix: Data are stored in a two-dimensional matrix, in which the rows represent source vertices and columns represent destination vertices. The data on the edges and vertices must be stored externally.
Graph
The code
If you found this guide helpful feel free to checkout my GitHub/gists where I host similar content:
Fundamental Javascript Concepts You Should Understand
Plain Old JS Object Lesson Concepts
Fundamental Javascript Concepts You Should Understand
Plain Old JS Object Lesson Concepts
- Label variables as either Primitive vs. Reference
- primitives: strings, booleans, numbers, null and undefined
- primitives are immutable
- refereces: objects (including arrays)
- references are mutable
- Identify when to use `.` vs `[]` when accessing values of an object
- dot syntax `object.key`
- easier to read
- easier to write
- cannot use variables as keys
- keys cannot begin with a number
- bracket notation `object["key]`
- allows variables as keys
- strings that start with numbers can be use as keys
- Write an object literal with a variable key using interpolation
put it in brackets to access the value of the variable, rather than just make the value that string
let a = "b";
let obj = {
a: "letter_a",
[a]: "letter b"
}
Use the obj[key] !== undefined pattern to check if a given variable that contains a key exists in an object
can also use (key in object) syntax interchangeably (returns a boolean)
Utilize Object.keys and Object.values in a function
Object.keys(obj) returns an array of all the keys in obj
Object.values(obj) returns an array of the values in obj
Iterate through an object using a for in loop
let printValues = function(obj) {
for (let key in obj) {
let value = obj[key];
console.log(value);
}
}
Define a function that utilizes ...rest syntax to accept an arbitrary number of arguments
...rest syntax will store all additional arguments in an array
array will be empty if there are no additional arguments
let myFunction = function(str, ...strs) {
console.log("The first string is " + str);
console.log("The rest of the strings are:");
strs.forEach(function(str) {
console.log(str);
})
}
Use ...spread syntax for Object literals and Array literals
let arr1 = ["a", "b", "c"];
let longer = [...arr1, "d", "e"]; // ["a", "b", "c", "d", "e"]
// without spread syntax, this would give you a nested array
let withoutRest = [arr1, "d", "e"] // [["a", "b", "c"], "d", "e"]
Destructure an array to reference specific elements
let array = [35, 9];
let [firstEl, secondEl] = array;
console.log(firstEl); // => 35
console.log(secondEl); // => 9
// can also destructure using … syntax let array = [35, 9, 14]; let [head, …tail] = array; console.log(head); // => 35 console.log(tail); // => [9, 14]
-Destructure an object to reference specific values
-
if you want to use variable names that don 't match the keys, you can use aliasing -
`let { oldkeyname: newkeyname } = object` -
rule of thumb— only destructure values from objects that are two levels deep ``
`javascript
let obj = {
name: "Wilfred",
appearance: ["short", "mustache"],
favorites: {
color: "mauve",
food: "spaghetti squash",
number: 3
}
}
// with variable names that match keys
let { name, appearance } = obj;
console.log(name); // "Wilfred"
console.log(appearance); // ["short", "mustache"]
// with new variable names (aliasing)
let {name: myName, appearance: myAppearance} = obj;
console.log(myName); // "Wilfred"
console.log(myAppearance); // ["short", "mustache"]
// in a function call
let sayHello = function({name}) {
console.log("Hello, " + name); // "Hello Wilfred"
}
// nested objects + aliasing
let { favorites: {color, food: vegetable} } = obj;
console.log(color, vegetable); //=> mauve spaghetti squash
Write a function that accepts a array as an argument and returns an object representing the count of each character in the array
//
let elementCounts = function(array) {
let obj = {};
array.forEach(function(el) {
if (el in obj) obj[el] += 1;
else obj[el] = 1;
})
return obj;
}
console.log(elementCounts(["e", "f", "g", "f"])); // => Object {e: 1, f: 2, g: 1}
Callbacks Lesson Concepts
Given multiple plausible reasons, identify why functions are called “First Class Objects” in JavaScript.
they can be stored in variables, passed as arguments to other functions, and serve as return value for a function
supports same basic operations as other types (strings, bools, numbers)
higher-order functions take functions as arguments or return functions as values
Given a code snippet containing an anonymous callback, a named callback, and multiple console.logs, predict what will be printed
what is this referring to?
Write a function that takes in a value and two callbacks. The function should return the result of the callback that is greater.
let greaterCB = function(val, callback1, callback2) {
if (callback1(val) > callback2(val)) {
return callback1(val);
}
return callback2(val);
}
let greaterCB = function(val, callback1, callback2) {
if (callback1(val) > callback2(val)) {
return callback1(val);
}
return callback2(val);
}
// shorter version let greaterCB = function(val, callback1, callback2) { return Math.max(callback1(val), callback2(val)); } // even shorter, cause why not let greaterCB = (val, cb1, cb2) => Math.max(cb1(val), cb2(val));
-Write a
function, myMap, that takes in an array and a callback as arguments.The
function should mimic the behavior of `Array#map`.
``
`javascript
let myMap = function(array, callback) {
let newArr = [];
for (let i = 0; i < array.length; i ++) {
mapped = callback(array[i], i, array);
newArr.push(mapped);
}
return newArr;
}
console.log( myMap([16,25,36], Math.sqrt)); // => [4, 5, 6];
let myMapArrow = (array, callback) => {
let newArr = [];
array.forEach( (ele, ind, array) => {
newArr.push(callback(ele, ind, array));
})
return newArr;
}
console.log(myMapArrow([16,25,36], Math.sqrt)); // => [4, 5, 6];
Write a function, myFilter, that takes in an array and a callback as arguments. The function should mimic the behavior of Array#filter.
let myFilter = function(array, callback) {
let filtered = [];
for (let i = 0; i < array.length; i++) {
if (callback(array[i])) {
filtered.push(array[i], i, array);
}
}
}
Write a function, myEvery, that takes in an array and a callback as arguments. The function should mimic the behavior of Array#every.
let myEvery = function(array, callback) {
for (let i = 0; i < array.length; i++) {
if (!callback(array[i], i, array)) {
return false
}
}
return true;
}
// with arrow function syntax
let myEvery = (array, callback) => {
for (let i = 0; i < array.length; i++) {
if (!callback(array[i])) {
return false
}
}
return true;
}
Scope Lesson Concepts
Identify the difference between const, let, and var declarations
const - cannot reassign variable, scoped to block
let - can reassign variable, scoped to block
var - outdated, may or may not be reassigned, scoped to function. can be not just reassigned, but also redeclared!
a variable will always evaluate to the value it contains regardless of how it was declared
Explain the difference between const, let, and var declarations
var is function scoped—so if you declare it anywhere in a function, the declaration (but not assignment) is "hoisted"
so it will exist in memory as “undefined” which is bad and unpredictable
var will also allow you to redeclare a variable, while let or const will raise a syntax error. you shouldn't be able to do that!
const won't let you reassign a variable, but if it points to a mutable object, you will still be able to change the value by mutating the object
block-scoped variables allow new variables with the same name in new scopes
block-scoped still performs hoisting of all variables within the block, but it doesn’t initialize to the value of undefined like var does, so it throws a specific reference error if you try to access the value before it has been declared
if you do not use var or let or const when initializing, it will be declared as global—THIS IS BAD
if you assign a value without a declaration, it exists in the global scope (so then it would be accessible by all outer scopes, so bad). however, there’s no hoisting, so it doesn’t exist in the scope until after the line is run
Predict the evaluation of code that utilizes function scope, block scope, lexical scope, and scope chaining
scope of a program means the set of variables that are available for use within the program
global scope is represented by the window object in the browser and the global object in Node.js
global variables are available everywhere, and so increase the risk of name collisions
local scope is the set of variables available for use within the function
when we enter a function, we enter a new scope
includes functions arguments, local variables declared inside function, and any variables that were already declared when the function is defined (hmm about that last one)
for blocks (denoted by curly braces {}, as in conditionals or for loops), variables can be block scoped
inner scope does not have access to variables in the outer scope
scope chaining — if a given variable is not found in immediate scope, javascript will search all accessible outer scopes until variable is found
so an inner scope can access outer scope variables
but an outer scope can never access inner scope variables
Define an arrow function
let arrowFunction = (param1, param2) => {
let sum = param1 + param2;
return sum;
}
// with 1 param you can remove parens around parameters let arrowFunction = param =>
// if your return statement is one line, you can use implied return let arrowFunction = param => param + 1;
// you don’t have to assign to variable, can be anonymous // if you never need to use it again param => param + 1;
Given an arrow function, deduce the value of this without executing the code
arrow functions are automatically bound to the context they were declared in.
unlike regular function which use the context they are invoked in (unless they have been bound using Function#bind).
if you implement an arrow function as a method in an object the context it will be bound to is NOT the object itself, but the global context.
so you can’t use an arrow function to define a method directly
let obj = {
name: “my object”,
unboundFunc: function () {
return this.name;
// this function will be able to be called on different objects
},
boundToGlobal: () => { return this.name; // this function, no matter how you call it, will be called // on the global object, and it cannot be rebound // this is because it was defined using arrow syntax },
makeFuncBoundToObj: function() {
return () => {
return this.name;
}
// this function will return a function that will be bound
// to the object where we call the outer method
// because the arrow syntax is nested inside one of this
// function's methods, it cannot be rebound
},
makeUnboundFunc: function() {
return function() {
return this.name;
}
//this function will return a function that will still be unbound
},
immediatelyInvokedFunc: function() {
return this.name;
}(), // this property will be set to the return value of this anonymous function,
// which is invoked during the object definition;
// basically, it's a way to check the context inside of an object, at this moment
innerObj: {
name: "inner object",
innerArrowFunc: () => {
return this.name;
} // the context inside a nested object is not the parent, it's still
// the global object. entering an object definition doesn't change the context
},
let otherObj = {
name: "my other object"
}
// call unboundFunc on obj, we get "my object" console.log("unboundFunc: ", obj.unboundFunc()); // => "my object" // assign unboundFunc to a variable and call it let newFunc = obj.unboundFunc; // this newFunc will default to being called on global object console.log("newFunc: ",newFunc()); // => undefined // but you could bind it directly to a different object if you wanted console.log("newFunc: ", newFunc.bind(otherObj)()); // "my other object"
// meanwhile, obj.boundToGlobal will only ever be called on global object console.log("boundToGlobal: ", obj.boundToGlobal()); //=> undefined let newBoundFunc = obj.boundToGlobal; console.log("newBoundFunc: ", newBoundFunc()); // => undefined // even if you try to directly bind to another object, it won't work! console.log("newBoundFunc: ", newBoundFunc.bind(otherObj)()); // => undefined
// let's make a new function that will always be bound to the context // where we call our function maker let boundFunc = obj.makeFuncBoundToObj();// note that we're invoking, not just assigning console.log("boundFunc: ", boundFunc()); // => "my object" // we can't rebind this function console.log("boundFunc: ", boundFunc.bind(otherObj)()) // =>"my object"
// but if I call makeFuncBoundToObj on another context // the new bound function is stuck with that other context let boundToOther = obj.makeFuncBoundToObj.bind(otherObj)(); console.log("boundToOther: ", boundToOther()); // => "my other object" console.log("boundToOther: ", boundToOther.bind(obj)()) // "my other object"
// the return value of my immediately invoked function // shows that the context inside of the object is the // global object, not the object itself // context only changes inside a function that is called // on an object console.log("immediatelyInvokedFunc: ", obj.immediatelyInvokedFunc); // => undefined
// even though we're inside a nested object, the context is // still the same as it was outside the outer object // in this case, the global object console.log("innerArrowFunc: ", obj.innerObj.innerArrowFunc()); // => undefined
}
-Implement a closure and explain how the closure effects scope
-
a closure is "the combination of a function and the lexical environment within which that function was declared" -
alternatively, "when an inner function uses or changes variables in an outer function" -
closures have access to any variables within their own scope + scope of outer functions + global scope— the set of all these available variables is "lexical environemnt" -
closure keeps reference to all variables ** even
if the outer
function has returned **
-each
function has a private mutable state that cannot be accessed externally
-
the inner
function will maintain a reference to the scope in which it was declared.so it has access to variables that were initialized in any outer scope— even
if that scope
-
if a variable exists in the scope of what could have been accessed by a
function(e.g.global scope, outer
function, etc), does that variable wind up in the closure even
if it never got accessed ?
-
if you change the value of a variable(e.g.i++) you will change the value of that variable in the scope that it was declared in
``
`javascript
function createCounter() {
// this function starts a counter at 0, then returns a
// new function that can access and change that counter
//
// each new counter you create will have a single internal
// state, that can be changed only by calling the function.
// you can't access that state from outside of the function,
// even though the count variable in question is initialized
// by the outer function, and it remains accessible to the
// inner function after the outer function returns.
let count = 0;
return function() {
count ++;
return count;
}
}
let counter = createCounter();
console.log(counter()); //=> 1
console.log(counter()); //=> 2
// so the closure here comes into play because
// an inner function is accessing and changing
// a variable from an outer function
// the closure is the combination of the counter
// function and the all the variables that existed
// in the scope that it was declared in. because
// inner blocks/functions have access to outer
// scopes, that includes the scope of the outer
// function.
// so counter variable is a closure, in that
// it contains the inner count value that was
// initialized by the outer createCounter() function
// count has been captured or closed over
// this state is private, so if i run createCounter again
// i get a totally separate count that doesn't interact
// with the previous one and each of the new functions
// will have their own internal state based on the
// initial declaration in the now-closed outer function
let counter2 = createCounter();
console.log(counter2()); // => 1
// if i set a new function equal to my existing counter
// the internal state is shared with the new function
let counter3 = counter2;
console.log(counter3());
Define a method that references this on an object literal
when we use this in a method it refers to the object that the method is invoked on
it will let you access other pieces of information from within that object, or even other methods
method style invocation — object.method(args) (e.g. built in examples like Array#push, or String#toUpperCase)
context is set every time we invoke a function
function style invocation sets the context to the global object no matter what
being inside an object does not make the context that object! you still have to use method-style invocation
Utilize the built in Function#bind on a callback to maintain the context of this
when we call bind on a function, we get an exotic function back — so the context will always be the same for that new function
let cat = {
purr: function () {
console.log("meow");
},
purrMore: function () {
this.purr();
},
};
let sayMeow = cat.purrMore; console.log(sayMeow()); // TypeError: this.purr is not a function
// we can use the built in Function.bind to ensure our context, our this, // is the cat object let boundCat = sayMeow.bind(cat);
boundCat(); // prints "meow"
-`bind`
can also work with arguments, so you can have a version of a
function with particular arguments and a particular context.the first arg will be the context aka the `this`
you want it to use.the next arguments will be the functions arguments that you are binding -
if you just want to bind it to those arguments in particular, you can use `null`
as the first argument, so the context won 't be bound, just the arguments -
Given a code snippet, identify what `this`
refers to
-
important to recognize the difference between scope and context -
scope works like a dictionary that has all the variables that are available within a given block, plus a pointer back the next outer scope(which itself has pointers to new scopes until you reach the global scope.so you can think about a whole given block 's scope as a kind of linked list of dictionaries) (also, this is not to say that scope is actually implemented in this way, that is just the schema that i can use to understand it) -
context refers to the value of the `this`
keyword -
the keyword `this`
exists in every
function and it evaluates to the object that is currently invoking that
function -so the context is fairly straightforward when we talk about methods being called on specific objects -
you could, however, call an object 's method on something other than that object, and then this would refer to the context where/how it was called, e.g.
``
`javascript
let dog = {
name: "Bowser",
changeName: function () {
this.name = "Layla";
},
};
// note this is **not invoked** - we are assigning the function itself
let change = dog.changeName;
console.log(change()); // undefined
// our dog still has the same name
console.log(dog); // { name: 'Bowser', changeName: [Function: changeName] }
// instead of changing the dog we changed the global name!!!
console.log(this); // Object [global] {etc, etc, etc, name: 'Layla'}
CALLING SOMETHING IN THE WRONG CONTEXT CAN MESS YOU UP!
could throw an error if it expects this to have some other method or whatever that doesn’t exist
you could also overwrite values or assign values to exist in a space where they should not exist
if you call a function as a callback, it will set this to be the outer function itself, even if the function you were calling is a method that was called on a particular object
let cat = {
purr: function () {
console.log("meow");
},
purrMore: function () {
this.purr();
},
};
global.setTimeout(cat.purrMore, 5000); // 5 seconds later: TypeError: this.purr is not a function
we can use strict mode with "use strict"; this will prevent you from accessing the global object with this in functions, so if you try to call this in the global context and change a value, you will get a type error, and the things you try to access will be undefined
let sayMeow = cat.purrMore; console.log(sayMeow()); // TypeError: this.purr is not a function
// we can use the built in Function.bind to ensure our context, our this , // is the cat object let boundCat = sayMeow.bind(cat);
boundCat(); // prints “meow”
-`bind`
can also work with arguments, so you can have a version of a
function with particular arguments and a particular context.the first arg will be the context aka the `this`
you want it to use.the next arguments will be the functions arguments that you are binding -
if you just want to bind it to those arguments in particular, you can use `null`
as the first argument, so the context won 't be bound, just the arguments -
Given a code snippet, identify what `this`
refers to
-
important to recognize the difference between scope and context -
scope works like a dictionary that has all the variables that are available within a given block, plus a pointer back the next outer scope(which itself has pointers to new scopes until you reach the global scope.so you can think about a whole given block 's scope as a kind of linked list of dictionaries) (also, this is not to say that scope is actually implemented in this way, that is just the schema that i can use to understand it) -
context refers to the value of the `this`
keyword -
the keyword `this`
exists in every
function and it evaluates to the object that is currently invoking that
function -so the context is fairly straightforward when we talk about methods being called on specific objects -
you could, however, call an object 's method on something other than that object, and then this would refer to the context where/how it was called, e.g.
``
`javascript
let dog = {
name: "Bowser",
changeName: function () {
this.name = "Layla";
},
};
// note this is **not invoked** - we are assigning the function itself
let change = dog.changeName;
console.log(change()); // undefined
// our dog still has the same name
console.log(dog); // { name: 'Bowser', changeName: [Function: changeName] }
// instead of changing the dog we changed the global name!!!
console.log(this); // Object [global] {etc, etc, etc, name: 'Layla'}
CALLING SOMETHING IN THE WRONG CONTEXT CAN MESS YOU UP!
could throw an error if it expects this to have some other method or whatever that doesn’t exist
you could also overwrite values or assign values to exist in a space where they should not exist
if you call a function as a callback, it will set this to be the outer function itself, even if the function you were calling is a method that was called on a particular object
we can use strict mode with "use strict"; this will prevent you from accessing the global object with this in functions, so if you try to call this in the global context and change a value, you will get a type error, and the things you try to access will be undefined
POJOs
1. Label variables as either Primitive vs. Reference
Javascript considers most data types to be ‘primitive’, these data types are immutable, and are passed by value. The more complex data types: Array and Object are mutable, are considered ‘reference’ data types, and are passed by reference.
Boolean — Primitive
Null — Primitive
Undefined — Primitive
Number — Primitive
String — Primitive
Array — Reference
Object — Reference
Function — Reference
2. Identify when to use . vs [] when accessing values of an object
let obj = {
"one": 1,
"two": 2
};
// Choose the square brackets property accessor when the property name is determined at
// runtime, or if the property name is not a valid identifier
let myKey = "one";
console.log(obj[myKey]);
// Choose the dot property accessor when the property name is known ahead of time.
console.log(obj.two);
3. Write an object literal with a variable key using interpolation
let keyName = "two";
// If the key is not known, you can use an alternative `[]` syntax for
// object initialization only
let obj2 = {
[keyName]: 2
}
console.log(obj2);
4. Use the obj[key] !== undefined pattern to check if a given variable that contains a key exists in an object
11. Write a function that accepts a string as an argument and returns an object representing the count of each character in the array
function charCount(inputString) {
let res = inputString.split("").reduce(function(accum, el) {
if (el in accum) {
accum[el] = accum[el] + 1;
} else {
accum[el] = 1;
}
return accum;
}, {})
return res;
}
console.log(charCount('aaabbbeebbcdkjfalksdfjlkasdfasdfiiidkkdingds'));
Review of Concepts
1. Identify the difference between const, let, and var declarations
2. Explain the difference between const, let, and var declarations
var a = "a";
var is the historical keyword used for variable declaration.
var declares variables in function scope, or global scope if not inside a function.
We consider var to be deprecated and it is never used in this course.
let b = "b";
let is the keyword we use most often for variable declaration.
let declares variables in block scope.
variables declared with let are re-assignable.
const c = "c";
const is a specialized form of let that can only be used to initialize a variable.
Except when it is declared, you cannot assign to a const variable.
const scopes variables the same way that let does.
3. Predict the evaluation of code that utilizes function scope, block scope, lexical scope, and scope chaining
Consider this run function, inside which foo and bar have function scope . i and baz are scoped to the block expression.
// function and block scope in this example
function run() {
var foo = "Foo";
let bar = "Bar";
console.log(foo, bar);
{
console.log(foo);
let baz = "Bazz";
console.log(baz);
}
console.log(baz); // ReferenceError
}
run();
Notice that referencing baz from outside it's block results in JavaScript throwing a ReferenceError.
Consider this run function, inside of which foo has function scope .
function run() {
console.log(foo); // undefined
var foo = "Foo";
console.log(foo); // Foo
}
run();
Consider this func1 function and it's nested scopes.
// global scope
function func1(arg1) {
// func1 scope
return function func2(arg2) {
// func2 scope
return function func3(arg3) {
// func3 scope
console.log(arg1, arg2, arg3);
}
}
}
6. Implement a closure and explain how the closure effects scope
This simple construct will create a function that accepts val as a parameter, and returns val immediately. We do not need to type return val , because this is a single-line function.
Identically, we could write
const returnValue = (val) => {
return val;
};
5. Given an arrow function, deduce the value of this without executing the code
If we use a function declaration style function, the this variable is set to the global object (i.e. Object [global] in Node. JS and Window in your browser).
Learning to use the print function in Python is the perfect way to start writing Python code. When learning to write in any new programming language, one of the first things you want to do is get some output from your program. The print function is how you output the value of an object to the screen. You will learn how to use the print function in Python.
Using print with no arguments:
>>> print()
>>>
Note: the empty line after calling the print function. The default end value when calling print is the newline character \\n.
Using print with a string literal:
>>> print(“WebDevHub School is awesome!”)
WebDevHub School is awesome!
>>>
Note: how calling print with the string literal printed the exact string we passed in onto the screen.
Using print with a variable:
>>> slogan = “i love lamp”
>>> print(slogan)
i love lamp
>>>
Note: how calling print with the slogan variable prints the value assigned to the slogan variable.
Using print with an expression:
>>> superlative = “wonderful”
>>> school = “WebDevHub School”
>>> print(school + “ is “ + superlative)
WebDevHub School is wonderful
>>>
Note: how the argument for the print function can be an expression. Once the expression is resolved to a string object, the print function can output it to the screen.
Any object passed as an argument into print will get converted into a string type before outputted to the screen.
You can see how the print function is easy to use and how it can handle any object type that you pass into it.
Passing multiple arguments into print
Now, let’s look at how we can pass multiple arguments into the print function. Using print with multiple arguments gives you a flexible and easy way to output items to the screen.
We can pass multiple objects, all of the same or different types, into print.
>>> print(“WebDevHub School”, 2021, True)
WebDevHub School 2021 True
>>>
Note: how each object we passed in was converted to a string and then output to the screen. Note: also that print used “ “ as the default separator value.
We can change the separator value by assigning a value to the keyword argument sep.
You can also specify the end value by assigning a value to the end keyword argument when you call the print function. Being able to print a value to the screen but allow the user to stay on the same line is useful and necessary in some cases.
Here is how you can change the default end value (which is \\n) when calling the print function.
>>> print(“Are you a WebDevHub School student?”, end=” (Y or N)”)
Are you a WebDevHub School student? (Y or N)>>>
Customizing the end value when calling the print function can be useful and necessary in some circumstances.
You have now learned the basics of using the print function in Python. You learned how to call the print function to print objects of different types. You now know how to use print with multiple positional arguments. In certain necessary situations, you also know how to change the default end value when calling the print function.
Now, get some practice using the print function by completing the Try: below.
Python is unique because indentation instead of some other character marks blocks of code. A block of code is a collection of statements that are grouped. The syntax for denoting blocks varies from language to language. For example, in C, blocks are delimited by curly braces ({ and }). Understanding how Python uses whitespace and indentation to denote logical lines and code blocks is essential.
Follow Along
Whitespace Characters
Whitespace is any character represented by something that appears empty (usually \\t or “ “). The characters that Python considers to be whitespace can be seen by printing out the value of string.whitespace from the string library.
Note: the characters are “ “ (space), \\t (tab), \\n (newline), \\r (return), \\x0b (unicode line tabulation), and \\x0c (unicode form feed).
You’ve seen the different types of whitespace characters that can appear, but you mainly need to concern yourself with “ “, \\t, and \\n.
Logical Lines of Code
Whitespace is used to denote the end of a logical line of code. In Python, a logical line of code’s end (a statement or a definition) is marked by a \\n.
>>> first = “WebDevHub”
>>> second = “School”
>>> first + second
‘WebDevHubSchool’
>>> first \\
… + \\
… second
‘WebDevHubSchool’
>>>
Note: how the REPL evaluates the expression first + second when I return on line 3. Below that, I can write one logical line of code over multiple lines by ending each line with a \\ character. That \\ character lets the Python interpreter that even though there is a newline, you don’t want it to treat it as the end of a logical line.
It’s important to understand that Python assumes meaning in newline characters when trying to interpret your code.
Code Blocks
Whitespace (indentation) can denote code blocks. Python gives meaning to the amount of whitespace (indentation level) that comes before a logical line of code.
>>> if True:
… if True:
File “<stdin>”, line 2
if True:
^
IndentationError: expected an indented block
>>>
HEAD^ # 1 commit before head
HEAD^^ # 2 commits before head
HEAD~5 # 5 commits before head
Branches
# create a new branch
git checkout -b $branchname
git push origin $branchname --set-upstream
# get a remote branch
git fetch origin
git checkout --track origin/$branchname
# delete local remote-tracking branches (lol)
git remote prune origin
# list merged branches
git branch -a --merged
# delete remote branch
git push origin :$branchname
# go back to previous branch
git checkout -
Collaboration
# Rebase your changes on top of the remote master
git pull --rebase upstream master
# Squash multiple commits into one for a cleaner git log
# (on the following screen change the word pick to either 'f' or 's')
git rebase -i $commit_ref
Submodules
# Import .gitmodules
git submodule init
# Clone missing submodules, and checkout commits
git submodule update --init --recursive
# Update remote URLs in .gitmodules
# (Use when you changed remotes in submodules)
git submodule sync
git rebase 76acada^
# get current sha1 (?)
git show-ref HEAD -s
# show single commit info
git log -1 f5a960b5
# Go back up to root directory
cd "$(git rev-parse --show-top-level)"
Short log
$ git shortlog
$ git shortlog HEAD~20.. # last 20 commits
James Dean (1):
Commit here
Commit there
Frank Sinatra (5):
Another commit
This other commit
Bisect
git bisect start HEAD HEAD~6
git bisect run npm test
git checkout refs/bisect/bad # this is where it screwed up
git bisect reset
Manual bisection
git bisect start
git bisect good # current version is good
git checkout HEAD~8
npm test # see if it's good
git bisect bad # current version is bad
git bisect reset # abort
Searching
git log --grep="fixes things" # search in commit messages
git log -S"window.alert" # search in code
git log -G"foo.*" # search in code (regex)
GPG Signing
git config set user.signingkey <GPG KEY ID> # Sets GPG key to use for signing
git commit -m "Implement feature Y" --gpg-sign # Or -S, GPG signs commit
git config set commit.gpgsign true # Sign commits by default
git commit -m "Implement feature Y" --no-gpg-sign # Do not sign
---
Refs
HEAD^ # 1 commit before head
HEAD^^ # 2 commits before head
HEAD~5 # 5 commits before head
Branches
# create a new branch
git checkout -b $branchname
git push origin $branchname --set-upstream
# get a remote branch
git fetch origin
git checkout --track origin/$branchname
# delete local remote-tracking branches (lol)
git remote prune origin
# list merged branches
git branch -a --merged
# delete remote branch
git push origin :$branchname
# go back to previous branch
git checkout -
Collaboration
# Rebase your changes on top of the remote master
git pull --rebase upstream master
# Squash multiple commits into one for a cleaner git log
# (on the following screen change the word pick to either 'f' or 's')
git rebase -i $commit_ref
Submodules
# Import .gitmodules
git submodule init
# Clone missing submodules, and checkout commits
git submodule update --init --recursive
# Update remote URLs in .gitmodules
# (Use when you changed remotes in submodules)
git submodule sync
git rebase 76acada^
# get current sha1 (?)
git show-ref HEAD -s
# show single commit info
git log -1 f5a960b5
# Go back up to root directory
cd "$(git rev-parse --show-top-level)"
Short log
$ git shortlog
$ git shortlog HEAD~20.. # last 20 commits
James Dean (1):
Commit here
Commit there
Frank Sinatra (5):
Another commit
This other commit
Bisect
git bisect start HEAD HEAD~6
git bisect run npm test
git checkout refs/bisect/bad # this is where it screwed up
git bisect reset
Manual bisection
git bisect start
git bisect good # current version is good
git checkout HEAD~8
npm test # see if it's good
git bisect bad # current version is bad
git bisect reset # abort
Searching
git log --grep="fixes things" # search in commit messages
git log -S"window.alert" # search in code
git log -G"foo.*" # search in code (regex)
GPG Signing
git config set user.signingkey <GPG KEY ID> # Sets GPG key to use for signing
git commit -m "Implement feature Y" --gpg-sign # Or -S, GPG signs commit
git config set commit.gpgsign true # Sign commits by default
git commit -m "Implement feature Y" --no-gpg-sign # Do not sign
#### If you found this guide helpful feel free to checkout my github/gists where I host similar content:
Graph Data Structure Interview Questions At A Glance
Because they’re just about the most important data structure there is.
Graph Data Structure Interview Questions At A Glance
Because they’re just about the most important data structure there is.
### Graphs
graph: collections of data represented by nodes and connections between nodes graphs: way to formally represent network; ordered pairs graphs: modeling relations between many items; Facebook friends (you = node; friendship = edge; bidirectional); twitter = unidirectional graph theory: study of graphs big O of graphs: G = V(E)
trees are a type of graph
Components required to make a graph:
nodes or vertices: represent objects in a dataset (cities, animals, web pages)
edges: connections between vertices; can be bidirectional
weight: cost to travel across an edge; optional (aka cost)
Useful for:
maps
networks of activity
anything you can represent as a network
multi-way relational data
Types of Graphs:
directed: can only move in one direction along edges; which direction indicated by arrows
undirected: allows movement in both directions along edges; bidirectional
cyclic: weighted; edges allow you to revisit at least 1 vertex; example weather
acyclical: vertices can only be visited once; example recipe
Two common ways to represent graphs in code:
adjacency lists: graph stores list of vertices; for each vertex, it stores list of connected vertices
adjacency matrices: two-dimensional array of lists with built-in edge weights; denotes no relationship
Both have strengths and weaknesses.
### Questions
What is a Graph?
A Graph is a data structure that models objects and pairwise relationships between them with nodes and edges. For example: Users and friendships, locations and paths between them, parents and children, etc.
Why is it important to learn Graphs?
Graphs represent relationships between data. Anytime you can identify a relationship pattern, you can build a graph and often gain insights through a traversal. These insights can be very powerful, allowing you to find new relationships, like users who have a similar taste in music or purchasing.
How many types of graphs are there?
Graphs can be directed or undirected, cyclic or acyclic, weighted or unweighted. They can also be represented with different underlying structures including, but not limited to, adjacency lists, adjacency matrices, object and pointers, or a custom solution.
What is the time complexity (big-O) to add/remove/get a vertex/edge for a graph?
It depends on the implementation. (Graph Representations). Before choosing an implementation, it is wise to consider the tradeoffs and complexities of the most commonly used operations.
Graph Representations
The two most common ways to represent graphs in code are adjacency lists and adjacency matrices, each with its own strengths and weaknesses. When deciding on a graph implementation, it’s important to understand the type of data and operations you will be using.
### Adjacency List
In an adjacency list, the graph stores a list of vertices and for each vertex, a list of each vertex to which it’s connected. So, for the following graph…
…an adjacency list in Python could look something like this:
Note that this adjacency list doesn’t actually use any lists. The vertices collection is a dictionary which lets us access each collection of edges in O(1) constant time while the edges are contained in a set which lets us check for the existence of edges in O(1) constant time.
Adjacency Matrix
Now, let’s see what this graph might look like as an adjacency matrix:
We represent this matrix as a two-dimensional array, or a list of lists. With this implementation, we get the benefit of built-in edge weights but do not have an association between the values of our vertices and their index.
In practice, both of these would probably contain more information by including Vertex or Edge classes.
Tradeoffs
Both adjacency matrices and adjacency lists have their own strengths and weaknesses. Let’s explore their tradeoffs.
For the following:
V: Total number of vertices in the graph
E: Total number of edges in the graph
e: Average number of edges per vertex
Space Complexity
Adjacency Matrix: O(V ^ 2)
Adjacency List: O(V + E)
Consider a sparse graph with 100 vertices and only one edge. An adjacency list would have to store all 100 vertices but only needs to keep track of that single edge. The adjacency matrix would need to store 100x100=10,000 possible connections, even though all but one would be 0.
Now consider a dense graph where each vertex points to each other vertex. In this case, the total number of edges will approach V² so the space complexities of each are comparable. However, dictionaries and sets are less space efficient than lists so for dense graphs, the adjacency matrix is more efficient.
Takeaway: Adjacency lists are more space efficient for sparse graphs while adjacency matrices become efficient for dense graphs.
Add Vertex
Adjacency Matrix: O(V)
Adjacency List: O(1)
Adding a vertex is extremely simple in an adjacency list:
self.vertices["H"] = set()
Adding a new key to a dictionary is a constant-time operation.
For an adjacency matrix, we would need to add a new value to the end of each existing row, then add a new row at the end.
for v in self.edges:
self.edges[v].append(0)
v.append([0] * len(self.edges + 1))
Remember that with Python lists, appending to the end of a list is usually O(1) due to over-allocation of memory but can be O(n) when the over-allocated memory fills up. When this occurs, adding the vertex can be O(V²).
Takeaway: Adding vertices is very efficient in adjacency lists but very inefficient for adjacency matrices.
Remove Vertex
Adjacency Matrix: O(V ^ 2)
Adjacency List: O(V)
Removing vertices is pretty inefficient in both representations. In an adjacency matrix, we need to remove the removed vertex’s row, then remove that column from each other row. Removing an element from a list requires moving everything after that element over by one slot which takes an average of V/2 operations. Since we need to do that for every single row in our matrix, that results in a V² time complexity. On top of that, we need to reduce the index of each vertex after our removed index by 1 as well which doesn’t add to our quadratic time complexity, but does add extra operations.
For an adjacency list, we need to visit each vertex and remove all edges pointing to our removed vertex. Removing elements from sets and dictionaries is a O(1) operation, so this results in an overall O(V) time complexity.
Takeaway: Removing vertices is inefficient in both adjacency matrices and lists but more inefficient in matrices.
Add Edge
Adjacency Matrix: O(1)
Adjacency List: O(1)
Adding an edge in an adjacency matrix is quite simple:
self.edges[v1][v2] = 1
Adding an edge in an adjacency list is similarly simple:
self.vertices[v1].add(v2)
Both are constant-time operations.
Takeaway: Adding edges to both adjacency lists and matrices is very efficient.
Remove Edge
Adjacency Matrix: O(1)
Adjacency List: O(1)
Removing an edge from an adjacency matrix is quite simple:
self.edges[v1][v2] = 0
Removing an edge from an adjacency list is similarly simple:
self.vertices[v1].remove(v2)
Both are constant-time operations.
Takeaway: Removing edges from both adjacency lists and matrices is very efficient.
Find Edge
Adjacency Matrix: O(1)
Adjacency List: O(1)
Finding an edge in an adjacency matrix is quite simple:
return self.edges[v1][v2] > 0
Finding an edge in an adjacency list is similarly simple:
return v2 in self.vertices[v1]
Both are constant-time operations.
Takeaway: Finding edges from both adjacency lists and matrices is very efficient.
Get All Edges from Vertex
Adjacency Matrix: O(V)
Adjacency List: O(1)
Say you want to know all the edges originating from a particular vertex. With an adjacency list, this is as simple as returning the value from the vertex dictionary:
return self.vertex[v]
In an adjacency matrix, however, it’s a bit more complicated. You would need to iterate through the entire row and populate a list based on the results:
v_edges = []
for v2 in self.edges[v]:
if self.edges[v][v2] > 0:
v_edges.append(v2)
return v_edges
Takeaway: Fetching all edges is more efficient in an adjacency list than an adjacency matrix.
Breadth-First Search
Can use breadth-first search when searching a graph; explores graph outward in rings of increasing distance from starting vertex; never attempts to explore vertex it is or has already explored
BFS
### Applications of BFS
pathfinding, routing
web crawlers
find neighbor nodes in P2P network
finding people/connections away on social network
find neighboring locations on graph
broadcasting on a network
cycle detection in a graph
finding connected components
solving several theoretical graph problems
Coloring BFS
It’s useful to color vertexes as you arrive at them and as you leave them behind as already searched.
unlisted: white vertices whose neighbors are being explored: gray vertices with no unexplored neighbors: black
BFS Pseudocode
def BFS(graph, start_vert):
for v of graph.vertices:
v.color = white
start_vert.color = gray
queue.enqueue(start_vert)
while !queue isEmpty():
# peek at head but don't dequeue
u = queue[0]
for v of u.neighbors:
if v.color == white:
v.color == gray
queue.enqueue(v)
queue.dequeue()
u.color = black
BFS Steps
Mark graph vertices white.
Mark starting vertex gray.
Enqueue starting vertex.
Check if queue is not empty.
If not empty, peek at first item in queue.
Loop through that vertex’s neighbors.
Check if unvisited.
If unvisited, mark as gray and enqueue vertex.
Dequeue current vertex and mark as black.
Repeat until all vertices are explored.
Depth-First Search
dives down the graph as far as it can before backtracking and exploring another branch; never attempts to explore a vertex it has already explored or is in the process of exploring; exact order will vary depending on which branches get taken first and which is starting vertex
DFS:
### Applications of DFS
preferred method for exploring a graph if we want to ensure we visit every node in graph
finding minimum spanning trees of weighted graphs
pathfinding
detecting cycles in graphs
solving and generating mazes
topological sorting, useful for scheduling sequences of dependent jobs
DFS Pseudocode
# recursion
def explore(graph):
visit(this_vert)
explore(remaining_graph)
# iterative
def DFS(graph):
for v of graph.verts:
v.color = white
v.parent = null
for v of graph.verts:
if v.color == white:
DFS_visit(v)
def DFS_visit(v):
v.color = gray
for neighbor of v.adjacent_nodes:
if neighbor.color == white:
neighbor.parent = v
DFS_visit(neighbor)
v.color = black
DFS Steps
Take graph as parameter.
Marks all vertices as unvisited.
Sets vertex parent as null.
Passes each unvisited vertex into DFS_visit().
Mark current vertex as gray.
Loops through its unvisited neighbors.
Sets parent and makes recursive call to DFS_visit().
Marks vertex as black.
Repeat until done.
Connected Components
connected components: in a disjoint graph, groups of nodes on a graph that are connected with each other
Uses
typically very large graphs, networks
social networks
networks (which devices can reach one another)
epidemics (how spread, who started, where next)
key to finding connected components: searching algorithms, breadth-first search
How to find connected componnents
for each node in graph:
has it been explored
if no, do BFS
all nodes reached are connected
if yes, already in connected component
go to next node
strongly connected components: any node in this group can get to any other node
Bonus Python Question:
'''
This Bellman-Ford Code is for determination whether we can get
shortest path from given graph or not for single-source shortest-paths problem.
In other words, if given graph has any negative-weight cycle that is reachable
from the source, then it will give answer False for "no solution exits".
For argument graph, it should be a dictionary type
such as
graph = {
'a': {'b': 6, 'e': 7},
'b': {'c': 5, 'd': -4, 'e': 8},
'c': {'b': -2},
'd': {'a': 2, 'c': 7},
'e': {'b': -3}
}
Review of Concepts:
A graph is any collection of nodes and edges.
A graph is a less restrictive class of collections of nodes than structures like a tree.
It doesn’t need to have a root node (not every node needs to be accessible from a single node)
It can have cycles (a group of nodes whose paths begin and end at the same node)
Cycles in a graph- Cycles are not always “isolated”, they can be one part of a larger graph. You can detect them by starting your search on a specific node and finding a path that takes you back to that same node.
- Any number of edges may leave a given node
- A Path is a sequence of nodes on a graph
Undirected Graph
Undirected Graph: An undirected graph is one where the edges do not specify a particular direction. The edges are bi-directional.
Types:
### Dense Graph
Dense Graph — A graph with lots of edges.
“Dense graphs have many edges. But, wait! ⚠️ I know what you must be thinking, how can you determine what qualifies as “many edges”? This is a little bit too subjective, right? ? I agree with you, so let’s quantify it a little bit:
Let’s find the maximum number of edges in a directed graph. If there are |V| nodes in a directed graph (in the example below, six nodes), that means that each node can have up to |v| connections (in the example below, six connections).
Why? Because each node could potentially connect with all other nodes and with itself (see “loop” below). Therefore, the maximum number of edges that the graph can have is |V|\*|V| , which is the total number of nodes multiplied by the maximum number of connections that each node can have.”
When the number of edges in the graph is close to the maximum number of edges, the graph is dense.
Sparse Graph
Sparse Graph — Few edges
When the number of edges in the graph is significantly fewer than the maximum number of edges, the graph is sparse.
Weighted Graph
Weighted Graph — Edges have a cost or a weight to traversal
Directed Graph
Directed Graph — Edges only go one direction
Undirected Graph
Undirected Graph — Edges don’t have a direction. All graphs are assumed to be undirected unless otherwise stated
Node Class
Uses a class to define the neighbors as properties of each node.
Adjacency Matrix
The row index will correspond to the source of an edge and the column index will correspond to the edges destination.
When the edges have a direction, matrix[i][j] may not be the same as matrix[j][i]
It is common to say that a node is adjacent to itself so matrix[x][x] is true for any node
Will be O(n²) space complexity
### Adjacency List
Seeks to solve the shortcomings of the matrix implementation. It uses an object where keys represent node labels and values associated with that key are the adjacent node keys held in an array.
Heroku lets you deploy, run and manage applications written in Ruby, Node.js, Java, Python, Clojure, Scala, Go and PHP. An application is a…
Heroku Deploy Guides & Cheatsheet Compilation
Heroku lets you deploy, run and manage applications written in Ruby, Node.js, Java, Python, Clojure, Scala, Go and PHP. An application is a collection of source code written in one of these languages, perhaps a framework, and some dependency description that instructs a build system as to which additional dependencies are needed in order to build and run the application.
#### This is a quick tutorial explaining how to get a static website hosted on Heroku.
Heroku hosts apps on the internet, not static websites. To get it to run your static portfolio, personal blog, etc., you need to trick Heroku into thinking your website is a PHP app.
Basic Assumptions You want to deploy some straight-up HTML, CSS, JS, maybe a few images. Nothing fancy here. You are in the root directory of your site (i.e. the directory that contains all subdirectories and files for the site) The root directory contains a main HTML page, e.g. index.html A Heroku app and remote are set up and ready to go Steps Add a file called composer.json to the root directory by running touch composer.json Add a file called index.php to the root directory by running touch index.php Rename the homepage (e.g. index.html) to home.html In index.php, add the following line: In composer.json, add the following line: {} Run git push heroku master Done! Visit your deployed single-page website, hosted by Heroku (as a fake PHP app ☺).
Starting with any basic boilerplate demo server with NodeJS.
Open a terminal and run the command npm init -y in order to create a new project. The dummy server will be written in Express, so we need to run the npm install express command to install this module.
Once this library is installed, we can create a new file for our project, named app.js.
We can start the application by running node app.js. Then we can try it out at the following URL http://localhost:3000. At this point you should see the message Hello World in the browser.
### 2.) Version Control
The next step is to choose a version control system and to place our code in a development platform in a repository.
The most popular version control system is Git along with Github as a development platform, so that’s what we’ll use here.
On GitHub, go ahead and create a new repository for your application, like this:
To upload your local code into a repository, you need to run the commands that are listed on GitHub after you click `Create repository` button:
**!** Before we do this, we must ignore some files. We want to upload to the repository only the code that we write, without the dependencies (the installed modules).
For that, we need to create a new file .gitignore and inside it write the file that we want to ignore.
Now, we can write the commands listed in the picture above (the one from GitHub).
If you ran the commands correctly, then it’ll be on your repository’s page. If you refresh it you should see your files, except the one that you explicitly ignored, namely node modules.
### Step 3 — Link the repository with Heroku
At this step, we can link the repository from Github to our Heroku application.
First, create a new application on Heroku and follow the steps listed on the platform.
Once the application has been created, a window similar to this should appear:
Now, if you look at the navigation at the top, you’ll see `Overview`, `Resources`, `Deploy`, `Metrics` and so on. Be sure that `Deploy` is selected. Then on the second row, click on the GitHub icon.
Search for the desired application, which is `demo-deploy-app-09` in our case. Then click `Connect`.
Once the application is successfully connected with your Heroku account, you can click `Deploy Branch` to deploy your application.
If you want, you can also select the option Enable Automatic Deploys which will automatically pull the code from your Github repository every time you make a push to that repository.
Once the application has been deployed, you can click on View to open your application.
### Step 4 — Configure Heroku to properly run the application
If you open the application at this point, you should see something like this:
That’s right, an error. That’s because Heroku doesn’t know how to start our application.
If you remember, we ran the command node app.js to start the application locally.
Heroku has no way of knowing what commands it needs to run to start the application, and that's why it threw an error.
To solve this problem, we must create a new file named Procfile with the following content: web: node ./app.js.
To update our application, all we need to do is push a new commit to GitHub. If we have enabled the Automatic Deploys option, then the code will be automatically pulled to Heroku. Otherwise we need to click on Deploy Branch again.
Cheat Sheet:
Git-Heroku Workflow:
Full Stack Deploy:
Alternative Approach:
This one was created by Nick G and originally posted on medium Aug 29 2020.
defined by a set of value and a set of operations. The definition of ADT only mentions what operations are to be performed but not how these operations will be implemented.
Examples: Array, List, Map, Queue, Set, Stack, Table, Tree, and Vector are ADTs. Each of these ADTs has many implementations i.e. CDT. The container is a high-level ADT of above all ADTs.
Real life example:
book is Abstract (Telephone Book is an implementation)
Abstract data types, commonly abbreviated ADTs, are a way of classifying data structures based on how they are used and the behaviors they provide. They do not specify how the data structure must be implemented or laid out in memory, but simply provide a minimal expected interface and set of behaviors. For example, a stack is an abstract data type that specifies a linear data structure with LIFO (last in, first out) behavior. Stacks are commonly implemented using arrays or linked lists, but a needlessly complicated implementation using a binary search tree is still a valid implementation. To be clear, it is incorrect to say that stacks are arrays or vice versa. An array can be used as a stack. Likewise, a stack can be implemented using an array.
Since abstract data types don’t specify an implementation, this means it’s also incorrect to talk about the time complexity of a given abstract data type. An associative array may or may not have O(1) average search times. An associative array that is implemented by a hash table does have O(1) average search times.
“If you want to build a ship, don’t drum up the men and women to gather wood, divide the work, and give orders. Instead, teach them to…
HTTP Basics
“If you want to build a ship, don’t drum up the men and women to gather wood, divide the work, and give orders. Instead, teach them to yearn for the vast and endless sea.” — Antoine de Saint-Exupery;
- `HTTP` : Hypertext Transfer Protocol.
- `HT` : Hypertext - content with references to other content.
- Term used to refer to content in computing.
- What makes the Web a “web”.
- Most fundamental part of how we interact.
- `Hyperlinks` : Links; references between HT resources.
- `TP` : Transfer Protocol - set of guidelines surrounding the transmission of data.
- Defines the expectations for both ends of the transer.
- Defines some ways the transfer might fail.
- HTTP is a `request/response` protocol.
- HTTP works between `clients` & `servers`.
- `Clients` : User Agent - the data consumer.
- `Servers` : Origin - Data provider & where the application is running.
HTTP is a client-server protocol: requests are sent by one entity, the user-agent (or a proxy on behalf of it). Most of the time the user-agent is a Web browser, but it can be anything, for example a robot that crawls the Web to populate and maintain a search engine index.
Each individual request is sent to a server, which handles it and provides an answer, called the response. Between the client and the server there are numerous entities, collectively called proxies, which perform different operations and act as gateways or caches, for example.
**Properties of HTTP**
Reliable Connections : Messages passed between a client & server sacrifice a little speed for the sake of trust.
TCP is HTTP’s preferred connection type.
Stateless Transfer : HTTP is a stateless protocol - meaning it does not store any kind of information.
HTTP supports cookies.
Intermediaries : Servers or devices that pass your request along which come in three types:
Proxies : Modify your request so it appears to come from a different source.
Gateways : Pretend to be the resource server you requested.
Tunnels : Simply passes your request along.
HTTP Requests
Structure of an HTTP Request
GET / HTTP/1.1
Host: appacademy.io
Connection: keep-alive
Upgrade-Insecure-Requests: 1
User-Agent: Mozilla/5.0 (Macintosh; Intel Mac OS X 10_14_5) AppleWebKit/537.36 (KHTML, like Gecko) Chrome/76.0.3809.132 Safari/537.36
Accept: text/html,application/xhtml+xml,application/xml;q=0.9,image/webp,image/apng,*/*;q=0.8,application/signed-exchange;v=b3
Accept-Encoding: gzip, deflate
Accept-Language: en-US,en;q=0.9
Example of a request:
Request-line & HTTP verbs
The first line of an HTTP Request made up of three parts:
The Method : Indicated by an HTTP Verb.
The URI : Uniform Resource Indicator that ID’s our request.
THe HTTPVersion : Version we expect to use.
HTTP Verbs are a simply way of declaring our intention to the server.
GET : Used for direct requests.
POST: Used for creating new resources on the server.
PUT: Used to updated a resource on the server.
PATCH : Similar to PUT, but do not require the whole resource to perform the update.
DELETE : Used to destroy resources on the server.
Headers
Key-Value pairs that come after the request line — they appear on sep. lines and define metadata needed to process the request.
Some common headers:
Host : Root path for our URI.
User-Agent : Displays information about which browser the request originated from.
Referer : Defines the URL you’re coming from.
Accept : Indicates what the client will receive.
Content- : Define Details about the body of the request.
Body
For when we need to send data that doesn’t fit into the header & is too complex for the URI we can use the body.
URL encoding : Most common way form data is formatted.
name=claire&age=29&iceCream=vanilla
We can also format using JSON or XML.
Sending an HTTP request from the command line
netcat : (nc) A Utility that comes as part of Unix-line environments such as Ubuntu and macOS.
Allows us to open a direct connection with a URL and manually send HTTP requests.
First line of an HTTP response — gives us a high level overview of the server’s intentions. (status line)
HTTP/1.1 200 OK
HTTP status codes : numeric way of representing a server’s response.
Follow the structure: x: xxx — xxx;
Status codes 100 - 199: Informational
Allow the clinet to know that a req. was received, and provides extra info from the server.
Status codes 200 - 299: Successful
Indicate that the request has succeeded and the server is handling it.
Common Examples: 200 OK (req received and fulfilled) & 201 Created (received and new record was created)
Status codes 300 - 399: Redirection
Let the client know if there has been a change.
Common Examples: 301 Moved Permanently (resource you requested is in a totally new location) & 302 Found (indicates a temporary move)
Status codes 400 - 499: Client Error
Indicate problem with client’s request.
Common Examples: 400 Bad Request (received, but could not understand) & 401 Unauthorized (resource exists but you’re not allowed to see w/o authentication) & 403 Forbidden (resource exists but you’re not allowed to see it at all ) & 404 Not Found (resource requested does not exist);
Status codes 500 - 599: Server Error
Indicates request was formatted correctly, but the server couldn’t do what you asked due to an internal problem.
Common Examples: 500 Internal Server Error (Server had trouble processing) & 504 Gateway Timeout (Server timeout);
Headers : Work just like HTTP requests.
Common Examples:
Location : Used by client for redirection responses.
Content-Type : Let’s client know what format the body is in.
Expires : When response is no longer valid
Content-Disposition : Let’s client know how to display the response.
Set-Cookie : Sends data back to the client to set on the cookie.
Data : If the request is successful, the body of the response will contain the resource you have requested.
If you found this guide helpful feel free to checkout my GitHub/gists where I host similar content:
All of the code examples below will be included a second time at the bottom of this article as an embedded gist.
Introduction to React for Complete Beginners
All of the code examples below will be included a second time at the bottom of this article as an embedded gist, so that it is properly syntax highlighted.
React uses a syntax extension of JavaScript called JSX that allows you to write HTML directly within JavaScript.
React
React uses a syntax extension of JavaScript called JSX that allows you to write HTML directly within JavaScript
because JSX is a syntactic extension of JavaScript, you can actually write JavaScript directly within JSX
include the code you want to be treated as JavaScript within curly braces: { ‘this is treated as JavaScript code’ }
JSX code must be compiled into JavaScript
under the hood the challenges are calling ReactDOM.render (JSX, document.getElementById(‘root’))
One important thing to know about nested JSX is that it must return a single element.
For instance, several JSX elements written as siblings with no parent wrapper element will not transpile.
From the React Docs:
What is React?
React is a declarative, efficient, and flexible JavaScript library for building user interfaces. It lets you compose complex UIs from small and isolated pieces of code called “components”.
React has a few different kinds of components, but we’ll start with React.Component subclasses:
class ShoppingList extends React.Component {
render() {
return (
<div className="shopping-list">
<h1>Shopping List for {this.props.name}</h1>
<ul>
<li>Instagram</li>
<li>WhatsApp</li>
<li>Oculus</li>
</ul>
</div>
);
}
}
// Example usage: <ShoppingList name="Mark" />
We’ll get to the funny XML-like tags soon. We use components to tell React what we want to see on the screen. When our data changes, React will efficiently update and re-render our components.
Here, ShoppingList is a React component class, or React component type. A component takes in parameters, called props (short for “properties”), and returns a hierarchy of views to display via the render method.
The render method returns a description of what you want to see on the screen. React takes the description and displays the result. In particular, render returns a React element, which is a lightweight description of what to render. Most React developers use a special syntax called “JSX” which makes these structures easier to write. The <div /> syntax is transformed at build time to React.createElement('div'). The example above is equivalent to:
return React.createElement('div', {className: 'shopping-list'},
React.createElement('h1', /* ... h1 children ... */),
React.createElement('ul', /* ... ul children ... */)
);
To put comments inside JSX, you use the syntax {/* */} to wrap around the comment text.
To put comments inside JSX, you use the syntax {/* */} to wrap around the comment text.
The code editor has a JSX element similar to what you created in the last challenge. Add a comment somewhere within the provided div element, without modifying the existing h1 or p elements.
const JSX = (
<div>
{/* This is a comment */}
<h1>This is a block of JSX</h1>
<p>Here's a subtitle</p>
</div>
);
With React, we can render this JSX directly to the HTML DOM using React’s rendering API known as ReactDOM.
ReactDOM offers a simple method to render React elements to the DOM which looks like this:
ReactDOM.render(componentToRender, targetNode)
the first argument is the React element or component that you want to render,
and the second argument is the DOM node that you want to render the component to.
ReactDOM.render() must be called after the JSX element declarations, just like how you must declare variables before using them.
key difference in JSX is that you can no longer use the word class to define HTML classes.
— -> This is because class is a reserved word in JavaScript. Instead, JSX uses className
the naming convention for all HTML attributes and event references in JSX become camelCase
a click event in JSX is onClick, instead of onclick. Likewise, onchange becomes onChange. While this is a subtle difference, it is an important one to keep in mind moving forward.
Apply a class of myDiv to the div provided in the JSX code.
The constant JSX should return a div element.
The div should have a class of myDiv.
const JSX = (
<div>
<h1>Add a class to this div</h1>
</div>
);
Ans:
const JSX = (
<div className="myDiv">
<h1>Add a class to this div</h1>
</div>
);
React: Learn About Self-Closing JSX Tags
-Another important way in which JSX differs from HTML is in the idea of the self-closing tag.
In HTML, almost all tags have both an opening and closing tag:<div></div>;the closing tag always has a forward slash before the tag name that you are closing.
there are special instances in HTML called “self-closing tags”, or tags that don’t require both an opening and closing tag before another tag can start.
For example the line-break tag can be written as<br>or as<br />,but should never be written as<br></br>, since it doesn't contain any content.
In JSX, the rules are a little different. Any JSX element can be written with a self-closing tag, and every element must be closed.
The line-break tag, for example, must always be written as<br />in order to be valid JSX that can be transpiled.
A<div>, on the other hand, can be written as<div />or<div></div>.
The difference is that in the first syntax version there is no way to include anything in the<div />.
Fix the errors in the code editor so that it is valid JSX and successfully transpiles. Make sure you don’t change any of the content — you only need to close tags where they are needed.
const JSX = (
<div>
<h2>Welcome to React!</h2> <br >
<p>Be sure to close all tags!</p>
<hr >
</div>
);
Ans:
const JSX = (
<div>
<h2>Welcome to React!</h2> <br />
<p>Be sure to close all tags!</p>
<hr />
</div>
);
React: Create a Stateless Functional Component
There are two ways to create a React component. The first way is to use a JavaScript function.
Defining a component in this way creates a stateless functional component.
think of a stateless component as one that can receive data and render it, but does not manage or track changes to that data.
To create a component with a function, you simply write a JavaScript function that returns either JSX or null
React requires your function name to begin with a capital letter.
Here’s an example of a stateless functional component that assigns an HTML class in JSX:
// After being transpiled, the <div> will have a CSS class of 'customClass'
const DemoComponent = function() {
return (
<div className='customClass' />
);
};
Because a JSX component represents HTML, you could put several components together to create a more complex HTML page.
The code editor has a function called MyComponent. Complete this function so it returns a single div element which contains some string of text.
Note: The text is considered a child of the div element, so you will not be able to use a self-closing tag.
const MyComponent = function() {
// Change code below this line
// Change code above this line
}
ANS:
const MyComponent = function() {
// Change code below this line
return (
<div> Some Text </div >
);
// Change code above this line
};
React: Create a React Component
The other way to define a React component is with the ES6 class syntax. In the following example, Kitten extends React.Component:
This creates an ES6 class Kitten which extends the React.Component class.
So the Kitten class now has access to many useful React features, such as local state and lifecycle hooks.
Also notice the Kitten class has a constructor defined within it that calls super()
It uses super() to call the constructor of the parent class, in this case React.Component
The constructor is a special method used during the initialization of objects that are created with the class keyword. It is best practice to call a component’s constructor with super, and pass props to both.
This makes sure the component is initialized properly. For now, know that it is standard for this code to be included.
MyComponent is defined in the code editor using class syntax. Finish writing the render method so it returns a div element that contains an h1 with the text Hello React!.
class MyComponent extends React.Component {
constructor(props) {
super(props);
}
render() {
// Change code below this line
// Change code above this line
}
};
ANS:
class MyComponent extends React.Component {
constructor(props) {
super(props);
}
render() {
// Change code below this line
return (
<div>
<h1>Hello React!</h1>
</div>
);
// Change code above this line
}
};
React: Create a Component with Composition
Imagine you are building an App and have created three components, a Navbar, Dashboard, and Footer.
To compose these components together, you could create an App parent component which renders each of these three components as children. To render a component as a child in a React component, you include the component name written as a custom HTML tag in the JSX.
For example, in the render method you could write:
When React encounters a custom HTML tag that references another component (a component name wrapped in < /> like in this example), it renders the markup for that component in the location of the tag. This should illustrate the parent/child relationship between the App component and the Navbar, Dashboard, and Footer.
Challenge:
In the code editor, there is a simple functional component called ChildComponent and a class component called ParentComponent. Compose the two together by rendering the ChildComponent within the ParentComponent. Make sure to close the ChildComponent tag with a forward slash.
Note:ChildComponent is defined with an ES6 arrow function because this is a very common practice when using React.
However, know that this is just a function.
const ChildComponent = () => {
return (
<div>
<p>I am the child</p>
</div>
);
};
class ParentComponent extends React.Component {
constructor(props) {
super(props);
}
render() {
return (
<div>
<h1>I am the parent</h1>
{ /* Change code below this line */ }
{ /* Change code above this line */ }
</div>
);
}
};
⌛The React component should return a single div element.
⌛The component should return two nested elements.
⌛The component should return the ChildComponent as its second child.
Ans:
const ChildComponent = () => {
return (
<div>
<p>I am the child</p>
</div>
);
};
class ParentComponent extends React.Component {
constructor(props) {
super(props);
}
render() {
return (
<div>
<h1>I am the parent</h1>
{ /* Change code below this line */ }
{ /* Change code above this line */ }
</div>
);
}
};
Write a function rotateRight(array, num) that takes in an array and a number as arguments.
The function should return a new array where the elements of the array are rotated to the right number times.
The function should not mutate the original array and instead return a new array.
Define this function using function expression syntax.
HINT: you can use Array#slice to create a copy of an array
JavaScript gives us four methods to add or remove items from the beginning or end of arrays:
pop(): Remove an item from the end of an array
let cats = ['Bob', 'Willy', 'Mini'];
cats.pop(); // ['Bob', 'Willy']
The general idea across all testing frameworks is to allow developers to write code that would specify the behavior of a function or module or class.
Testing one function at a time is vulnerable to false negatives and false positives.
Why do we test?
To make sure everything works.
Increase flexibility & reduce fear of code.
Automated Tests are known as Specs, they:
Make collaboration easier.
Produce Documentation.
How We Test
Testing Framework : Runs the tests and presents them to a user.
Assertion Libraries : Backbone of written tests, the code that we use to write our tests.
Mocha : JS testing framework which is highly flexible; supports a variety of assertion libraries.
Domain Specific Language : Refers to a computer language specialized for a particular purpose
What do we Test?
The public interface:
Ask yourself, “What is the public interface of the module or class I’m writing?”
When in doubt, make sure that you at least have the most important and/or complex parts of that interface working as intended.
*The Testing Pyramid*
Unit Tests : The smallest unit of testing.
Used to test smallest pieces in isolation before putting everything together.
Tests ONE THING.
Integration Tests : Test the interactions between two pieces of your application.
End to End : Closest automated tests come to testing the actual user experience of your application.
Reading Tests
Most important thing about a test is that it is readable and understandable.
describe("avgValue()", function () {
it("should return the average of an array of numbers", function () {
assert.equal(avgValue([10, 20]), 15);
});
});
avgValue() => The function we will be testing.
it(“string”) => describes the desired output.
Test-Driven Development
TDD is a quick repetitive cycle that revolves around first determining what a piece of code should do and writing tests for that behavior before actually writing any code.
A simple example just to give an idea of what test code looks like… note that it reads more like spoken english than normal code…
I can’t imagine the kind of masochism it would take to enjoy the act of posting and daily maintenance on a job board…It’s part of the…
Job Boards and The Hunt
I can’t imagine the kind of masochism it would take to enjoy the act of posting and daily maintenance on a job board…It’s part of the process that you’ve already invested so much of yourself in, so you should take pride in it; do a good job the first time around and you’ll get where your going in the blink of an eye!
As a candidate, there are key next steps that you can and should after every interview to help you stand out.
Send a thank you email within 24 business hours
Do not miss this step! It takes less than five minutes and can make the difference between you and another candidate. It also keeps you fresh in your interviewers’ memories. For example:
Hi (name),
Thank you so much for taking the time to meet with me yesterday to discuss my candidacy for (role title). After learning more about (share one or two takeaways from the interview about the company/team’s priorities), I’m even more excited to bring my skills in (1–3 relevant skills) to the team.
I look forward to hearing from you about next steps, and if there is anything that I can clarify about my experience or qualifications for the (role title) position, please don’t hesitate to reach out.
Thank you for your consideration,
(your name)
Follow up
Don’t wait for the company to reach out to you! Be proactive in showing your interest by checking in to see where you stand in the process. If a company indicates a deadline by which you will hear back, and the deadline has passed, follow-up!
Check your email and phone regularly
*
*Don’t ghost on a company at any stage in the process; make sure you add their domain to your safe senders list and respond to any messages within 24 hours.
Be prepared
*
*You might be invited for another interview on short notice; review the description regularly so it doesn’t slip from your memory, and keep brushing up on skills you may need for an interview (chances are, this won’t be the only job you’ll need them for anyway!)
Here I will maintain a running list of applicable job boards and below I will go into detail about the niches they occupy and whatever I resource I have found to use them to your maximum advantage. !
Another Update:
● AngelList
● Stackoverflow
● Y Combinator Jobs (HackerNews, list new jobs at the beginning of the month)
I am intentionally not linking glassdoor because they have irritated me for the last time by insisting I provide a job review every time I want to access their content… (To the makers of glassdoor… HOW MANY TIMES A MONTH DO YOU THINK I CHANGE JOBS!!!!) I don’t have 15 minutes to make up a job experience every time I want to read a review.
Networking Opportunities:
SHAPR Like Tinder for networking. Students have met some great people and two are finalizing jobs
through people they met on this FREE APP
Dzone.com
Discord (Slack for gamers and developers/whiteboarding)
EMAIL NO. 1: SOMEONE YOU USED TO WORK CLOSELY WITH
Perhaps it’s your supervisor from your college internship. Or maybe it’s your favorite colleague from one of your previous jobs. Either way, nobody knows your skills and preferences better than the people you used to work side-by-side with–meaning they can be a huge help in your job search.
Hey [Name],
I hope you’re having a great week! I’ve been keeping up with you on LinkedIn, and it looks like things are going awesome with [job or professional interest].
I’m getting in touch to let you know that I’m currently searching for a new opportunity in [industry]. With my background in [field] and skills in [area], my ideal position involves [detailed description of ideal job] for an employer who [detailed description of ideal company].
Since we used to work so closely and I know you’re so well-connected, I’d love if you could let me know if you hear of any opportunities that you think I’d be a good fit for. I’ve attached my resume to this email, just in case that helps.
Of course, I’m always willing to return the favor if you ever need.
Thanks so much, [Name]! I have so many fond memories of our time together at [Company], and I hope things are even better for you since then.
Best, [Your Name]
EMAIL NO. 2: SOMEONE WHO WORKS IN YOUR DESIRED INDUSTRY
Sending a note to someone who is already employed in the field you’re eager to be a part of is always helpful, but especially when you’re making a career change. Chances are good that he or she is connected to other people in the industry–some of whom might even be hiring.
Hello [Name],
I hope you’re doing well!
I’m reaching out to let you know that I’ve decided to make a career change. Thus, I’m currently exploring different opportunities in [industry].
Since I know you’ve worked in the industry for quite a while, I thought you’d be the perfect person to get in touch with. If you become aware of any open roles that might be a good fit for someone with a background in [field], skills in [area], and a desire to learn, I’d love if you could give me a heads up. You can also find my resume attached to this email to get a better understanding of what I bring to the table.
I can’t tell you how much I appreciate any help as I work on making this switch.
Thanks so much, [Name]!
All the best, [Your Name]
Also here is a repo of compiled job search and interviewing resources:
First off I am going to introduce a few different categories for those of you who are completely overwhelmed by the prospect of even selecting a job board let alone establishing a competitive presence on one. Here’s a few catorizations I think are worth distinguishing for one and other.
1. Interpersonal Connections
Seek to leverage the connections you have with people you know and companies you want to work with. I know that that’s a violation of the premise of this article but without even feeling the need to provide quantitative proof; I can confidently assume that this is the most ROI efficient way to produce a desirable result. (Sorry introverts… 2020 may have been your year but this is our world. 😘)
If personal connections don’t come through, the next best thing is cold outreach (best in terms of results…. personally I hate cold calling strangers and I am an extrovert.)
Before or after submitting an application, identify 1–3 professionals to reach out to at the company to express interest in opportunities.
Send a message to express interest and request an informational interview with the individual via LinkedIn, email, Twitter, or other available communication methods.
If you hear back and the individual is willing to connect, confirm a day and time to conduct a preliminary interview.ORIf you have yet to hear back after 3 business days, follow-up.
Once you send off a message in step two, there are a variety of responses you may receive. Sometimes an individual will forward you along to someone who may be of better assistance, other times your message may be overlooked with no reply, and its possible (best case scenario) your request for a chat becomes an invitation to interview.
### ***2. LinkedIn***.
I am going to devote a lot of time to this one because it is the largest and most active of all the job board ecosystems… period… full stop regardless of your industry.
LinkedIn now has almost 740 million members with over 55 million registered companies. (for comparison 12.3 million people visited Indeed in October, up 19.6 percent. Monster.com attracted 12.1 million people, and CareerBuilder.comattractedd 11.3 million in that same time) and LinkedIn is the most-used social media platform amongst Fortune 500 companies as it provides far more networking capabilities than pure recruitment.
If you put your resume and skills on LinkedIn.com as a software Engineer, and state that you are open to new opportunities, you will be contacted by multiple recruiters, and if your skills are desirable possibly also directly by companies seeking to hire you. It’s a developer’s market; there’s not enough people out there, especially in America.
Here’s my profile… feel free to connect… the larger your network the greater your exposure is to someone who works at your potential dream job.
[ ] I have listed all professional roles included on my resume in this section and any that I had to cut from my resume for space
[ ] I have written 2–4 power statements for each experience listed (okay to copy and paste from resume)
[ ] My power statements for each experience are bulleted, not in paragraph form.
[ ] I did list responsibilities in bullet point format (I did not leave in paragraph format)
[ ] I did start each bullet point with an action verb and I did not use phrases such as: Assisted with...Worked on...Helped with... (Solely responsible for... ok)
[ ] I did describe past projects in past tense and current projects in present tense
[ ] I did not use pronouns such as: “I,” “we,” “they, “you,” “me,” “us”
[ ] Optional: Bootcamp student experience and projects can be listed under your experience section if you have no (or almost no) prior work experience.
[ ] If I listed my Bootcamp student experience, my title is [name of program] Student (example: Data Science Student)
[ ] I copied and pasted my Lambda projects in my student description and also included them in the Accomplishments section
Do’s:
Spend a good portion of your time learning and reading. Your jobs teach you so much about an organization and the business.
Follow business owners and senior managers, successful team leaders in large organizations, startup owners. You would be surprised how willing some otherwise busy executives are to rub elbows with veritable newcomers. They’re not just doing this out of the kindness of their hearts, just like you… they have an ulterior motive. They are hoping to build goodwill with the incoming workforce in a bid to make their company more attractive to high quality candidates. If they give you any of their time…treat it like an interview.
To leverage this information, (the trick is to constantly remind yourself to be on your game with speaking with them.) I do not care what your teacher’s past have said… mark my words…THERE IS MOST CERTAINLY SUCH A THING AS A STUPID QUESTION*…Anyone who tells you otherwise is either stupid themselves or just overcome with their own compassion (an admirable trait but ultimately a disservice to you the competitive job seeker).*
Engage in networking. I would recommend finding and connecting with current attendee of any software development bootcamp. They’re all (for the most part) programatically encouraged to connect network and engage in peer skill promotion (even if they have no idea of you skill level). If that weren’t enough reason, all of them come from a cohort of other individuals being instructed to do the same. Once you have a few in your network other’s will seek you out through Linkedin recommendations algorithm.
Note to prospective employers please just skip the next few sentences and don’t ask why…😅
Of the 214 people that vouched for me… I guestimate about only 80 actually know me in any respectable capacity, and of those, only probably 30 or so are familiar with my competency in the skills they endorsed. It all boils down to the strategies that bootcamps instill in their students. It’s the polar opposite of a zero sum game and they’re more than happy to exchange personal recommendations with you. They’re also far more driven to consistently engage with other members of the linkedin ecosystem because they need to a network to help compensate for their lack of a four year degree and the connections you make in that time.
Build your personal brand. Developing your brand will not only help you attract clients or recruits if you decide to start a business, but will also help you find great job opportunities. You can post anything you take pride in so long as it’s fairly professional. Definitely make use of the featured section to showcase your work.
### Don’t:
Don’t Use LinkedIn’s Default Headline
LinkedIn automatically populates your headline with your current job title and company name. I hope it goes without saying… but as a rule avoid signaling to prospective employers the depths of your laziness by using any stock responses LinkedIn provides you.
Don’t Go Ham On Keyword Placment
Placing keywords strategically into your LinkedIn profile is virtually the only way to ensure being flagged by search algorithms as a potential candidate.You could be forgiven for being tempted to heed the advice of your inner lizard brain, and just stuffing your profile with buzzwords but this will likely trigger a spam account checker and result in worse outcomes than the absence of said keywords.
Why it matters*¿*
Are We Really All Connected by Just Six Degrees of Separation?
Most of us are familiar with the concept of six degrees of separation — the idea is that anyone in the planet can be connected to anyone else in just six steps. So through just five other people, you’re effectively connected to the Queen of England, Jim Belushi or even yo mamma.
Back to the other Job Board Niches:
3. Traditional job boards. Dice.com, Monster.com, etc. They will not find you great jobs at technology companies; they may find you openings as a software engineer at other types of more traditional companies (for example, banks, retail chains, etc though.
4. Local-focused sites. The biggest is Craigslist, but there are others. Often great for contract work and opportunities you wouldn’t have otherwise come across.
5. Freelancer websites. oDesk.com, Elance.com, etc. Lower pay, but 100% contract work, and has a lot of flexible opportunities if you’re not looking for traditional full-time employment or remote work.
Learn CSS So That Your Site Doesn’t Look Like Garbage
CSS Selectors
Learn CSS So That Your Site Doesn’t Look Like Garbage
CSS Selectors
CSS Selector : Applies styles to a specific DOM element(s), there are various types:
Type Selectors : Matches by node name.
Class Selectors : Matches by class name.
ID Selectors : Matches by ID name.
Universal Selectors : Selects all HTML elements on a page.
Attribute Selectors : Matches elements based on the prescence or value of a given attribute. (i.e. a[title] will match all a elements with a title attribute)
Used for elements that directly follow one another and who both have the same parent.
h1 + h2 { font-style: italic; } <h1>Big header</h1> <h2>This one is styled because it is directly adjacent to the H1</h2> <h2>This one is NOT styled because there is no H1 right before it</h2>
Pseudo-Classes
Pseudo-Class : Specifies a special state of the seleted element(s) and does not refer to any elements or attributes contained in the DOM.
Some common pseudo-classes that are frequently used are:
active : ‘push down’, when ele are activated.
checked : applies to things like radio buttons or checkbox inputs.
disabled : any disabled element.
first-child : first element in a group of children/siblings.
focus : elements that have current focus.
hover : elements that have cursor hovering over it.
invalid : any form elements in an invalid state from client-side form validation.
last-child : last element in a group of children/siblings.
not(selector) : elements that do not match the provided selector.
required : form elements that are required.
valid : form elements in a valid state.
visited : anchor tags of whih the user has already been to the URL that the href points to.
Pseudo-Selectors
Used to create pseudo-elements as children of the elements to which the property applies.
::after
::before
<style>
p::before {
background-color: lightblue;
border-right: 4px solid violet;
content: ":-) ";
margin-right: 4px;
padding-left: 4px;
}
</style>
<p>This is the first paragraph</p>
<p>This is the second paragraph</p>
<p>This is the third paragraph</p>
Will add some blue smiley faces before the p tag elements.
CSS Rules
CSS Rule : Collection of single or compound selectors, a curly brace, zero or more properties
CSS Rule Specificity : Sometimes CSS rules will contain multiple elements and may have overlapping properties rules for those same elements - there is an algorithm in CSS that calculates which rule takes precedence.
The Four Number Calculation : listed in increasing order of importance.
Coming back to our example where all the CSS Rules have tied, the last step 4 wins out so our element will have a purple border.
CSS: Type, Properties, and Imports
Typography
font-family : change the font.
- Remember that not all computers have the same fonts on them.
- You can import web fonts via an api by using
- `@import url('https://fonts.googleapis.com/css2?family=Liu+Jian+Mao+Cao&display=swap');` and pasting it st the top of your CSS file.
- And then reference it in your font-family.
- `font-size` : Changes the size of your font.
- Keep in mind the two kind of units CSS uses:
- `Absolute` : `Pixels`, Points, Inches, Centimeters.
- `Relative` : Em, Rem.
- Em: Calulating the size relative to the previous div (bubbles down)
- Rem: Calulates relative to the parent element always.
- `font-style` : Used to set a font to italics.
- `font-weight` : Used to make a font bold.
- `text-align` : Used to align your text to the left, center, or right.
- `text-decoration` : Use to put lines above, through, or under text. Lines can be solid, dashed, or wavy!
- `text-transform` : Used to set text to all lowercase, uppercase, or capitalize all words.
Background-Images
You can use the background-image property to set a background image for an element.
CSS: Colors, Borders, and Shadows
Colors
You can set colors in CSS in three popular ways: by name, by hexadecimal RGB value, and by their decimal RGB value.
rgba() is used to make an rbg value more transparent, the a is used to specify the alpha channel.
Color : Property used to change the color of text.
Background-Color : Property to change the backgrounf color of an element.
Borders
Borders take three values: The width of the border, the style (i.e. solid, dotted, dashed), color of the border.
Shadows
There are two kinds of shadows in CSS: box shadows and text shadows.
Box refers to HTML elements.
Text refers to text.
Shadows take values such as, the horizontal & vertical offsets of the shadow, the blur radius of the shadow, the spread radius, and of course the colors.
The Box Model
Box Model : A concept that basically boils down that every DOM element has a box around it.
Imagine a gift, inside is the gift, wrapped in foam all around (padding), and the giftbox outside of it (border) and then a wrapping paper on the giftbox (margin).- For items that are using block as it’s display, the browser will follow these rules to layout the element: - The box fills 100% of the available container space. - Every new box takes on a new line/row. - Width and Height properties are respected. - Padding, Margin, and Border will push other elements away from the box. - Certain elements have block as their default display, such as: divs, headers, and paragraphs.- For items that are using inline as it’s display, the browser will follow these rules to layout the element: - Each box appears in a single line until it fills up the space. - Width and height are not respected. - Padding, Margin, and Border are applied but they do not push other elements away from the box. - Certain elements have inline as their default display, such as: span tags, anchors, and images.
Standard Box Model vs Border-Box- As per the standard Box Model, the width and height pertains to the content of the box and excludes any additional padding, borders, and margins.
This bothered many programmers so they created the border box to include the calculation of the entire box’s height and width.
Inline-Block- Inline-block uses the best features of both block and inline. - Elements still get laid out left to right. - Layout takes into account specified width and height.
Padding- Padding applies padding to every side of a box. It is shorthand for four padding properties in this order: padding-top, padding-right, padding-bottom, padding-left (clockwise!)
Border- Border applies a border on all sides of an element. It takes three values in this order: border-width, border-style, border-color. - All three properties can be broken down in the four sides clockwise: top, right, bottom, left.
Margin- Margin sets margins on every side of an element. It takes four values in this order: margin-top, margin-right, margin-bottom, margin-left. - You can use margin: 0 auto to center an element.
Positioning
The position property allows us to set the position of elements on a page and is an integral part of creatnig a Web page layout.
It accepts five values: static, relative, absolute, fixed, sticky.
Every property (minus static) is used with: top, right, bottom, and left to position an element on a page.
Static Positioning
The default position value of page elements.
Most likely will not use static that much.
Relative Positioning
Remains in it’s original position in the page flow.
It is positioned RELATIVE to the it’s ORIGINAL PLACE on the page flow.
Creates a stacking context : overlapping elements whose order can be set by the z-index property.
Absolute elements are removed from the normal page flow and other elements around it act like it’s not there. (how we can easily achieve some layering)
Here are some examples to illustration absolute positioning:
- Note that the container ele has a relative positioning — this is so that any changes made to the absolute positioned children will be positioned from it’s top-left corner.
- Note that because we removed the pink from the normal page flow, the container has now shifted the blue box to where the pink box should have been — which is why it is now layered beneath the pink.
- As you can see here, since we have also taken the blue box out of the normal page flow by declaring it as absoutely positioned it now overlaps over the pink box.
- If we removed the container’s relative position. Our absolute unit would look for the nearest parent which would be the document itself.
Fixed Positioning
Another positioning that removes it’s element from the page flow, and automatically positions it’s parent as the HTML doc itself.
Fixed also uses top, right, bottom, and left.
Useful for things like nav bars or other features we want to keep visible as the user scrolls.
Sticky Positioning
Remains in it’s original position in the page flow, and it is positioned relative to it’s closest block-level ancestor and any scrolling ancestors.
Behaves like a relatively positioned element until the point at which you would normally scroll past it’s viewport — then it sticks!
It is positioned with top, right, bottom, and left.
A good example are headers in a scrollable list.
Flexible Box Model
Flexbox is a CSS module that provides a convenient way for us to display items inside a flexible container so that the layout is responsive.
Float was used back in the day to display position of elements in a container.
A very inconvenient aspect of float is the need to clear the float.
To ‘clear’ a float we need to set up a ghost div to properly align — this is already sounds so inefficient.
Using Flexbox
Flexbox automatically resizes a container element to fit the viewport size without needing to use breakpoints.
- Flexbox layout applies styles to the parent element, and it’s children.
.container {
display: flex; /*sets display to use flex*/
flex-wrap: wrap; /*bc flex tries to fit everything into one line, use wrap to have the elements wrap to the next line*/
flex-direction: row; /*lets us create either rows or columns*/
}
flex-flow can be used to combine wrap and direction.
justify-content used to define the alignment of flex items along the main axis.
align-items used to define the alignment on the Y-axis.
align-content redistributes extra space on the cross axis.
By default, flex items will appear in the order they are added to the DOM, but we can use the order property to change that.
Some other properties we can use on flex items are:
flex-grow : dictates amount of avail. space the item should take up.
flex-shrink : defines the ability for a flex item to shrink.
flex-basis : Default size of an element before the remaining space is distributed.
flex : shorthand for grow, shrink and basis.
align-self : Overrides default alignment in the container.
Grid Layout
CSS Grid is a 2d layout system that let’s use create a grid with columns and rows purely using Vanilla CSS. (flex is one dimensional)
Bootstrap vs CSS Grid
Bootstrap was a front-end library commonly used to create grid layouts but now CSS grid provides greater flexibility and control.
Grid applies style to a parent container and it’s child elements.
Any grid items that aren’t explicity placed are automatically placed or re-flowed
Spanning Columns & Rows
We can use the following properties to take up a specified num of cols and rows.
grid-column-start
grid-column-end
grid-row-start
grid-row-end
All four properties can take any of the following values: the line number, span #, span name, auto.
.item-1 {
grid-row-start: row2-start; /* Item starts at row line named "row2-start" */
grid-row-end: 5; /* Item ends at row line 5 */
grid-column-start: 1; /* Item starts at column line 1 */
grid-column-end: three; /* Item ends at column line named "three" */
}.item-2 {
grid-row-start: 1; /* Item starts at row line 1 */
grid-row-end: span 2; /* Item spans two rows and ends at row line 3 */
grid-column-start: 3; /* Item starts at column line 3 */
grid-column-end: span col5-start; /* Item spans and ends at line named "col5-start" */
}
Grid Areas
We use the grid areas in conjunction with grid-container property to define sections of the layout.
We can then assign named sections to individual element’s css rules.
Justify & Align Self
Justify items and Align Items can be used to align all grid items at once.
Justify Self is used to align self on the row.
It can take four values: start, end, center, stretch.
Align Self is used to align self on the column.
It can take four values: start, end, center, stretch.
The Pseudo Class Selector hover activates when the cursor goes over the selected element.
Content Overflow- You can apply an overflow content property to an element if it’s inner contents are spilling over.
There are three members in the overflow family: — overflow-x : Apply horizontally. - overflow-y : Apply vertically. - overflow : Apply both directions.
Transitions
Transitions provide a way to control animation speed when changing CSS properties.
Implicit Transitions : Animations that involve transitioning between two states.
Defining Transitions
transition-property : specifies the name of the CSS property to apply the transition.
transition-duration : during of the transition.
transition-delay : time before the transition should start.
I am not saying they’re in any way special compared with other bash scripts… but when I consider that you can never recover time spent… the…
Life Saving Bash Scripts Part 2
I am not saying they’re in any way special compared with other bash scripts… but when I consider that you can never recover time spent… the value of these commands in my life quickly becomes incalculable!
Below the following 20 commands I will include the gist files so you can download these commands all at once as well as see them syntax highlighted but I decided to include them as plain code blocks for the ease with which they can be copied and pasted as well as detected by the web crawlers of various search engines (it could be the case that it has no affect on seo… but that’s a chance I don’t have to take).
This recursively searches for files containing foo. The second -exec is only run if the first exec exits successfully, i.e. if grep matches. Dryrun and remove the echo if the output seems correct.
Web storage objects localStorage and sessionStorage allow to save key/value pairs in the browser.
LocalStorage VS SessionStorage
Web storage objects localStorage and sessionStorage allow to save key/value pairs in the browser.
What’s interesting about them is that the data survives a page refresh (for `sessionStorage`) and even a full browser restart (for `localStorage`). We'll see that very soon.
We already have cookies. Why additional objects?
Unlike cookies, web storage objects are not sent to server with each request. Because of that, we can store much more. Most browsers allow at least 2 megabytes of data (or more) and have settings to configure that.
Also unlike cookies, the server can’t manipulate storage objects via HTTP headers. Everything’s done in JavaScript.
The storage is bound to the origin (domain/protocol/port triplet). That is, different protocols or subdomains infer different storage objects, they can’t access data from each other.
Both storage objects provide same methods and properties:
setItem(key, value) -- store key/value pair.
getItem(key) -- get the value by key.
removeItem(key) -- remove the key with its value.
clear() -- delete everything.
key(index) -- get the key on a given position.
length -- the number of stored items.
As you can see, it’s like a Map collection (setItem/getItem/removeItem), but also allows access by index with key(index).
Let’s see how it works.
localStorage demo
The main features of localStorage are:
Shared between all tabs and windows from the same origin.
The data does not expire. It remains after the browser restart and even OS reboot.
For instance, if you run this code…
localStorage.setItem('test', 1);
…And close/open the browser or just open the same page in a different window, then you can get it like this:
alert( localStorage.getItem('test') ); // 1
We only have to be on the same origin (domain/port/protocol), the url path can be different.
The localStorage is shared between all windows with the same origin, so if we set the data in one window, the change becomes visible in another one.
Object-like access
We can also use a plain object way of getting/setting keys, like this:
// set key
localStorage.test = 2;
// get key
alert( localStorage.test ); // 2
// remove key
delete localStorage.test;
That’s allowed for historical reasons, and mostly works, but generally not recommended, because:
If the key is user-generated, it can be anything, like length or toString, or another built-in method of localStorage. In that case getItem/setItem work fine, while object-like access fails:
sessionStorage.user = JSON.stringify({name: "John"});
// sometime later
let user = JSON.parse( sessionStorage.user );
alert( user.name ); // John
Also it is possible to stringify the whole storage object, e.g. for debugging purposes:
// added formatting options to JSON.stringify to make the object look nicer
alert( JSON.stringify(localStorage, null, 2) );
sessionStorage
The sessionStorage object is used much less often than localStorage.
Properties and methods are the same, but it’s much more limited:
The sessionStorage exists only within the current browser tab.
Another tab with the same page will have a different storage.
But it is shared between iframes in the same tab (assuming they come from the same origin).
The data survives page refresh, but not closing/opening the tab.
Let’s see that in action.
Run this code…
sessionStorage.setItem('test', 1);
…Then refresh the page. Now you can still get the data:
alert( sessionStorage.getItem('test') ); // after refresh: 1
…But if you open the same page in another tab, and try again there, the code above returns null, meaning "nothing found".
That’s exactly because sessionStorage is bound not only to the origin, but also to the browser tab. For that reason, sessionStorage is used sparingly.
Storage event
When the data gets updated in localStorage or sessionStorage, storage event triggers, with properties:
key – the key that was changed (null if .clear() is called).
oldValue – the old value (null if the key is newly added).
newValue – the new value (null if the key is removed).
url – the url of the document where the update happened.
storageArea – either localStorage or sessionStorage object where the update happened.
The important thing is: the event triggers on all window objects where the storage is accessible, except the one that caused it.
Let’s elaborate.
Imagine, you have two windows with the same site in each. So localStorage is shared between them.
You might want to open this page in two browser windows to test the code below.
If both windows are listening for window.onstorage, then each one will react on updates that happened in the other one.
// triggers on updates made to the same storage from other documents
window.onstorage = event => { // same as window.addEventListener('storage', event => {
if (event.key != 'now') return;
alert(event.key + ':' + event.newValue + " at " + event.url);
};
localStorage.setItem('now', Date.now());
Please note that the event also contains: event.url -- the url of the document where the data was updated.
Also, event.storageArea contains the storage object -- the event is the same for both sessionStorage and localStorage, so event.storageArea references the one that was modified. We may even want to set something back in it, to "respond" to a change.
That allows different windows from the same origin to exchange messages.
Modern browsers also support Broadcast channel API, the special API for same-origin inter-window communication, it’s more full featured, but less supported. There are libraries that polyfill that API, based on localStorage, that make it available everywhere.
Summary
Web storage objects localStorage and sessionStorage allow to store key/value in the browser.
Both key and value must be strings.
The limit is 5mb+, depends on the browser.
They do not expire.
The data is bound to the origin (domain/port/protocol).
localStoragesessionStorage
Shared between all tabs and windows with the same originVisible within a browser tab, including iframes from the same origin
Survives browser restartSurvives page refresh (but not tab close)
API:
setItem(key, value) -- store key/value pair.
getItem(key) -- get the value by key.
removeItem(key) -- remove the key with its value.
clear() -- delete everything.
key(index) -- get the key number index.
length -- the number of stored items.
Use Object.keys to get all keys.
We access keys as object properties, in that case storage event isn't triggered.
Storage event:
Triggers on setItem, removeItem, clear calls.
Contains all the data about the operation (key/oldValue/newValue), the document url and the storage object storageArea.
Triggers on all window objects that have access to the storage except the one that generated it (within a tab for sessionStorage, globally for localStorage).
Schemas allow us to easily visualize database tables and their relationships to one another.
What is Relational Database Design?
RDD : Relational Database Design differs from other Databases because data is organized into tables and all types of data access are carried out via controlled transactions.
Define the purpose & entitites of the Relational DB.
Why is the database being created?
What problem is it solving?
What is the data used for?
Identify the Primary keys.
Identify the PK of each table.
Establish Table Relationships.
There are theee types of relational database table relationships:
One-To-One
One record in a table is associated with only one record in another table.
The least common type of table relationship.
One-To-Many
Each record in a table is associated with multiple records in another table.
Many-To-Many
Multiple records in one table are associated with multiple records in another table.
Usually we would create a third table for this relationship called a join table
Apply Normalization Rules.
Normalization : Process of optimizing the database structure so that redundancy and confusion are eliminated.
Rules are called ‘normal forms’
First normal form.
Eliminate repeating groups in tables.
Create sep. table for each set of related data.
ID each set of related data with a primary key.
Second normal form.
Create sep. tables for sets of values that apply to multiple records.
Related these tables with a foreign key.
Third normal form.
Eliminate fields that do not depend on the table’s key.
Boyce-Codd normal form.
Fifth normal form.
The first three are widely used in practice and the fourth/fifth less so.
Transactions
Using Transactions allow us to make changes to a SQL database in a consistent and durable way, and it is considered best practice to use them regularly.
Transaction : Single unit of work, which can contain multiple operations, performed on a database.
Bundles multiple steps into a single, all-or-nothing operation.
Implicit vs. explicit transactions
Technically every SQL statement is a transaction.
INSERT INTO hobbits(name,purpose)
VALUES('Frodo','Destroy the One Ring of power.');
This statement would be a implicit transaction.
On the flip side explicit transactions will allow us to create save points and roll back to whatever point in time we choose.
PostgreSQL transactional commands
BEGIN : Initiates a transaction block. All Statements after a BEGIN command will be executed in a single transaction until COMMIT or ROLLBACK is called.
BEGIN;
INSERT INTO hobbits(name,purpose)
VALUES('Frodo','Destroy the One Ring of power.');
COMMIT : Commits a current transaction, all changes made by this transaction become visible to others and are guaranteed to be durable if a crash occurs.
BEGIN;
INSERT INTO hobbits(name,purpose)
VALUES('Frodo','Destroy the One Ring of power.');
COMMIT;
ROLLBACK : Rolls back current transaction and removes all updates made by the transaction.
BEGIN;
INSERT INTO hobbits(name,purpose)
VALUES('Frodo','Destroy the One Ring of power.');
ROLLBACK;
SAVEPOINT : Establishes a new save point within the current transaction.
BEGIN;
DELETE FROM fellowship
WHERE age > 100;
SAVEPOINT first_savepoint;
DELETE FROM fellowship
WHERE age > 80;
DELETE FROM fellowship
WHERE age >= 40;
ROLLBACK TO first_savepoint;
COMMIT;
SET TRANSACTION : Sets the characteristics of the current transaction.
BEGIN;
SET TRANSACTION READ ONLY;
...
COMMIT;
When to use transactions and why
Good to use when making any updates, insertions, or deletions to a database.
Help us deal with crashes, failures, data consistency, and error handling.
Atomicity is another feature that is a benefit of transactions.
Transaction properties: ACID
A SQL transaction has four properties known collectively as ACID (Atomic, Consistent, Isolated, and Durable)
Atomicity : All changes to data are performed as if they are a single operation.
You can also refer to the A as ‘Abortability’
I.E. if an app transfers funds from one account to another, the atomic nature of transactions will ensure that if a debt is successfully made, the credit will be properly transferred.
Consistency : Data is in a consistent start when a transaction starts and ends.
I.E. if a transfer is scheduled, this prop ensures total value of funds in both accounts is the same at the start and end of a transaction.
Isolation : Intermediate state of a transaction is invisible to othe rtransactioned, they appear to be serialized.
I.E. continuing our money transfer example, when a transfer occurs this prop ensures that transactions can see funds in one account or the other BUT NOT both NOR neither.
Durable : After a transaction successfully completes, changes to data persists and are not undone even in system failure.
I.E. this prop ensures our transaction will success and cannot be reversed in the event of a failure.
Banking transaction example
BEGIN;
UPDATE accounts SET balance = balance - 100.00
WHERE name = 'Alice';
UPDATE branches SET balance = balance - 100.00
WHERE name = (SELECT branch_name FROM accounts WHERE name = 'Alice');
UPDATE accounts SET balance = balance + 100.00
WHERE name = 'Bob';
UPDATE branches SET balance = balance + 100.00
WHERE name = (SELECT branch_name FROM accounts WHERE name = 'Bob');
COMMIT;
Subqueries and JOINs
Joins vs. Subqueries What is a JOIN?
JOIN allows us to retrieve rows from multiple tables.
SELECT * FROM puppies
INNER JOIN breeds ON (puppies.breed_id = breeds.id);
There are a few different types of JOIN operations:
Inner Join : Returns results containing rows in the left table that match rows in the right table.
Left Join : Returns a set of results containing all rows from the left table with the matching rows from the right table. If there is no match, the right side will have null values.
Right Join : Returns a set of results containing all rows from the right table with the matching rows from the left table. If there is no match, the left side will have null values.
Full Outer Join : Returns a set of results containing all rows from both the left and right tables, with matching rows from both sides where avail. If there is no match the missing side contains null values.
Self-Join : Query in which a table is joined to itslef, useful for comparing values in a column of rows within the same table.
What is a subquery?
A SELECT statement nested inside another SELECT statement.
postgres=# SELECT * FROM puppies;
id | name | age_yrs | breed_id | weight_lbs | microchipped
----+----------+---------+----------+------------+--------------
1 | Cooper | 1.0 | 8 | 18 | t
2 | Indie | 0.5 | 9 | 13 | t
3 | Kota | 0.7 | 1 | 26 | f
4 | Zoe | 0.8 | 6 | 32 | t
5 | Charley | 1.5 | 2 | 25 | f
6 | Ladybird | 0.6 | 7 | 20 | t
7 | Callie | 0.9 | 4 | 16 | f
8 | Jaxson | 0.4 | 3 | 19 | t
9 | Leinni | 1.0 | 8 | 25 | t
10 | Max | 1.6 | 5 | 65 | f
(10 rows)
SELECT
puppies.name,
age_yrs,
breeds.name
FROM
puppies
INNER JOIN
breeds ON (breeds.id = puppies.breed_id)
WHERE
age_yrs > (
SELECT
AVG (age_yrs)
FROM
puppies
);
Multiple-row subquery
SELECT *
FROM friends
WHERE
puppy_id IN (
SELECT puppy_id
FROM puppies
WHERE
age_yrs < 0.6
);
We can also use a JOIN operation instead of the WHERE clause like in the above example.
SELECT *
FROM friends
INNER JOIN puppies ON (puppies.puppy_id = friends.puppy_id)
WHERE
puppies.age_yrs < 0.6;
Should I use a JOIN or a subquery?
Joins are better when you want to combine rows from one or more tables based on a match condition.
Subqueries work great when you’re only returning a single value.
When returning multiple rows, you could go with either subQ’s or joins.
Indexes and Performance Analysis
PostgreSQL Index : Works similarly like an index in the back of a book, they provide special lookup tables to let us make faster database queries.
The Syntax for creating index is as follows:
CREATE INDEX index_name ON table_name (column_name);
CREATE INDEX addresses_phone_index ON addresses (phone_number);
DROP INDEX addresses_phone_index;
Types of indexes
There are several types of indexes use in Postgres: B-tree, Hash, GiST, and GIN.
Single-Column Indexes Uses only one table column.
CREATE INDEX addresses_phone_index ON addresses (phone_number);
Multiple-Column Indexes Uses more than one table column.
CREATE INDEX idx_addresses_city_post_code ON table_name (city_id, postal_code);
Partial Indexes Uses subset of a table defined by a conditional expression.
CREATE INDEX addresses_phone_index ON addresses (phone_number) WHERE (city_id = 2);
When to use an index
Overall DB indexes are known to enhance performance when performing queries, however there are certain situations where it is not recommended:
When working with small tables.
When table has large batch updates or insert operations.
When working with columns that have many NULL values.
When working with columns that are frequently manipulated.
Using EXPLAIN and ANALYZE keywords can give us performance data of our queries.
EXPLAIN ANALYZE SELECT *
FROM tenk1 t1, tenk2 t2
WHERE t1.unique1 < 100 AND t1.unique2 = t2.unique2;
QUERY PLAN
----------------------------------------------------------------------------------------------------------------------------------
Nested Loop (cost=2.37..553.11 rows=106 width=488) (actual time=1.392..12.700 rows=100 loops=1)
-> Bitmap Heap Scan on tenk1 t1 (cost=2.37..232.35 rows=106 width=244) (actual time=0.878..2.367 rows=100 loops=1)
Recheck Cond: (unique1 < 100)
-> Bitmap Index Scan on tenk1_unique1 (cost=0.00..2.37 rows=106 width=0) (actual time=0.546..0.546 rows=100 loops=1)
Index Cond: (unique1 < 100)
-> Index Scan using tenk2_unique2 on tenk2 t2 (cost=0.00..3.01 rows=1 width=244) (actual time=0.067..0.078 rows=1 loops=100)
Index Cond: (unique2 = t1.unique2)
Total runtime: 14.452 ms
Accessing Data from Node.js
Node-Postgres And Prepared Statements
The node-postgres library is the library used for node apps to connect to postgres applications.
Connecting
Use a POOL of client objects to connect to the database.
const { Pool } = require("pg");
const pool = new Pool({
user: "application_user",
password: "iy7qTEcZ",
});
const results = await pool.query(`
SELECT id, name, age_yrs
FROM puppies;
`);
console.log(results);
Prepared Statement
Prepared Statements are SQL statements that parameters in them that you can substitute values.
in inside an array.
await pool.query(`
INSERT INTO puppies (name, age_yrs, breed, weight_lbs, microchipped)
VALUES ($1, $2, $3, $4, $5);
`, [name, age, breedName, weight, isMicrochipped]);
const { Pool } = require("pg");
const allPuppiesSql = `
SELECT id, name, age_yrs, breed, weight_lbs, microchipped
FROM puppies;
`;
const pool = new Pool({
database: "«database name»",
});
async function selectAllPuppies() {
const results = await pool.query(allPuppiesSql);
console.log(results.rows);
pool.end();
}
const id = Number.parseInt(process.argv[2]);
selectOnePuppy(id);
There are many differences between Node.js and browser environments, but many of them are small and inconsequential in practice. For example, in our Asynchronous lesson, we noted how Node’s setTimeout has a slightly different return value from a browser’s setTimeout. Let’s go over a few notable differences between the two environments.
Global vs Window
In the Node.js runtime, the global object is the object where global variables are stored. In browsers, the window object is where global variables are stored. The window also includes properties and methods that deal with drawing things on the screen like images, links, and buttons. Node doesn’t need to draw anything, and so it does not come with such properties. This means that you can’t reference window in Node.
Most browsers allow you to reference global but it is really the same object as window.
Document
Browsers have access to a document object that contains the HTML of a page that will be rendered to the browser window. There is no document in Node.
Location
Browsers have access to a location that contains information about the web address being visited in the browser. There is no location in Node, since it is not on the web.
Require and module.exports
Node has a predefined require function that we can use to import installed modules like readline. We can also import and export across our own files using require and module.exports. For example, say we had two different files, animals.js and cat.js, that existed in the same directory:
If we execute animals.js in Node, the program would print ‘Sennacy is a great pet!’.
Browsers don’t have a notion of a file system so we cannot use require or module.exports in the same way.
The fs module
Node comes with an fs module that contains methods that allow us to interact with our computer’s File System through JavaScript. No additional installations are required; to access this module we can simply require it. We recommend that you code along with this reading. Let's begin with a change-some-files.js script that imports the module:
// change-some-files.js
const fs = require("fs");
Similar to what we saw in the readline lesson, require will return to us a object with many properties that will enable us to do file I/O.
Did you know?I/O is short for input/output. It’s usage is widespread and all the hip tech companies are using it, like.io.
The fs module contains tons of functionality! Chances are that if there is some operation you need to perform regarding files, the fs module supports it. The module also offers both synchronous and asynchronous implementations of these methods. We prefer to not block the thread and so we'll opt for the asynchronous flavors of these methods.
Creating a new file
To create a file, we can use the writeFile method. According to the documentation, there are a few ways to use it. The most straight forward way is:
The code acreate-a-nnew-file.js (github.com)bove will create a new file called foo.txt in the same directory as our change-some-file.js script. It will write the string 'Hello world!' into that newly created file. The third argument specifies the encoding of the characters. There are different ways to encode characters; UTF-8 is the most common and you'll use this in most scenarios. The fourth argument to writeFile is a callback that will be invoked when the write operation is complete. The docs indicate that if there is an error during the operation (such as an invalid encoding argument), an error object will be passed into the callback. This type of error handling is quite common for asynchronous functions. Like we are used to, since writeFile is asynchronous, we need to utilize callback chaining if we want to guarantee that commands occur after the write is complete or fails.
Beware! If the file name specified towriteFilealready exists, it will completely overwrite the contents of that file.
We won’t be using the foo.txt file in the rest of this reading.
Reading existing files
To explore how to read a file, we’ll use VSCode to manually create a poetry.txt file within the same directory as our change-some-file.js script. Be sure to create this if you are following along.
Our poetry.txt file will contain the following lines:
My code fails
I do not know why
My code works
I do not know why
We can use the readFile method to read the contents of this file. The method accepts very similar arguments to writeFile, except that the callback may be passed an error object and string containing the file contents. In the snippet below, we have replaced our previous writeFile code with readFile:
Running the code above would print the following in the terminal:
THE CONTENTS ARE:
My code fails
I do not know why
My code works
I do not know why
Success! From here, you can do anything you please with the data read from the file. For example, since data is a string, we could split the string on the newline character \n to obtain an array of the file's lines:
THE CONTENTS ARE:
[ 'My code fails',
'I do not know why',
'My code works',
'I do not know why' ]
The third line is My code works
File I/O
Using the samepoetry.txtfile from before:
My code fails
I do not know why
My code works
I do not know why
Let’s replace occurrences of the phrase ‘do not’ with the word ‘should’.
We can read the contents of the file as a string, manipulate this string, then write this new string back into the file.
We’ll need to utilize callback chaining in order for this to work since our file I/O is asynchronous:
Executing the script above will edit the poetry.txt file to contain:
My code fails
I should know why
My code works
I should know why
Refactor:
If you found this guide helpful feel free to checkout my github/gists where I host similar content:
In JavaScript, String values are immutable, which means that they cannot be altered once created.
For example, the following code:
var myStr = "Bob";
myStr[0] = "J";
cannot change the value of myStr to Job, because the contents of myStr cannot be altered. Note that this does not mean that myStr cannot be changed, just that the individual characters of a string literal cannot be changed. The only way to change myStr would be to assign it with a new string, like this:
var myStr = "Bob";
myStr = "Job";
Objects are passed by reference, are mutable, and can be modified by our functions:
function rotateLeft(arr, num) {
for (let i = 0; i < num; i++) {
let el = arr.pop();
arr.unshift(el);
}
}
let myArr = [1, 2, 3, 4, 5, ];
rotateLeft(myArr, 2);
console.log(myArr);
Strings are passed by value, are immutable, and a new array is constructed and returned, because it cannot be changed in place.
function rotateString(str, num) {
return str.slice(num) + str.slice(0, num);
}
let str = "foobar";
let ret = rotateString(str, 3);
console.log(str);
console.log(ret);
Dereferencing
Arrays
To dereference an array, use let [var1, var2] syntax.
let arr = ['one', 'two', 'three'];
let [first] = arr;
console.log(first);
Objects
To dereference attributes from an object, use let {} syntax.
Product icons themes allow theme authors to customize the icons used in VS Code’s built-in views: all icons except file icons (covered by file icon themes) and icons contributed by extensions. This extension uses Fluent Icons.
A VS Code theme for the night owls out there. Works well in the daytime, too, but this theme is fine-tuned for those of us who like to code late into the night. Color choices have taken into consideration what is accessible to people with color blindness and in low-light circumstances. Decisions were also based on meaningful contrast for reading comprehension and for optimal razzle dazzle. ✨
1. Remove spaces from file and folder names and then remove numbers from files and folder names….
Description: need to : sudo apt install rename
Notes: Issue when renaming file without numbers collides with existing file name…
code:
find . -name "* *" -type d | rename 's/ /_/g'
find . -name "* *" -type f | rename 's/ /_/g'
```sh
find $dir -type f | sed 's|\(.*/\)[^A-Z]*\([A-Z].*\)|mv \"&\" \"\1\2\"|' | sh
find $dir -type d | sed 's|\(.*/\)[^A-Z]*\([A-Z].*\)|mv \"&\" \"\1\2\"|' | sh
for i in *.html; do mv "$i" "${i%-*}.html"; done
for i in *.*; do mv "$i" "${i%-*}.${i##*.}"; done
---
### Description: combine the contents of every file in the contaning directory.
>Notes: this includes the contents of the file it's self...
###### code:
```js
//APPEND-DIR.js
const fs = require('fs');
let cat = require('child_process')
.execSync('cat *')
.toString('UTF-8');
fs.writeFile('output.md', cat, err => {
if (err) throw err;
});
Description: recursively unzips folders and then deletes the zip file by the same name.
Notes:
code:
find . -name "*.zip" | while read filename; do unzip -o -d "`dirname "$filename"`" "$filename"; done;
find . -name "*.zip" -type f -print -delete
7. git pull keeping local changes:
Description:
Notes:
code:
git stash
git pull
git stash pop
8. Prettier Code Formatter:
Description:
Notes:
code:
sudo npm i prettier -g
prettier --write .
9. Pandoc
Description:
Notes:
code:
find ./ -iname "*.md" -type f -exec sh -c 'pandoc --standalone "${0}" -o "${0%.md}.html"' {} \;
find ./ -iname "*.html" -type f -exec sh -c 'pandoc --wrap=none --from html --to markdown_strict "${0}" -o "${0%.html}.md"' {} \;
find ./ -iname "*.docx" -type f -exec sh -c 'pandoc "${0}" -o "${0%.docx}.md"' {} \;
10. Gitpod Installs
Description:
Notes:
code:
sudo apt install tree
sudo apt install pandoc -y
sudo apt install rename -y
sudo apt install black -y
sudo apt install wget -y
npm i lebab -g
npm i prettier -g
npm i npm-recursive-install -g
black .
prettier --write .
npm-recursive-install
11. Repo Utils Package:
Description: my standard repo utis package
Notes:
code:
npm i @bgoonz11/repoutils
12. Unix Tree Package Usage:
Description:
Notes:
code:
tree -d -I 'node_modules'
tree -I 'node_modules'
tree -f -I 'node_modules' >TREE.md
tree -f -L 2 >README.md
tree -f -I 'node_modules' >listing-path.md
tree -f -I 'node_modules' -d >TREE.md
tree -f >README.md
#!/bin/bash
for file in *.md.md
do
mv "${file}" "${file%.md}"
done
#!/bin/bash
for file in *.html.html
do
mv "${file}" "${file%.html}"
done
#!/bin/bash
for file in *.html.png
do
mv "${file}" "${file%.png}"
done
for file in *.jpg.jpg
do
mv "${file}" "${file%.png}"
done
15. Truncate folder names down to 12 characters:
Description:
Notes:
code:
for d in ./*; do mv $d ${d:0:12}; done
16.Appendir.js
Description: combine the contents of every file in the containing directory.
Notes: this includes the contents of the file it’s self…
sudo sed -i '/githubusercontent/d' ./*sandbox.md
sudo sed -i '/githubusercontent/d' ./*scrap2.md
sudo sed -i '/github\.com/d' ./*out.md
sudo sed -i '/author/d' ./*
20. Remove duplicate lines from a text file
Description:
Notes: //…syntax of uniq…// $uniq [OPTION] [INPUT[OUTPUT]] The syntax of this is quite easy to understand. Here, INPUT refers to the input file in which repeated lines need to be filtered out and if INPUT isn’t specified then uniq reads from the standard input. OUTPUT refers to the output file in which you can store the filtered output generated by uniq command and as in case of INPUT if OUTPUT isn’t specified then uniq writes to the standard output.
Now, let’s understand the use of this with the help of an example. Suppose you have a text file named kt.txt which contains repeated lines that needs to be omitted. This can simply be done with uniq.
Description: Creates an index.html file that contains all the files in the working directory or any of it’s sub folders as iframes instead of anchor tags.
26. Filter Corrupted Git Repo For Troublesome File:
Description:
Notes:
code:
git filter-branch --index-filter 'git rm -r --cached --ignore-unmatch assets/_index.html' HEAD
27. OVERWRITE LOCAL CHANGES:
Description:
Important: If you have any local changes, they will be lost. With or without — hard option, any local commits that haven’t been pushed will be lost.[*] If you have any files that are not tracked by Git (e.g. uploaded user content), these files will not be affected.
Notes: First, run a fetch to update all origin/ refs to latest:
code:
git fetch --all
# Backup your current branch:
git branch backup-master
# Then, you have two options:
git reset --hard origin/master
# OR If you are on some other branch:
git reset --hard origin/<branch_name>
# Explanation:
# git fetch downloads the latest from remote without trying to merge or rebase anything.
# Then the git reset resets the master branch to what you just fetched. The --hard option changes all the files in your working tree to match the files in origin/master
git fetch --all
git reset --hard origin/master
28. Remove Submodules:
Description: To remove a submodule you need to:
Notes:
Delete the relevant section from the .gitmodules file. Stage the .gitmodules changes git add .gitmodules Delete the relevant section from .git/config. Run git rm — cached path_to_submodule (no trailing slash). Run rm -rf .git/modules/path_to_submodule (no trailing slash). Commit git commit -m “Removed submodule “ Delete the now untracked submodule files rm -rf path_to_submodule
npm i mediumexporter -g
mediumexporter https://medium.com/codex/fundamental-data-structures-in-javascript-8f9f709c15b4 >ds.md
36. Delete files in violation of a given size range (100MB for git)
Description:
Notes:
code:
find . -size +75M -a -print -a -exec rm -f {} \;
find . -size +98M -a -print -a -exec rm -f {} \;
37. download all links of given file type
Description:
Notes:
code:
wget -r -A.pdf https://overapi.com/git
38. Kill all node processes
Description:
Notes:
code:
killall -s KILL node
39. Remove string from file names recursively
Description: In the example below I am using this command to remove the string “-master” from all file names in the working directory and all of it’s sub directories.
code:
find <mydir> -type f -exec sed -i 's/<string1>/<string2>/g' {} +
find . -type f -exec rename 's/-master//g' {} +
Notes: The same could be done for folder names by changing the -type f flag (for file) to a -type d flag (for directory)
find <mydir> -type d -exec sed -i 's/<string1>/<string2>/g' {} +
find . -type d -exec rename 's/-master//g' {} +
40. Remove spaces from file and folder names recursively
Description: replaces spaces in file and folder names with an _ underscore
Notes: need to runsudo apt install renameto use this command
Objects store unordered key-value pairs. With Objects we can not rely on indices to access values.Meaning - we'll have to iterate through…
Object Methods
Objects store unorderedkey-value pairs. With Objects we can not rely on indices to access values.Meaning - we'll have to iterate through objects in new ways to access the keys and values within.
Objects store unordered key-value pairs. With Objects we can not rely on indices to access values.
Meaning - we'll have to iterate through objects in new ways to access the keys
and values within.
This article will cover:
Iterate through Object keys and values using a for...in loop
Use the Object.keys and the Object.values methods to iterate through an Object.
For In Loop
We can use special syntax to iterate through each key of an object (in
arbitrary order). This is super useful for looping through both the keys and
values of an object.
The syntax looks like this:
// The current key is assigned to *variable* on each iteration.
for (let variable in object) {
statement;
}
ex.)
let obj = { name: "Rose", cats: 2 };
// The key we are accessing is assigned to the `currentKey`
// *variable* on each iteration.
for (let currentKey in obj) {
console.log(currentKey);
}
// prints out:
// name
// cats
The example above prints all the keys found in obj to the screen.
On each iteration of the loop, the key we are currently accessing is assigned to thecurrentKey variable.
To access values in an object, we would throw some bracket notation
into the mix:
let obj = { name: "Rose", cats: 2 };
for (let key in obj) {
let value = obj[key];
console.log(value);
}
// prints out:
// Rose
// 2
You can only use variable keys when using bracket notation (obj[key])!
Like all variables, you can name the current key variable whatever you like -
just be descriptive! Here is an example of using a descriptive name for a key
variable:
let employees = {
manager: "Angela",
sales: "Gracie",
service: "Paul"
};
for (let title in employees) {
let person = employees[title];
console.log(person);
}
// prints out:
// Angela
// Gracie
// Paul
What’s a method?
A method is essentially a function that belongs to an object.
That means that every method is a function, but not every function
is a method.
myFunc is a function
myObject.myFunc is a method of the object myObject
myObject["myFunc"] is a method of the object myObject
A method is just a key-value pair where the key is the function name and the
value is the function definition! Let's use what we learned earlier to teach
our dog some new tricks:
let dog = {
name: "Fido"
};
// defining a new key-value pair where the *function name* is the key
// the function itself is the value!
dog.bark = function() {
console.log("bark bark!");
};
// this is the same thing as above just using Bracket Notation
dog["speak"] = function(string) {
console.log("WOOF " + string + " WOOF!!!");
};
dog.bark(); // prints `bark bark!`
dog.speak("pizza"); // prints `WOOF pizza WOOF!!!`
Additionally, we can give objects methods when we initialize them:
let dog2 = {
name: "Rover",
bark: function() {
console.log("bork bork!");
},
speak: function(string) {
console.log("BORK " + string + " BORK!!!");
}
};
// Notice that in the object above, we still separate the key-value pairs with commas.
// `bark` and `speak` are just keys with functions as values.
dog2.bark(); // prints `bork bork!`
dog2.speak("burrito"); // prints `BORK burrito BORK!!!`
To invoke, or call, a method we need to specify which object is calling that method. In the example above the dog2 object had the bark method so to invoke bark we had to specify it was dog2's method: dog2.bark().
Useful Object Methods
Iterating through keys using Object.keys
The Object.keys method accepts an object as the argument and returns an array of the keys within that Object.
> let dog = {name: "Fido", age: "2"}
undefined
> Object.keys(dog)
['name', 'age']
> let cup = {color: "Red", contents: "coffee", weight: 5}
undefined
> Object.keys(cup)
['color', 'contents', 'weight']
The return value of Object.keys method is an array of keys - which is useful
for iterating!
Iterating through keys using Object.values
The Object.values method accepts an object as the argument and returns an
array of the values within that Object.
> let dog = {name: "Fido", age: "2"}
undefined
> Object.values(dog)
['Fido', '2']
> let cup = {color: "Red", contents: "coffee", weight: 5}
undefined
> Object.keys(cup)
['Red', 'coffee', 5]
The return value of Object.values method is an array of values - which is
useful for iterating!
The mechanism that puts behavior and data together behind methods that hide the specific implementation of a class.
How can a CommonJS Module import functionality from another module?
Through the use of the require function.
How can an ES6 module import functionality from another module?
Through the use of the import-from syntax that looks like this:
import SymbolName from './relative-path.js';
How do CommonJS Modules allow other modules to access exported symbols?
Through the use of the module.exports property.
How do ES6 Modules export functionality so other modules can use them?
Through the use of the export keyword.
Implementation inheritance
The data and methods defined on a parent class are available on objects created from classes that inherit from those parent classes
Inheritance
The mechanism that passes traits of a parent class to its descendants.
Prototypal inheritance
A method of realizing implementation inheritance through process of finding missing properties on an object by delegating the resolution to a prototype object.
The constructor method
The special method of a class that is called to initialize an object when code uses the new keyword to instantiate an object from that class.
The Dependency Inversion Principle
Functionality that your class depends on should be provided as parameters to methods rather than using new in the class to create a new instance of a dependency.
The extends keyword
The keyword in JavaScript that allows one class to inherit from another.
The Interface Segregation Principle
Method names should be grouped together into granular collections called “interfaces”
The Law Of Demeter
Don’t use more than one dot (not counting the one after “this”).
A method of an object can only invoke the methods (or use the properties) of the following kinds of objects: Methods on the object itself Any of the objects passed in as parameters to the method And object created in the method Any values stored in the instance variables of the object Any values stored in global variables
The Liskov Substitution Principle
You can substitute child class objects for parent class objects and not cause errors.
The Open-Close Principle
A class is open for extension and closed for modification.
The Single-Responsibility Principle
Any one of the following:
A class should do one thing and do it well.
A class should have only one reason to change.
Gather together the things that change for the same reasons. Separate those things that change for different reasons.
Background:
Constructor Functions
Defining a constructor function Example of an object using object initialization
const fellowshipOfTheRing = {
title: "The Fellowship of the Ring",
series: "The Lord of the Rings",
author: "J.R.R. Tolkien",
};
The above literal is a “Book” object type.
Object Type is defined by it's attributes and behaviors.
Behaviorsare represented by methods.
Constructor Functions : Handle the creation of an object - it's a factory for creating objects of a specific type.
There are a few specific things to constructors worth noting:
The name of the constructor function is capitalized
The Function does not explicitly return a value
Within the body, the this keyword references the newly created object
We can invoke a constructor function using the new keyword.
function Book(title, series, author) {
this.title = title;
this.series = series;
this.author = author;
}
const fellowshipOfTheRing = new Book(
"The Fellowship of the Ring",
"The Lord of the Rings",
"J.R.R. Tolkien"
);
console.log(fellowshipOfTheRing); // Book { title: 'The Fellowship of the Ring', ... }
Four Things will happen when invoking a constructor function
A new empty object is created {};
The new obj’s prototype is set to the object referenced by the constructors prototype property.
This is bound to the new object.
The new object is returned after the constructor function has completed.
Understanding New Object Instances
Instance : term to describe an objected created from a constructor function.
Every instance created is a unique object and therefore not equal to each other.
Using the instanceof operator to check an object’s type
By using the instanceof operator we can verify that an object was created from a certain object type.
The instanceOf operator works by checking to see if the prototype object of the left side of the operator is the same as the prototype object of the right side of the operator.
Invoking a constructor function without the new keyword
If we invoke a constructor function without the new keyword, we may result in one of two unexpected outcomes:
In non-strict mode, this will be bound to the global object instead.
In strict mode, this will become undefined.
You can enable strict mode by typing "use strict" at the top of your file.
Defining Sharable Methods
Avoid the temptation to store an object method inside a constructor function, it is inefficient with computer memory usage b/c each object instance would have it’s own method definition.
Prototype : An object that is delegated to when a reference to an object property or method can't be resolved.
Every instance created by a constructor function shares the same prototype.
Object.setPrototypeOf() and Object.getPrototypeOf() are just used to set a prototype of one object to another object; and also the verify a prototype.
proto : aka "dunder proto" is a property used to gain easy access to an object's prototype - it is widely supported by browsers but is considered deprecated.
function Book(title, series, author) {
this.title = title;
this.series = series;
this.author = author;
}
// Any method defined on the `Book.prototype` property
// will be shared across all `Book` instances.
Book.prototype.getInformation = function () {
return `${this.title} by ${this.author}`;
};
const fellowshipOfTheRing = new Book(
"The Fellowship of the Ring",
"The Lord of the Rings",
"J.R.R. Tolkien"
);
console.log(fellowshipOfTheRing.getInformation());
Every method we define on a constructor function’s prototype property will be shared across all instances of that object type.
The Problem with Arrow Functions
We cannot use arrow functions when defining methods on a constructor function’s prototype property.
Arrow functions don’t include their own this binding; therefore it will not reference the current instance — always stick with the function () keyword.
Putting the Class in JavaScript Classes
In ES2015, JS gained the class keyword - replacing the need to use only constructor functions & prototypes to mimic classes!
class : keyword that gives developers a formal way to create a class definition to specify an object type's attributes and behavior; also used to create objects of that specific type.
Defining a ES2015 class
class Book {
constructor(title, series, author) {
this.title = title;
this.series = series;
this.author = author;
}
}
Class names also begin only with capital letters.
Although not required, class definitions can include a class constructor function - these are similar to regular constructors in that:
They don’t explicitly return a value.
The this keyword references the newly created object instance.
Instantiating an instance of a class
We can also use the new.
Four things occur when instantiating an instance of a class:
New empty object is created {};
The new obj’s prototype is set to the class prototype’s property value.
This is bound to the new object.
After the constructor method has completed, the new obj is returned.
Don’t try to instatiate a class object without the new keyword.
Class Definitions are NOT hoisted
test();
function test() {
console.log("This works!");
}
In JS you can call a function before it’s declared — this is known as hoisting.
Class definitions are NOT hoisted, so just get in the habit of declaring them before you use them.
Defining Methods
A class can contain two types of methods:
Instance Method : Methods that are invoked on an instance of the class - useful for performing an action on a specific instance.
Instance methods are also sometimes referred to as prototype methods because they are defined on a shared prototype object.
Static Method : Methods that invoked directly on a class, not on an instance.
Important: Invoking a static method on an instance will result in a runtime error.
Prepending the static keyword at the beginning on the method name will make it static.
class Book {
constructor(title, series, author) {
this.title = title;
this.series = series;
this.author = author;
}
// Notice the use of a rest parameter (...books)
// to capture the passed parameters as an array of values.
static getTitles(...books) {
return books.map((book) => book.title);
}
getInformation() {
return `${this.title} by ${this.author}`;
}
}
const fellowshipOfTheRing = new Book(
"The Fellowship of the Ring",
"The Lord of the Rings",
"J.R.R. Tolkien"
);
const theTwoTowers = new Book(
"The Two Towers",
"The Lord of the Rings",
"J.R.R. Tolkien"
);
const bookTitles = Book.getTitles(fellowshipOfTheRing, theTwoTowers);
console.log(bookTitles.join(", ")); // The Fellowship of the Ring, The Two Towers
If we go back to an example of how constructor functions also use static methods — we see that static methods are defined directly on the constructor function — whereas instance methods need to be defined on the prototype object.
function Book(title, series, author) {
this.title = title;
this.series = series;
this.author = author;
}
// Static methods are defined
// directly on the constructor function.
Book.getTitles = function (...books) {
return books.map((book) => book.title);
};
// Instance methods are defined
// on the constructor function's `prototype` property.
Book.prototype.getInformation = function () {
return `${this.title} by ${this.author}`;
};
const fellowshipOfTheRing = new Book(
"The Fellowship of the Ring",
"The Lord of the Rings",
"J.R.R. Tolkien"
);
const theTwoTowers = new Book(
"The Two Towers",
"The Lord of the Rings",
"J.R.R. Tolkien"
);
console.log(fellowshipOfTheRing.getInformation()); // The Fellowship of the Ring by J.R.R. Tolkien
console.log(theTwoTowers.getInformation()); // The Two Towers by J.R.R. Tolkien
// Call the static `Book.getTitles()` method
// to get an array of the book titles.
const bookTitles = Book.getTitles(fellowshipOfTheRing, theTwoTowers);
console.log(bookTitles.join(", ")); // The Fellowship of the Ring, The Two Towers
Comparing Classes to Constructor Functions
ES2015 Classes are essentiallysyntactic sugarover traditional constructor functions and prototypes.
Javascript Inheritance
Child Class : Class that is based upon another class and inherits properties and methods from that other class.
Parent Class : Class that is being inherited downwards.
Inheritance : The process of basing a class upon another class.
class CatalogItem {
constructor(title, series) {
this.title = title;
this.series = series;
}
getInformation() {
if (this.series) {
return `${this.title} (${this.series})`;
} else {
return this.title;
}
}
}
class Book extends CatalogItem {
constructor(title, series, author) {
super(title, series);
this.author = author;
}
}
class Movie extends CatalogItem {
constructor(title, series, director) {
super(title, series);
this.director = director;
}
}
const theGrapesOfWrath = new Book(
"The Grapes of Wrath",
null,
"John Steinbeck"
);
const aNewHope = new Movie(
"Episode 4: A New Hope",
"Star Wars",
"George Lucas"
);
console.log(theGrapesOfWrath.getInformation()); // The Grapes of Wrath
console.log(aNewHope.getInformation()); // Episode 4: A New Hope (Star Wars)
console.log(Catalogitem instanceof Function); // true
console.log(Book instanceof Function); // true
A prototype chain defines a series of prototype objects that are delegated to one by one, when a property or method can't be found on an instance object.
console.log(theGrapesOfWrath.getInformation()); // The Grapes of Wrath
When the getInformation() method is invoked:
JS looks for get() on the current object.
If it isn’t found, the method call is delegated to the object’s prototype.
It continues up the prototype chain until the method is found.
Overriding a method in a parent class
Method Overriding : when a child class provides an implementation of a method that's already defined in a parent class.
class Movie extends CatalogItem {
constructor(title, series, director) {
super(title, series);
this.director = director;
}
getInformation() {
let result = super.getInformation();
if (this.director) {
result += ` [directed by ${this.director}]`;
}
return result;
}
}
We can simply declare our own method of the same name in our child class to override our parent’s version of getInformation()
JavaScript Modules
Introducing Node.js modules
In Node.js, each JS file in a project defines a module.
Module’s contents are private by default.
Local Modules : Modules defined within your project.
Core Modules : Native modules contained within Node.js that you can use to perform tasks or to add functionality to your application.
CommonJS : A legacy module system.
ES Modules : Newer module sysem that will eventually replace CommonJS.
Entry Point : JS File that is passed to Node for access to the entire application.
Following the convention of a single exported item per module helps to keep modules focused and less likely to become bloted with too much code.
Understanding Module Loading
When loading a module, Node will examine the identifier passed to the require() function to determine if our module is local, core, or third-party:
Local Module: identifier starts with ./ ../ or /
Node.js Core: identifier matches name
Third-Party: identifier matches a module in the node modules folder (installed package)
Encapsulation
Puts the behavior and data together behind methods that hide the specific implementation so that code that uses it doesn’t need to worry about the details of it.
Inheritance
Implementation Inheritance** :** Means that data and methods defined on a parent class are available on objects created from classes that inherit from those parent classes.
Prototypal Inheritance : Means that JS uses prototype objects to make its implementation inheritance actually work.
Parent Class === Prototype === Super Class === Base Class
Inheritance === Subtyping
class MyClass {}
// is the same as
class MyClass extends Object {}
When you declare a class with no explicit parent class, JS will make it a child of Object.
class Charity {}
class Business {
toString() {
return "Give us your money.";
}
}
class Restaurant extends Business {
toString() {
return "Eat at Joe's!";
}
}
class AutoRepairShop extends Business {}
class Retail extends Business {
toString() {
return "Buy some stuff!";
}
}
class ClothingStore extends Retail {}
class PhoneStore extends Retail {
toString() {
return "Upgrade your perfectly good phone, now!";
}
}
console.log(new PhoneStore().toString()); // 'Upgrade your perfectly good phone, now!'
console.log(new ClothingStore().toString()); // 'Buy some stuff!';
console.log(new Restaurant().toString()); // 'Eat at Joe\'s!'
console.log(new AutoRepairShop().toString()); // 'Give us your money.'
console.log(new Charity().toString()); // [object object]
The nuts and bolts of prototypal inheritance
- When JavaScript uses a property (or method) from a prototype that it found through prototypal inheritance, then the this property points to the original object on which the first call was made.
class Parent {
constructor() {
this.name = "PARENT";
}
toString() {
return `My name is ${this.name}`;
}
}
class Child extends Parent {
constructor() {
super();
this.name = "CHILD";
}
}
const parent = new Parent();
console.log(parent.toString()); // my name is Parent
const child = new Child();
console.log(child.toString()); // my name is Child
Polymorphism
The ability to treat an object as if it were an instance of one of its parent classes.
The SOLID Principles Explained
SOLID is an anagram for:
The Single-Responsibility Principle
The Open-Close Principle
The Liskov Substitution Principle
The Interface Segregation Principle
The Dependency Inversion Principle
Single-Responsibility Principle
A class should do one thing and do it well
This principle is about limiting the impact of change.
The Liskov Substitution Principle:
Subtype Requirement: Let ϕ(x) be a property provable about objects x of type T. Then ϕ(y) should be true for objects y of type S where S is a subtype of T.
You can substitute child class objects for parent class objects and not cause errors.
The Other Three
The remaining three principles are important for languages that have static typing - which means a variable can have only one kind of thing in it.
Open-Close Principle
A class is open for extension and closed for modification.
Creating new functionality can happen in child classes, and not the original class.
Interface Segregation Principle
Method names should be grouped together into granular collections called “interfaces”.
Dependency Inversion Principle
Functionality that your class depends on should be provided as parameters to methods rather than using new in the class to create a new instance.
Controlling Coupling with The Law of Demeter
Coupling : The degree of interdependence between two or more classes.
The fewer the connections between classes, the less chance there is for the ripple effect.
Here is the formal definition:
A method of an object can only invoke the methods (or use the properties) of the following kind of objects:
Methods on the object itself.
Any of the objects passed in as parameters to the method.
Any object created in the method.
Any values stores in the instance variables of the object.
Any values stored in global variables.
Law of Demeter is more so of a guideline than a law.
Easiest way to implement it is to not us more than one dot
You cannot cheat by separating extra calls onto different lines.
When to ignore the Law of Demeter
When you work with objects that come from code that you didn’t create — you will often have to break the LoD.
Codepen with examples for you to practice with below!
Objects in Javascript
Codepen with examples for you to practice with below!
### The Object Type
The object is a data structure that stores other data, similar to how an array stores elements.
Javascript simple types:
numbers (has object-like methods but they are immutable)
strings (has object-like methods but they are immutable)
booleans (has object-like methods but they are immutable)
null
undefined
All other values are objects including arrays and functions.
Objects are class free, can contain other objects and can inherit properties from their prototypes (which can reduce object initialisation time and memory consumption).
In other programming languages, objects are referred to as, “dictionaries”, “maps”, or “associative arrays”.
Objects are indexed with keys instead of numbers.
Order is not guaranteed within an Object.
Objects are defined by using curly braces {}
You can think of Objects as tables.
Fun Fact: Objects are affectionately known as POJO’s (Plain Old Javascript Objects)
Setting Keys and Values
If we try to access a key that has not yet been assigned within an object we will output undefined.
The preferred method for checking to see if an object exists at a key is to use the operator.
Using Variables as Keys
Using Different Notations
Bracket Notation vs Dot Notation
Easier To Read
You can use variables as keys!
Easier To Write b/c do not need Quotations.
Okay to use variables and Strings that start with numbers.
Cannot access with Variables
Keys cannot contain numbers as their first character
When accessing object keys: Bracket notation needs to refer to that key in quotations, dot notation doesn’t.
When accessing object keys via a variable: Bracket notation can refer to that key w/o use of quotations, dot notation can’t do this at all.
Putting it All Together
You can put an object together in a single statement.
Operator Precedence Revisited
Iterating Through Objects
Because objects store unordered key-value pairs, we do not rely on indices to access values; instead we rely on our keys.
Methods vs Functions
A is a function that belongs to an object. Every method is a function, but not every function is a method.
Useful Object Methods
Object.keys() : A method that allows us to iterate through keys, it accepts an obj as the argument and returns an array of the keys.
Object.values() : Method that accepts an object as the argument and returns an array of the values.
Iterating through an Object’s keys & values
References vs Primitives
Primitives vs Objects
So far we have learned about 6 different data types:
When we reassign primitives we simply have our variable point elsewhere in memory.
In a nutshell, immutability cannot change values in memory, but only reassign where our variables are pointing to.
Mutability
Rest and Spread
Using the Spread Operator and Rest Parameter Syntax Accepting Arguments
Just keep in mind that function will still run even if it is not passed any arguments.
Parameters will take just as many arguments they need even if more than enough are offered.
We will encounter an error if there are not enough parameters ( > 0).
Utilizing Rest Parameters
Rest Parameter Syntax : Allows us to capture all of a function's incoming arguments into an array.
Only the last parameter can be a rest parameter.
Utilizing Spread Syntax
Takes a data type (i.e. array, obj) and spreads the values of that type where elements are expected.
Takes iterable data and spreads the elements of that type where arguments are expected.
Destructuring
Swapping Variables using destructuring
Destructuring objects into variables
Destructuring and the Rest Pattern
Destructuring Parameters
We can also destructure incoming parameters of a function.
This is very useful when we’re passing objects around to different functions.
Object Literals
An object literal is zero or more comma-separated name/value pairs surrounded by curly braces {}
let empty_object = {};
let today = {
day: "Wednesday",
month: "April",
year: 2014,
weather: { //objects can contain nested objects like this one
morning: "sunny",
afternoon: "cloudy"
}
}
Retrieval
Can be done with either dot notation today.weather.morning or with square brackets today['month']
Or operand (||) can be used to fill in default values for nonexistent data to prevent and undefined error: var weath = today.weather.evening || "unknown"
Update
Assigning a property value to an object overwrites any existing property values with that property name
Reference
Objects refer to each other, they don’t hold duplicate copies of data
Prototype
Every object has a prototype object from which it inherits properties
Object.prototype comes standard with Javascript and is almost like a ‘root parent’
- The `Object.create` method is now available in ES5 (but the method is in the book if required for older versions)
- If an object does not have a property you ask it for, it will keep looking up the prototype chain until it finds it
- If the property *does note exist* anywhere in the chain, it will return *undefined*
- A new property is *immediately visible* to all of the objects below it in the chain once created
Best way to enumerate all the properties you want is a for loop:
let i;
let properties = [ ‘day’, ‘month’, ‘year’ ];
for (i = 0; i < properties.length; i++) {
document.writeIn(properties[i] + ‘:’ + today[properties[i]]);
}
This ensures you get the properties you want (i.e. not up the prototype chain) and in the order you want, as opposed to a for in loop which achieves neither of these
Delete
Removes property from object, but also reveals property from further up the prototype chain if it exists
Format: delete today.month
Global Abatement
One way to mitigate the risks of global variables is to create a single global variable which then contains your whole application
let MYAPP = {}
MYAPP.today = {
day: "Wednesday",
month: "April",
year: 2014,
weather: { //objects can contain nested objects like this one
morning: "sunny",
afternoon: "cloudy"
}
}
//Making sure all other variables (like today) are contained within this one global variable (MYAPP) means none of them have global scope and therefore the risk of naming conflicts, etc in your application is reduced
The object is a data structure that stores other data, similar to how an array stores elements.
Objects In JavaScript
The object is a data structure that stores other data, similar to how an array stores elements.
- The object differs in that each `value` stores in an obj is associated with a `key`.
The Object
In other programming languages, objects are referred to as, “dictionaries”, “maps”, or “associative arrays”.
Objects are indexed with keys instead of numbers.
Order is not guaranteed within an Object.
Objects are defined by using curly braces {}
You can think of Objects as tables.
Setting Keys and Values
We assign values to an object by defining the name of the key in brackets and assigning it to a value.
> car {
color: "Blue",
seats: 2
}
>
"color" in car;
true
>
"model" in car;
false
If we try to access a key that has not yet been assigned within an object we will output undefined.
The preferred method for checking to see if an object exists at a key is to use the in operator.
Using Variables as Keys
It is useful to set a variable as a key because variables can be re-assigned new values — this way we can quickly access different data and also create new key/value pairs.
Using Different Notations
Dot notation:
Property identifies can only be alphanumeric (and _ and $)
Property identifiers cannot start with a number.
Property identifiers cannot contain variables.
OK — obj.prop_1, obj.prop$
Not OK — obj.1prop, obj.prop name
Bracket notation:
Property identifiers have to be a String or a variable that references a String.
It is okay to use variables, spaces, and Strings that start with numbers
OK — obj["1prop"], obj["prop name"]
>
let dog = {};
undefined
>
dog.bark = "Bowowowo";
"Bowowowowo"
>
dog.bark "Bowowowo"
>
dog {
bark: "Bowowowowo"
}
We can also use dot notation“.” to access key/value pairs in an object.
One thing to note is that when using dot notation, we do not have to use string quotes as the key.
Bracket Notation vs Dot Notation
DotBracketEasier To ReadYou can use variables as keys! Easier To Write b/c do not need Quotations. Okay to use variables and Strings that start with numbers.Cannot access with VariablesKeys cannot contain numbers as their first character
When accessing object keys: Bracket notation needs to refer to that key in quotations, dot notation doesn’t.
When accessing object keys via a variable: Bracket notation can refer to that key w/o use of quotations, dot notation can’t do this at all.
As illustrated above, the dot notation cannot access a variable key — since it takes a literal interpretation of the key.
You can put an object together in a single statement.
The concept of Operator Precedence also applies to objects.
There are two types of associativity:
Right Associativity : When code is evaluated right to left.
a = b = 1;
- Since **assignment of variables** takes lowest precedence, we end up evaluating b = 1 first before a = b.
Left Associativity : When code is evaluated left to right.
let id = "header";
let element = document.getElementById(id).value;
- We first resolve the document variable, then use dot notation to retrieve the getElementById function, we eval it's arguments, access it's value, and then retrieve assignment \(the lowest precedence\).
Iterating Through Objects
Because objects store unordered key-value pairs, we do not rely on indices to access values; instead, we rely on our keys.
A New Kind of For Loop
SYNTAX: for (let variable in object) {statement};
We use a special syntax to iterate through each key of an object called a for-in loop.
Methods vs Functions
A Method is a function that belongs to an object. Every method is a function, but not every function is a method.
myFunc is a
function
myObject.myFunc is a method of the object myObject
myObject["myFunc"] is a method of the object myObject
Methods are just a key-value pair where the key is the function name and the value is the function definition.
To invoke these methods we just need to specify which object is calling that method.
myObject.methodName();
Useful Object Methods
Object.keys() : A method that allows us to iterate through keys, it accepts an obj as the argument and returns an array of the keys.
Object.values() : Method that accepts an object as the argument and returns an array of the values.
Iterating through an Object’s keys & values
Object.entries : Method that accepts an object as the argument and returns an array of the [key, value] pairs within.
When we reassign primitives we simply have our variable point elsewhere in memory.
In a nutshell, immutability cannot change values in memory, but only reassign where our variables are pointing to.
Mutability
If we change either cat1 or cat2, our computer memory will change because they are both pointing at the same memory location.
Rest and Spread
Using the Spread Operator and Rest Parameter SyntaxAccepting Arguments
Just keep in mind that the function will still run even if it is not passed any arguments.
Parameters will take just as many arguments as they need even if more than enough is offered.
We will encounter an error if there are not enough parameters ( > 0).
Utilizing Rest Parameters
Rest Parameter Syntax : Allows us to capture all of a function's incoming arguments into an array.
Only the last parameter can be a rest parameter.
Utilizing Spread Syntax
Spread Operator: This allows us to break down a data type into the elements that make it up.
Takes a data type (i.e. array, obj) and spreads the values of that type where elements are expected.
Takes iterable data and spreads the elements of that type where arguments are expected.
let numArray = [1, 2, 3];
// here we are taking `numArray` and *spreading* it into a new array where
// comma separated elements are expected to be
let moreNums = [...numArray, 4, 5, 6];
>
moreNums
// => [1, 2, 3, 4, 5, 6]
Each table is made up of rows and columns. If you think of a table as a grid, the column go from left to right across the grid and each entry of data is listed down as a row.
Each row in a relational is uniquely identified by a primary key. This can be by one or more sets of column values. In most scenarios it is a single column, such as employeeID.
Every relational table has one primary key. Its purpose is to uniquely identify each row in the database. No two rows can have the same primary key value. The practical result of this is that you can select every single row by just knowing its primary key.
SQL Server UNIQUE constraints allow you to ensure that the data stored in a column, or a group of columns, is unique among the rows in a table.
Although both UNIQUE and PRIMARY KEY constraints enforce the uniqueness of data, you should use the UNIQUE constraint instead of PRIMARY KEY constraint when you want to enforce the uniqueness of a column, or a group of columns, that are not the primary key columns.
Different from PRIMARY KEY constraints, UNIQUE constraints allow NULL. Moreover, UNIQUE constraints treat the NULL as a regular value, therefore, it only allows one NULL per column.
SELECT *
FROM table1
INNER JOIN table2 ON conditions
SELECT *
FROM table1
LEFT JOIN table2 ON conditions
SELECT *
FROM table1
FULL OUTER JOIN table2 ON conditions
SELECT *
FROM table1
CROSS JOIN table2;
SELECT *
FROM table1
NATURAL JOIN table2;
Return the number of rows of a table.
SELECT COUNT (*)
FROM table_name;
Sort rows in ascending or descending order:
SELECT select_list
FROM table
ORDER BY column ASC [DESC], column2 ASC [DESC],...;
Group rows using GROUP BY clause.
SELECT *
FROM table
GROUP BY column_1, column_2, ...;
Filter groups using the HAVING clause.
SELECT *
FROM table
GROUP BY column_1
HAVING condition;
Set operations
Combine the result set of two or more queries with UNION operator:
SELECT * FROM table1
UNION
SELECT * FROM table2;
Minus a result set using EXCEPT operator:
SELECT * FROM table1
EXCEPT
SELECT * FROM table2;
Get intersection of the result sets of two queries:
SELECT * FROM table1
INTERSECT
SELECT * FROM table2;
DROP DATABASE IF EXISTS books_db;
CREATE DATABASE books_db WITH ENCODING='UTF8' TEMPLATE template0;
DROP TABLE IF EXISTS books;
CREATE TABLE books (
id SERIAL PRIMARY KEY,
client VARCHAR NOT NULL,
data JSONb NOT NULL
);
We’re going to store events in this table, like pageviews. Each event has properties, which could be anything (e.g. current page) and also sends information about the browser (like OS, screen resolution, etc). Both of these are completely free form and could change over time (as we think of extra stuff to track).
Using the JSON operators, combined with traditional PostgreSQL aggregate functions, we can pull out whatever we want. You have the full might of an RDBMS at your disposal.
Lets see browser usage:
SELECT browser->>'name' AS browser, count(browser) FROM events GROUP BY browser->>'name';
Output:
- Total revenue per visitor:
SELECT visitor_id, SUM(CAST(properties->>'amount' AS integer)) AS total FROM events WHERE CAST(properties->>'amount' AS integer) > 0 GROUP BY visitor_id;
Output:
- Average screen resolution
- `SELECT AVG(CAST(browser->'resolution'->>'x' AS integer)) AS width, AVG(CAST(browser->'resolution'->>'y' AS integer)) AS height FROM events;`
Output:
#### If you found this guide helpful feel free to checkout my github/gists where I host similar content:
If you follow this guide to a tee… you will install PostgreSQL itself on your Windows installation. Then, you will install psql in your…
PostgreSQL Setup For Windows & WSL/Ubuntu
If you follow this guide to a tee… you will install PostgreSQL itself on your Windows installation. Then, you will install `psql` in your Ubuntu installation. Then you will also install Postbird, a cross-platform graphical user interface that makes working with SQL and PostgreSQL ‘allegedly’ …(personally I prefer to just use the command line but PG Admin makes for an immeasurably more complicated tutorial than postbird)… better than just using the **command line tool** `psql`**.**
Important Distinction: PSQL is the frontend interface for PostgreSQL … they are not synonymous!
The primary front-end for PostgreSQL is the psqlcommand-line program, which can be used to enter SQL queries directly, or execute them from a file.
In addition, psql provides a number of meta-commands and various shell-like features to facilitate writing scripts and automating a wide variety of tasks; for example tab completion of object names and SQL syntax.
pgAdmin:
The pgAdmin package is a free and open-source graphical user interface (GUI) administration tool for PostgreSQL.
When you read “installation”, that means the actual OS that’s running on your machine. So, you have a Windows installation, Windows 10, that’s running when you boot your computer. Then, when you start the Ubuntu installation, it’s as if there’s a completely separate computer running inside your computer. It’s like having two completely different laptops.
Other Noteworthy Distinctions:
### Installing PostgreSQL 12
To install PostgreSQL 12, you need to download the installer from the Internet. PostgreSQL’s commercial company, Enterprise DB, offers installers for PostgreSQL for every major platform.
Once that installer downloads, run it. You need to go through the normal steps of installing software.
Yes, Windows, let the installer make changes to my device.
Thanks for the welcome. Next.
Yeah, that’s a good place to install it. Next.
I don’t want that pgAdmin nor the Stack Builder things. Uncheck. Uncheck. Next.
- Also, great looking directory. Thanks. Next.
Oooh! A password! I’ll enter ****. I sure won’t forget that because, if I do, I’ll have to uninstall and reinstall PostgreSQL and lose all of my hard work. Seriously, write down this password or use one you will not forget!!!!!!!!!!!!!!!
I REALLY CANNOT STRESS THE ABOVE POINT ENOUGH… Experience is a great teacher but in this case … it’s not worth it.
Sure. 5432. Good to go. Next.
Not even sure what that means. Default! Next.
Yep. Looks good. Next.
Insert pop culture reference to pass the time
Installing PostgreSQL Client Tools on Ubuntu
Now, to install the PostgreSQL Client tools for Ubuntu. You need to do this so that the Node.js (and later Python) programs running on your Ubuntu installation can access the PostgreSQL server running on your Windows installation. You need to tell apt, the package manager, that you want it to go find the PostgreSQL 12 client tools from PostgreSQL itself rather than the common package repositories. You do that by issuing the following two commands. Copy and paste them one at a time into your shell. (If your Ubuntu shell isn't running, start one.)
Pro-tip: Copy those commands because you’re not going to type them, right? After you copy one of them, you can just right-click on the Ubuntu shell. That should paste them in there for you.
echo "deb http://apt.postgresql.org/pub/repos/apt/ `lsb_release -cs`-pgdg main" | sudo tee /etc/apt/sources.list.d/pgdg.list
The last line of output of those two commands running should read “OK”. If it does not, try copying and pasting them one at a time.
Now that you’ve registered the PostgreSQL repositories as a source to look for PostgreSQL, you need to update the apt registry. You should do this before you install any software on Ubuntu.
sudo apt update
Once that’s finished running, the new entries for PostgreSQL 12 should be in the repository. Now, you can install them with the following command.
If it asks you if you want to install them, please tell it “Y”.
Test that it installed by typing psql --version. You should see it print out information about the version of the installed tools. If it tells you that it can't find the command, try these instructions over.
Configuring the client tools
Since you’re going to be accessing the PosgreSQL installation from your Ubuntu installation on your Windows installation, you’re going to have to type that you want to access it over and over, which means extra typing. To prevent you from having to do this, you can customize your shell to always add the extra commands for you.
This assumes you’re still using Bash. If you changed the shell that your Ubuntu installation uses, please follow that shell’s directions for adding an alias to its startup file.
Make sure you’re in your Ubuntu home directory. You can do that by typing cd and hitting enter. Use ls to find out if you have a .bashrc file. Type ls .bashrc. If it shows you that one exists, that's the one you will add the alias to. If it tells you that there is no file named that, then type ls .profile. If it shows you that one exists, that's the one you will add the alias to. If it shows you that it does not exist, then use the file name .bashrc in the following section.
Now that you know which profile file to use, type code «profile file name» where "profile file name" is the name of the file you determined from the last section. Once Visual Studio Code starts up with your file, at the end of it (or if you've already added aliases, in that section), type the following.
alias psql="psql -h localhost"
When you run psql from the command line, it will now always add the part about wanting to connect to localhost every time. You would have to type that each time, otherwise.
To make sure that you set that up correctly, type psql -U postgres postgres. This tells the psql client that you want to connect as the user "postgres" (-U postgres) to the database postgres (postgres at the end), which is the default database created when PostgreSQL is installed. It will prompt you for a password. Type the password that you used when you installed PostgrSQL, earlier. If the alias works correctly and you type the correct password, then you should see something like the following output.
psql (12.2 (Ubuntu 12.2-2.pgdg18.04+1))
Type "help" for help.
postgres=#
Type \q and hit Enter to exit the PostgreSQL client tool.
Now, you will add a user for your Ubuntu identity so that you don’t have to specify it all the time. Then, you will create a file that PostgreSQL will use to automatically send your password every time.
Copy and paste the following into your Ubuntu shell. Think of a password that you want to use for your user. Replace the password in the single quotes in the command with the password that you want. It has to be a non-empty string. PostgreSQL doesn’t like it when it’s not.
psql -U postgres -c "CREATE USER `whoami` WITH PASSWORD 'password' SUPERUSER"
It should prompt you for a password. Type the password that you created when you installed PostgreSQL. Once you type the correct password, you should see “CREATE ROLE”.
Now you will create your PostgreSQL password file. Type the following into your Ubuntu shell to open Visual Studio Code and create a new file.
code ~/.pgpass
In that file, you will add this line, which tells it that on localhost for port 5432 (where PostgreSQL is running), for all databases (*), use your Ubuntu user name and the password that you just created for that user with thepsqlcommand you just typed. (If you have forgotten your Ubuntu user name, type whoami on the command line.) Your entry in the file should have this format.
localhost:5432:*:«your Ubuntu user name»:«the password you just used»
Once you have that information in the file, save it, and close Visual Studio Code.
The last step you have to take is change the permission on that file so that it is only readable by your user. PostgreSQL will ignore it if just anyone can read and write to it. This is for your security. Change the file permissions so only you can read and write to it. You did this once upon a time. Here’s the command.
chmod go-rw ~/.pgpass
You can confirm that only you have read/write permission by typing ls -al ~/.pgpass. That should return output that looks like this, with your Ubuntu user name instead of "web-dev-hub".
-rw------- 1 web-dev-hub web-dev-hub 37 Mar 28 21:20 /home/web-dev-hub/.pgpass
Now, try connecting to PostreSQL by typing psql postgres. Because you added the alias to your startup script, and because you created your .pgpass file, it should now connect without prompting you for any credentials! Type \q and press Enter to exit the PostgreSQL command line client.
Installing Postbird
Head over to the Postbird releases page on GitHub. Click the installer for Windows which you can recognize because it’s the only file in the list that ends with “.exe”.
After that installer downloads, run it. You will get a warning from Windows that this is from an unidentified developer. If you don’t want to install this, find a PostgreSQL GUI client that you do trust and install it or do everything from the command line.
You should get used to seeing this because many open-source applications aren’t signed with the Microsoft Store for monetary and philosophical reasons.
Otherwise, if you trust Paxa like web-dev-hub and tens of thousands of other developers do, then click the link that reads “More info” and the “Run anyway” button.
When it’s done installing, it will launch itself. Test it out by typing the “postgres” into the “Username” field and the password from your installation in the “Password” field. Click the Connect button. It should properly connect to the running
You can close it for now. It also installed an icon on your desktop. You can launch it from there or your Start Menu at any time.
Now.. if you still have some gas in the tank… let’s put our new tools to work:
The node-postgres
The node-postgres is a collection of Node.js modules for interfacing with the PostgreSQL database. It has support for callbacks, promises, async/await, connection pooling, prepared statements, cursors, and streaming results.
In our examples we also use the Ramda library. See Ramda tutorial for more information.
Setting up node-postgres
First, we install node-postgres.
$ node -v
v14.2
$ npm init -y
We initiate a new Node application.
npm i pg
We install node-postgres with nmp i pg.
npm i ramda
In addition, we install Ramda for beautiful work with data.
cars.sql
DROP TABLE IF EXISTS cars;
CREATE TABLE cars(id SERIAL PRIMARY KEY, name VARCHAR(255), price INT);
INSERT INTO cars(name, price) VALUES(‘Audi’, 52642);
INSERT INTO cars(name, price) VALUES(‘Mercedes’, 57127);
INSERT INTO cars(name, price) VALUES(‘Skoda’, 9000);
INSERT INTO cars(name, price) VALUES(‘Volvo’, 29000);
INSERT INTO cars(name, price) VALUES(‘Bentley’, 350000);
INSERT INTO cars(name, price) VALUES(‘Citroen’, 21000);
INSERT INTO cars(name, price) VALUES(‘Hummer’, 41400);
INSERT INTO cars(name, price) VALUES(‘Volkswagen’, 21600);
In some of the examples, we use this cars table.
The node-postgres first example
In the first example, we connect to the PostgreSQL database and return a simple SELECT query result.
We issue a simple SELECT query. We get the result and output it to the console. The res.rows is an array of objects; we use Ramda to get the returned scalar value. In the end, we close the connection with end().
node first.js
5
This is the output.
The node-postgres column names
In the following example, we get the columns names of a database.
Introduction to python taught through example problems. Solutions are included in embedded repl.it at the bottom of this page for you to…
Python Problems & Solutions For Beginners
Introduction to python taught through example problems. Solutions are included in embedded repl.it at the bottom of this page for you to practice and refactor.
Python Practice Problems
Here are some other articles for reference if you need them:
Here are the problems without solutions for you to practice with:
Problem 1
Create a program that asks the user to enter their name and their age. Print out a message addressed to them that tells them the year that they will turn 100 years old.
The datetime module supplies classes for manipulating dates and times.
While date and time arithmetic is supported, the focus of the implementation is on efficient attribute extraction for output formatting and manipulation.
Ask the user for a number. Depending on whether the number is even or odd, print out an appropriate message to the user.
Bonus:
If the number is a multiple of 4, print out a different message.
Ask the user for two numbers: one number to check (call it num) and one number to divide by (check). If check divides evenly into num, tell that to the user. If not, print a different appropriate message.
Problem 3
Take a list and write a program that prints out all the elements of the list that are less than 5.
Extras:
Instead of printing the elements one by one, make a new list that has all the elements less than 5 from this list in it and print out this new list.
Write this in one line of Python.
Ask the user for a number and return a list that contains only elements from the original list a that are smaller than that number given by the user.
Problem 4
Create a program that asks the user for a number and then prints out a list of all the divisors of that number. (If you don’t know what a divisor is, it is a number that divides evenly into another number.
For example, 13 is a divisor of 26 because 26 / 13 has no remainder.)
Problem 5
Take two lists, and write a program that returns a list that contains only the elements that are common between the lists (without duplicates). Make sure your program works on two lists of different sizes.
Ask the user for a string and print out whether this string is a palindrome or not. (A palindrome is a string that reads the same forwards and backwards.)
Here’s 5 ways to reverse a string (courtesy of geeksforgeeks)
Problem 7
Let’s say I give you a list saved in a variable: a = [1, 4, 9, 16, 25, 36, 49, 64, 81, 100].
Write one line of Python that takes this list a and makes a new list that has only the even elements of this list in it.
Problem 8
Make a two-player Rock-Paper-Scissors game.
Hint:
Ask for player plays (using input), compare them. Print out a message of congratulations to the winner, and ask if the players want to start a new game.
### Problem 9
Generate a random number between 1 and 100 (including 1 and 100). Ask the user to guess the number, then tell them whether they guessed too low, too high, or exactly right.
Hint:
Remember to use the user input from the very first exercise.
Extras:
Keep the game going until the user types “exit”.
Keep track of how many guesses the user has taken, and when the game ends, print this out.
Problem 10
Write a program that asks the user how many Fibonacci numbers to generate and then generates them. Take this opportunity to think about how you can use functions. Make sure to ask the user to enter the number of numbers in the sequence to generate.
Hint:
The Fibonacci sequence is a sequence of numbers where the next number in the sequence is the sum of the previous two numbers in the sequence. The sequence looks like this: 1, 1, 2, 3, 5, 8, 13, …
Intermediate Problems:
Problem 11
In linear algebra, a Toeplitz matrix is one in which the elements on any given diagonal from top left to bottom right are identical.
Here is an example:
1 2 3 4 8
5 1 2 3 4
4 5 1 2 3
7 4 5 1 2
Write a program to determine whether a given input is a Toeplitz matrix.
Problem 12
Given a positive integer N, find the smallest number of steps it will take to reach 1.
There are two kinds of permitted steps:
— -> You may decrement N to N — 1.
— -> If a * b = N, you may decrement N to the larger of a and b.
For example, given 100, you can reach 1 in 5 steps with the following route: 100 -> 10 -> 9 -> 3 -> 2 -> 1.
Problem 13
Consider the following scenario: there are N mice and N holes placed at integer points along a line. Given this, find a method that maps mice to holes such that the largest number of steps any mouse takes is minimized.
Each move consists of moving one mouse one unit to the left or right, and only one mouse can fit inside each hole.
For example, suppose the mice are positioned at [1, 4, 9, 15], and the holes are located at [10, -5, 0, 16]. In this case, the best pairing would require us to send the mouse at 1 to the hole at -5, so our function should return 6.
// ./src/Message.js
import React from "react";
class Message extends React.Component {
render() {
return <div>{this.props.text}</div>;
}
}
export default Message;
We can access props within a class component by using this.props
Keep in mind Class Components are used just like function components.
// ./src/index.js
import React from "react";
import ReactDOM from "react-dom";
import Message from "./Message";
ReactDOM.render(
<React.StrictMode>
<Message text="Hello world!" />
</React.StrictMode>,
document.getElementById("root")
);
Setting and accessing props
class Message extends React.Component {
constructor(props) {
super(props);
// TODO Initialize state, etc.
}
render() {
return <div>{this.props.text}</div>;
}
}
If we define a constructor method in our Class Component, we have to define the super method with props passed through it.
Side Note: Before React used ES2015 Classes, it used React.createclass function, if you ever need to use this antiquated method make sure you install a module called create-react-class
Stateful components
One of the major reasons why you would choose to use a Class Component over a Function Component is to add and manage local or internal state to your component.
Second of the major reasons is to be able to use a Class Component’s lifecycle methods.
What is state?
Props are data that are provided by the consumer or caller of the component.
Not meant to be changed by a component.
State is data that is internal to the component.
Intended to be updated or mutated.
When to use state
Only Use State when it is absolutely necessary
If the data never changes, or if it’s needed through an entire application use props instead.
State is more often used when creating components that retrieve data from APIs or render forms.
The general rule of thumb: If a component doesn’t need to use state or Lifecyle methods, it should be prioritized as a function component.
Functional:Stateless || Class:Stateful
Initializing state
Use a class constructor method to initialize this.state object.
Application Entry Point
// ./src/index.js
import React from 'react'
import ReactDOM from 'react-dom';
import RandomQuote from './RandomQuote';
ReactDOM.render(
<React.StrictMode>
<RandomQuote />
</React.StrictMode>
document.getElementById('root');
)
Class Component: RandomQuote
import React from "react";
class RandomQuote extends React.Component {
constructor() {
super();
const quotes = [
"May the Force be with you.",
"There's no place like home.",
"I'm the king of the world!",
"My mama always said life was like a box of chocolates.",
"I'll be back.",
];
this.state = {
quotes,
currentQuoteIndex: this.getRandomInt(quotes.length);
}
}
getRandomInt(max) {
return Math.floor(Math.random() * Math.floor(max));
}
render() {
return (
<div>
<h2>Random Quote</h2>
<p>{this.state.quotes[this.state.currentQuoteIndex]}</p>
</div>
)
}
}
export default RandomQuote;
Updating State
Let’s say we want to update our state with a new quote.
We can set up event listeners in React similarly to how we did them before.
Our Class Component File should now look like this with the new additions:
import React from "react";
class RandomQuote extends React.Component {
constructor() {
super();
const quotes = [
"May the Force be with you.",
"There's no place like home.",
"I'm the king of the world!",
"My mama always said life was like a box of chocolates.",
"I'll be back.",
];
this.state = {
quotes,
currentQuoteIndex: this.getRandomInt(quotes.length);
}
}
changeQuote = () => {
const newIndex = this.getRandomInt(this.state.quotes.length);
// Setting the 'new state' of currentQuoteIndex state property
// to newly generated random index #.
this.setState({
currentQuoteIndex: newIndex;
})
}
getRandomInt(max) {
return Math.floor(Math.random() * Math.floor(max));
}
render() {
return (
<div>
<h2>Random Quote</h2>
<p>{this.state.quotes[this.state.currentQuoteIndex]}</p>
<button type="button" onClick={this.changeQuote}>
Change Quote
</button>
</div>
)
}
}
export default RandomQuote;
Don’t modify state directly
It is important to never modify your state directly!
ALWAYS use this.setState method to update state.
This is because when you only use this.state to re-assign, no re-rendering will occur => leaving our component out of sync.
Properly updating state from the previous state
In our current example, the way we have changeQuote set up leaves us with occasionally producing the same index twice in a row.
One solution is to design a loop but keep in mind that state updates are handled asynchronously in React (your current value is not guaranteed to be the latest)
A safe method is to pass an anonymous method to this.setState (instead of an object literal)
In our current example, we pass in a static array of predefined quotes in our constructor.
The way it is set up right now leaves our list of quotes unchanged after initialization.
We can make quotes more dynamic by replacing our static array with a props argument passed into super.
constructor(props) { super(props); }
We can now move our quotes array to our application entry point and pass it in as a prop.
Application Entry Point
// ./src/index.js
import React from 'react'
import ReactDOM from 'react-dom';
import RandomQuote from './RandomQuote';
// Re-assign our array here and pass it in as a prop in Render.
const quotes = [
"May the Force be with you.",
"There's no place like home.",
"I'm the king of the world!",
"My mama always said life was like a box of chocolates.",
"I'll be back.",
"This way I can define more quotes",
];
ReactDOM.render(
<React.StrictMode>
<RandomQuote quotes={quotes}/>
</React.StrictMode>
document.getElementById('root');
)
One thing to note about this workaround is that the caller of the component must set the quotes prop or the component will throw an error => so use defaultProps!
// At the bottom of RandomQuote.js...
RandomQuote.defaultProps = {
quotes: [
"May the Force be with you.",
"There's no place like home.",
"I'm the king of the world!",
"My mama always said life was like a box of chocolates.",
"I'll be back.",
"This way I can define more quotes",
],
};
A good safety net in case the consumer/caller doesn’t provide a value for the quotes array.
We can even remove it from our index.js now and an error will not be thrown.
Handling Events
To add an event listener to an element, just define a method to handle the event and associate that method with the element event you are listening for. Example
When we console log this we see the AlertButton object.
If we were to write the showAlert method with a regular class method like:
showAlert() {
console.log(this);
}
We would get undefined => remember that fat arrow binds to the current context!
Reviewing class methods and thethiskeyword
Binding:
class Girlfriend {
constructor() {
this.name = "JavaScript";
}
displayName() {
console.log(this.name);
}
}
const Ming = new Girlfriend();
Ming.displayName(); // => Javascript
const displayAgain = Ming.displayName;
displayAgain(); // => Result in a Type Error: Cannot read property 'name' of undefined.
The first time we use our displayMethod call, it is called directly on the instance of the boyfriend class, which is why Javascript was printed out.
The second time it was called, the ref of the method is stored as a variable and method is called on that variable instead of the instance; resulting in a type error (it has lost it’s context)
Remember we can use the bind method to rebind context!
We can refactor to get the second call working like this:
const displayAgain = Ming.displayName.bind(Ming); displayAgain(); => //Now Javascript will be printed out.
To continue using function declarations vs fat arrow we can assign context in a constructor within a class component.
Experimental Syntax : Syntax that has been proposed to add to ECMAScript but hasn't officially been added to the language specification yet.
It’s good to pick one approach and use it consistently, either:
Class Properties & Arrow Functions
Bind Method & This Keyword
TheSyntheticEventobject
Synthetic Event Objects: Cross Browser wrappers around the browser’s native event.
Includes the use of stopPropagation() and preventDefault();
Attributes of the Synthetic Event Object:
Attributesboolean bubblesboolean cancelableDOMEventTarget currentTargetboolean defaultPreventednumber eventPhaseboolean isTrustedDOMEvent nativeEventvoid preventDefault()boolean isDefaultPrevented()void stopPropagation()boolean isPropagationStopped()void persist()DOMEventTarget targetnumber timeStampstring type- `nativeEvent` : property defined in a synthetic event object that gives you access to the underlying native browser event (rarely used!)
Forms in React
Exercise being done in a separate file
Random Notes
onChange : detects when a value of an input element changes.
Assigning onChange to our input fields makes our component's state update in real time during user input.
Don’t forget to add preventDefault onto form submissions to deal with the default behavior of the browser refreshing the page!
submittedOn: new Date(), Can be added to a form, most likely will persist into a DB.
Controlled Components
We use the onChange event handlers on form fields to keep our component's state as the "one source of truth"
Adding an onChange event handler to every single input can massively bloat your code.
Try assigning it to it’s own method to apply everywhere.
textarea is handled differently in react: it takes in a value property to handle what the inner text will be.
We can use validation libraries like validate to make our validation functions more complex.
import isEmail from "validator/es/lib/isEmail";
validate(name, email) {
const validationErrors = [];
if (!name) {
validationErrors.push("Please provide a Name");
}
if (!email) {
validationErrors.push("Please provide an Email");
} else if (!isEmail(email)) {
validationErrors.push("Please provide a valid Email");
}
return validationErrors;
}
Note About Client-side vs server-side validation
Server-side validation is not optional.
Tech-savvy users can manipulate client-side validations.
Sometimes the ‘best approach’ is to skip implementing validations on the client-side and rely completely on the server-side validation.
Component Lifecycle
- Component Lifecycle is simply a way of describing the key moments in the lifetime of a component.
Loading (Mounting)
Updating
Unloading (Unmounting)
The lifecycle of a React component
Each Class Component has several lifecycle methods that you can add to run code at specific times.
componentDidMount : Method called after your component has been added to the component tree.
componentDidUpdate : Method called after your component has been updated.
componentWillUnmount : Method called just before your component is removed from the component tree.
Mounting
constructor method is called
render method is called
React updates the DOM
componentDidMount is called
Updating
When component receives new props
render method is called
React updates the DOM
componentDidUpdate is called
When setState is called:
render method is called
React updates the DOM
componentDidUpdate is called
Unmounting
The moment before a class component is removed from the component tree:
componentDidMount will be called.
Avoiding the legacy lifecycle methods
Occasionally you will encounter some deprecated lifecycle methods:
UNSAFE_componentWillMount
UNSAFE_componentWillReceiveProps
UNSAFE_componentWillUpdate
Just know they will be removed soon from React’s API…☮️
Regular expressions are patterns used to match character combinations in strings. In JavaScript, regular expressions are also objects. These patterns are used with theexec()andtest()methods ofRegExp, and with thematch(),matchAll(),replace(),replaceAll(),search(), andsplit()methods ofString. This chapter describes JavaScript regular expressions.
Creating a regular expression
You construct a regular expression in one of two ways:
Using a regular expression literal, which consists of a pattern enclosed between slashes, as follows:
let re = /ab+c/;
Regular expression literals provide compilation of the regular expression when the script is loaded. If the regular expression remains constant, using this can improve performance.
2. Or calling the constructor function of theRegExpobject, as follows:
let re = new RegExp('ab+c');
Using the constructor function provides runtime compilation of the regular expression. Use the constructor function when you know the regular expression pattern will be changing, or you don't know the pattern and are getting it from another source, such as user input.
Writing a regular expression pattern
A regular expression pattern is composed of simple characters, such as /abc/, or a combination of simple and special characters, such as /ab*c/ or /Chapter (\d+)\.\d*/.
The last example includes parentheses, which are used as a memory device. The match made with this part of the pattern is remembered for later use.
Using simple patterns
Simple patterns are constructed of characters for which you want to find a direct match.
For example, the pattern /abc/ matches character combinations in strings only when the exact sequence "abc" occurs (all characters together and in that order).
Such a match would succeed in the strings "Hi, do you know your abc's?" and "The latest airplane designs evolved from slabcraft."
In both cases the match is with the substring "abc".
There is no match in the string "Grab crab" because while it contains the substring "ab c", it does not contain the exact substring "abc".
Using special characters
When the search for a match requires something more than a direct match, such as finding one or more b's, or finding white space, you can include special characters in the pattern.
For example, to match a single"a"followed by zero or more"b"s followed by"c", you'd use the pattern /ab*c/:
the * after "b" means "0 or more occurrences of the preceding item." In the string "cbbabbbbcdebc", this pattern will match the substring "abbbbc".
Assertions** : Assertions include boundaries, which indicate the beginnings and endings of lines and words, and other patterns indicating in some way that a match is possible (including look-ahead, look-behind, and conditional expressions).**
Character classes** : Distinguish different types of characters. For example, distinguishing between letters and digits.**
Groups and ranges** : Indicate groups and ranges of expression characters.**
Quantifiers** : Indicate numbers of characters or expressions to match.**
Unicode property escapes** : Distinguish based on unicode character properties, for example, upper- and lower-case letters, math symbols, and punctuation.**
If you want to look at all the special characters that can be used in regular expressions in a single table, see the following:
### Special characters in regular expressions.
Escaping
If you need to use any of the special characters literally (actually searching for a "*", for instance), you must escape it by putting a backslash in front of it.
For instance, to search for "a" followed by "*" followed by "b",
you'd use /a\*b/ --- the backslash "escapes" the "*", making it literal instead of special.
Similarly, if you're writing a regular expression literal and need to match a slash ("/"), you need to escape that (otherwise, it terminates the pattern)
For instance, to search for the string "/example/" followed by one or more alphabetic characters, you'd use /\/example\/[a-z]+/i
--the backslashes before each slash make them literal.
To match a literal backslash, you need to escape the backslash.
For instance, to match the string "C:\" where "C" can be any letter,
you'd use /[A-Z]:\\/
--- the first backslash escapes the one after it, so the expression searches for a single literal backslash.
If using the RegExp constructor with a string literal, remember that the backslash is an escape in string literals, so to use it in the regular expression, you need to escape it at the string literal level.
/a\*b/ and new RegExp("a\\*b") create the same expression,
which searches for "a" followed by a literal "*" followed by "b".
If escape strings are not already part of your pattern you can add them using String.replace:
function escapeRegExp(string) {
return string.replace(/[.*+\-?^${}()|[\]\\]/g, '\\$&'); // $& means the whole matched string
}
The "g" after the regular expression is an option or flag that performs a global search, looking in the whole string and returning all matches.
Using parentheses
Parentheses around any part of the regular expression pattern causes that part of the matched substring to be remembered.
Once remembered, the substring can be recalled for other use.
Using regular expressions in JavaScript
Regular expressions are used with the RegExpmethods
test()andexec()
and with the Stringmethodsmatch(),replace(),search(), andsplit().
Method Descriptions
exec()
Executes a search for a match in a string.
It returns an array of information or null on a mismatch.
test()
Tests for a match in a string.
It returns true or false.
match()
Returns an array containing all of the matches, including capturing groups, or null if no match is found.
matchAll()
Returns an iterator containing all of the matches, including capturing groups.
search()
Tests for a match in a string.
It returns the index of the match, or -1 if the search fails.
replace()
Executes a search for a match in a string, and replaces the matched substring with a replacement substring.
replaceAll()
Executes a search for all matches in a string, and replaces the matched substrings with a replacement substring.
split()
Uses a regular expression or a fixed string to break a string into an array of substrings.
Methods that use regular expressions
When you want to know whether a pattern is found in a string, use the test() or search() methods;
for more information (but slower execution) use the exec() or match() methods.
If you use exec() or match() and if the match succeeds, these methods return an array and update properties of the associated regular expression object and also of the predefined regular expression object, RegExp.
If the match fails, theexec()method returnsnull (which coerces to false).
In the following example, the script uses the exec() method to find a match in a string.
let myRe = /d(b+)d/g;
let myArray = myRe.exec('cdbbdbsbz');
If you do not need to access the properties of the regular expression, an alternative way of creating myArray is with this script:
let myArray = /d(b+)d/g.exec('cdbbdbsbz');
// similar to "cdbbdbsbz".match(/d(b+)d/g); however,
// "cdbbdbsbz".match(/d(b+)d/g) outputs Array [ "dbbd" ], while
// /d(b+)d/g.exec('cdbbdbsbz') outputs Array [ 'dbbd', 'bb', index: 1, input: 'cdbbdbsbz' ].
If you want to construct the regular expression from a string, yet another alternative is this script:
let myRe = new RegExp('d(b+)d', 'g');
let myArray = myRe.exec('cdbbdbsbz');
With these scripts, the match succeeds and returns the array and updates the properties shown in the following table.
Results of regular expression execution.
You can use a regular expression created with an object initializer without assigning it to a letiable.
If you do, however, every occurrence is a new regular expression.
For this reason, if you use this form without assigning it to a letiable, you cannot subsequently access the properties of that regular expression.
For example, assume you have this script:
let myRe = /d(b+)d/g;
let myArray = myRe.exec('cdbbdbsbz');
console.log('The value of lastIndex is ' + myRe.lastIndex);
// "The value of lastIndex is 5"
However, if you have this script:
let myArray = /d(b+)d/g.exec('cdbbdbsbz');
console.log('The value of lastIndex is ' + /d(b+)d/g.lastIndex);
// "The value of lastIndex is 0"
The occurrences of /d(b+)d/g in the two statements are different regular expression objects and hence have different values for their lastIndex property.
If you need to access the properties of a regular expression created with an object initializer, you should first assign it to a variable.
[Advanced searching with flags]
Regular expressions have six optional flags that allow for functionality like global and case insensitive searching.
These flags can be used separately or together in any order, and are included as part of the regular expression.
Flag Description Corresponding property
g Global search. RegExp.prototype.global
i Case-insensitive search. RegExp.prototype.ignoreCase
m Multi-line search. RegExp.prototype.multiline
s Allows . to match newline characters. RegExp.prototype.dotAll
u "unicode"; treat a pattern as a sequence of unicode code points. RegExp.prototype.unicode
y Perform a "sticky" search that matches starting at the current position in the target string. RegExp.prototype.sticky
Regular expression flags
To include a flag with the regular expression, use this syntax:
let re = /pattern/flags;
or
let re = new RegExp('pattern', 'flags');
Note that the flags are an integral part of a regular expression. They cannot be added or removed later.
For example, re = /\w+\s/g creates a regular expression that looks for one or more characters followed by a space, and it looks for this combination throughout the string.
let re = /\w+\s/g;
let str = 'fee fi fo fum';
let myArray = str.match(re);
console.log(myArray);
// ["fee ", "fi ", "fo "]
You could replace the line:
let re = /\w+\s/g;
with:
let re = new RegExp('\\w+\\s', 'g');
and get the same result.
The behavior associated with the g flag is different when the .exec() method is used.
The roles of "class" and "argument" get reversed:
In the case of .match(), the string class (or data type) owns the method and the regular expression is just an argument,
while in the case of .exec(), it is the regular expression that owns the method, with the string being the argument.
Contrast this str.match(re) versus re.exec(str).
The g flag is used with the .exec() method to get iterative progression.
let xArray; while(xArray = re.exec(str)) console.log(xArray);
// produces:
// ["fee ", index: 0, input: "fee fi fo fum"]
// ["fi ", index: 4, input: "fee fi fo fum"]
// ["fo ", index: 7, input: "fee fi fo fum"]
The m flag is used to specify that a multiline input string should be treated as multiple lines.
If the m flag is used, ^ and $ match at the start or end of any line within the input string instead of the start or end of the entire string.
Using special characters to verify input
In the following example, the user is expected to enter a phone number. When the user presses the "Check" button, the script checks the validity of the number. If the number is valid (matches the character sequence specified by the regular expression), the script shows a message thanking the user and confirming the number. If the number is invalid, the script informs the user that the phone number is not valid.
Within non-capturing parentheses (?: , the regular expression looks for three numeric characters \d{3} OR | a left parenthesis \( followed by three digits \d{3}, followed by a close par

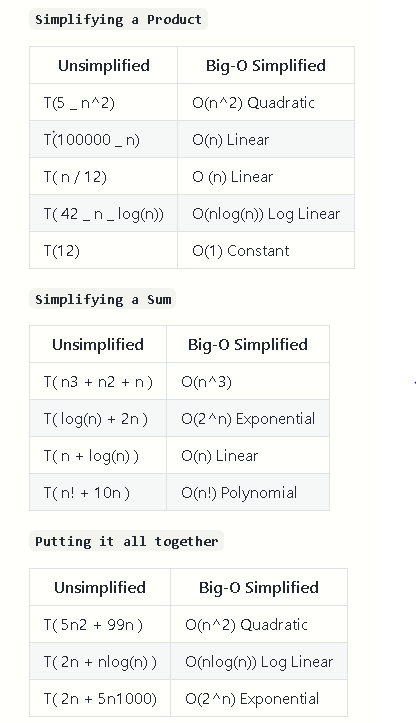
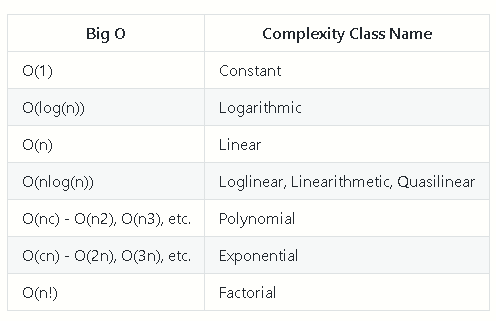
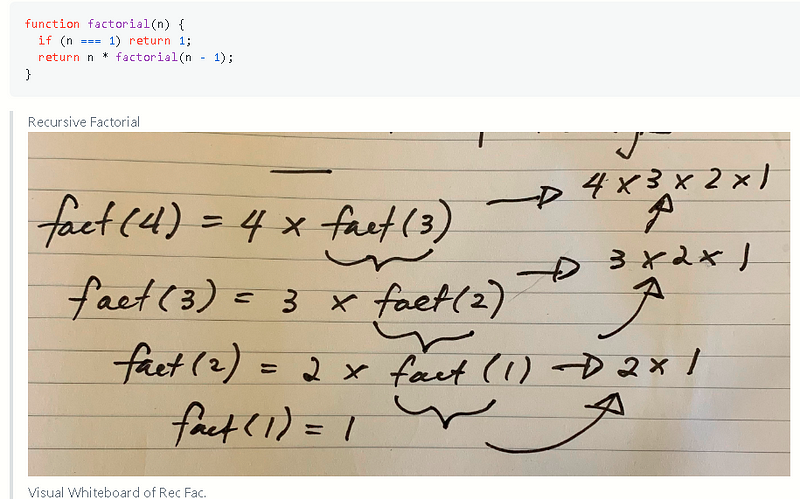
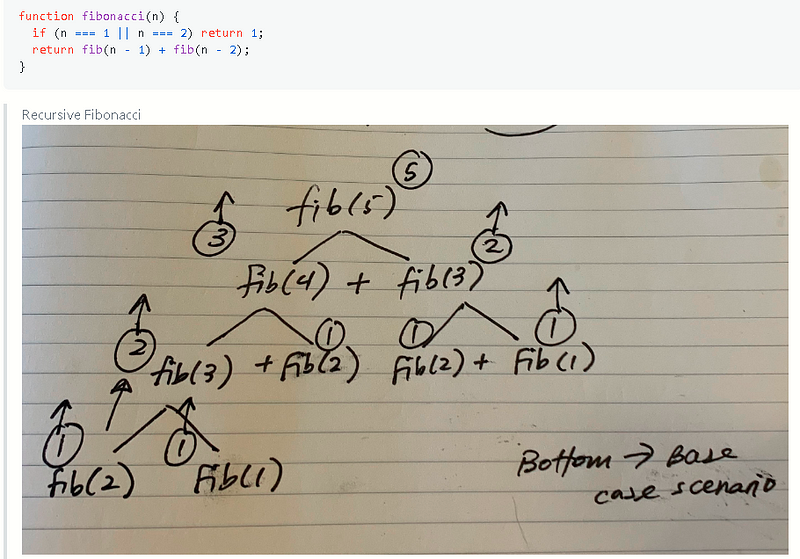

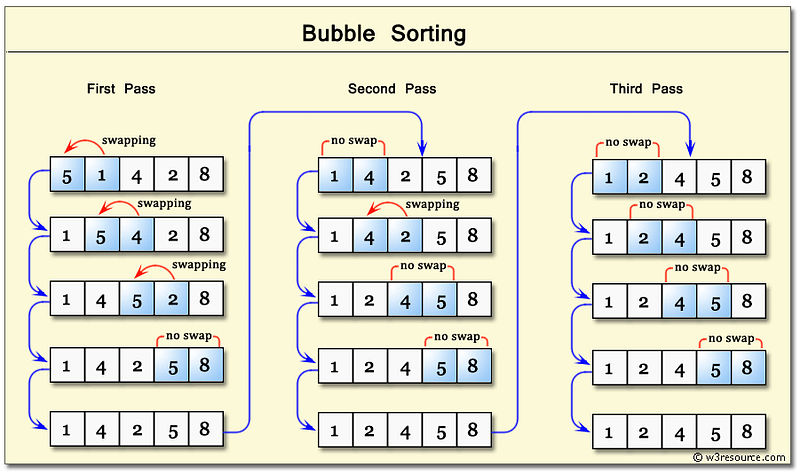
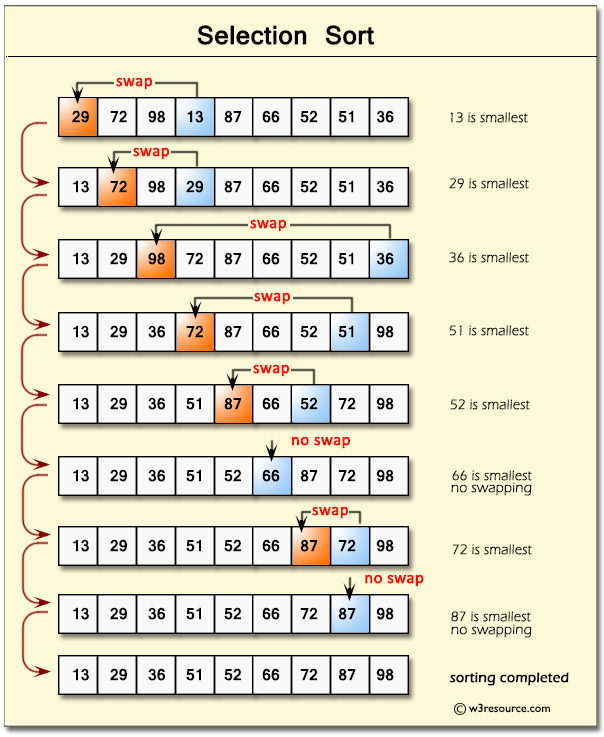

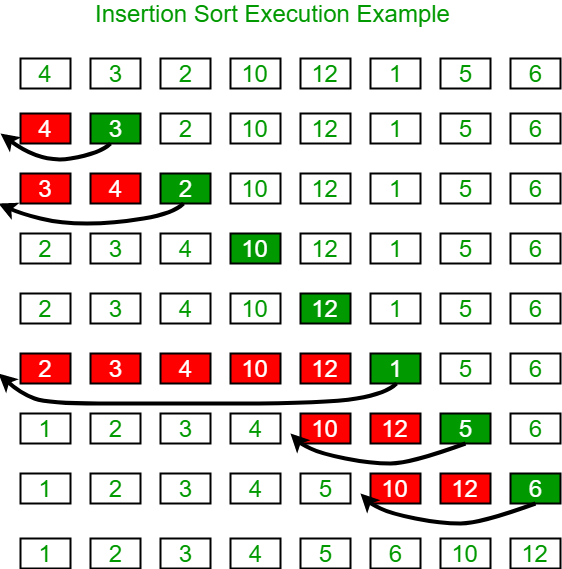
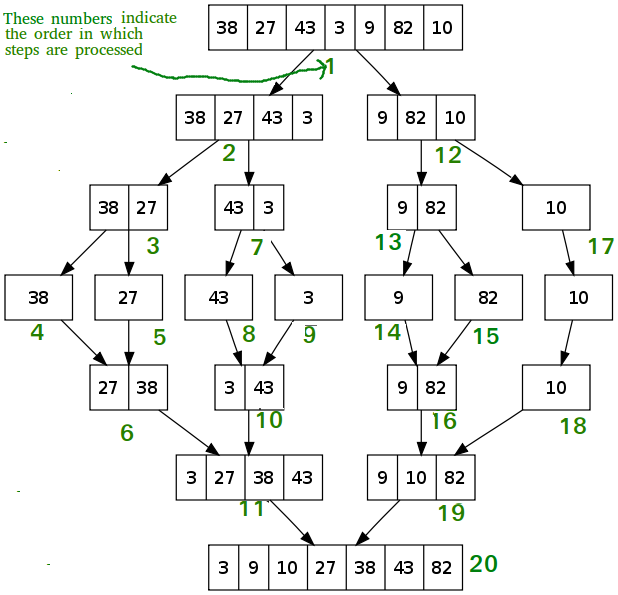

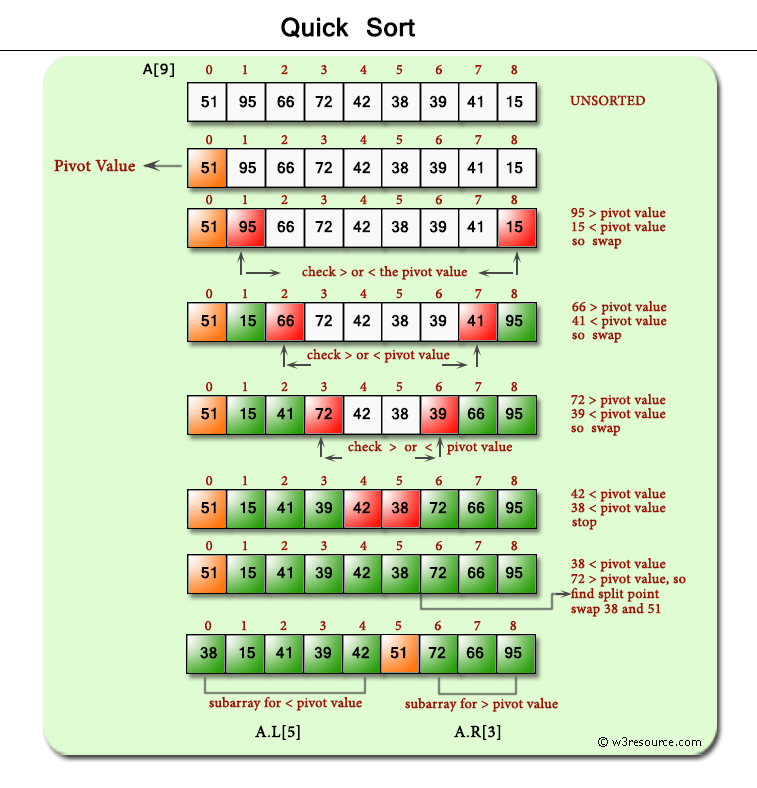
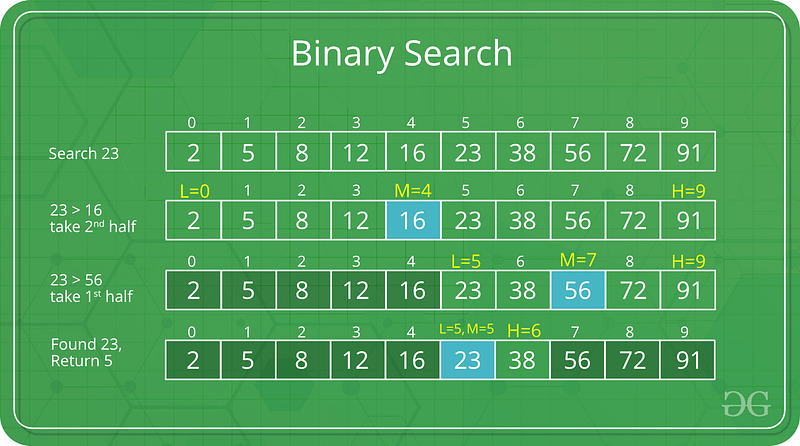
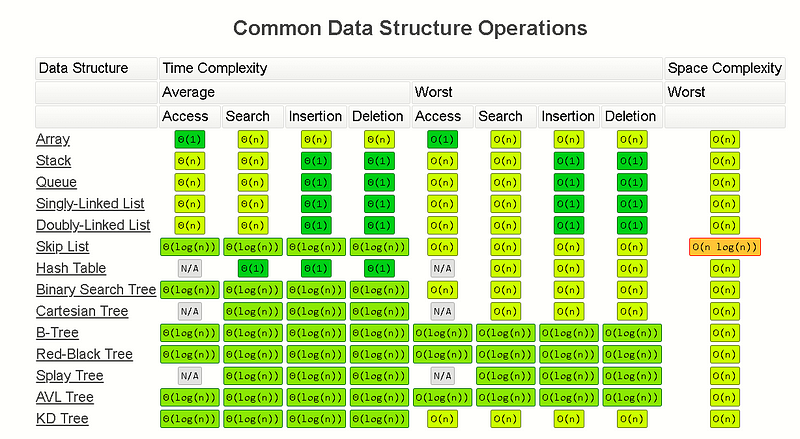

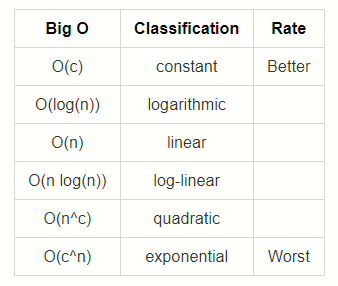
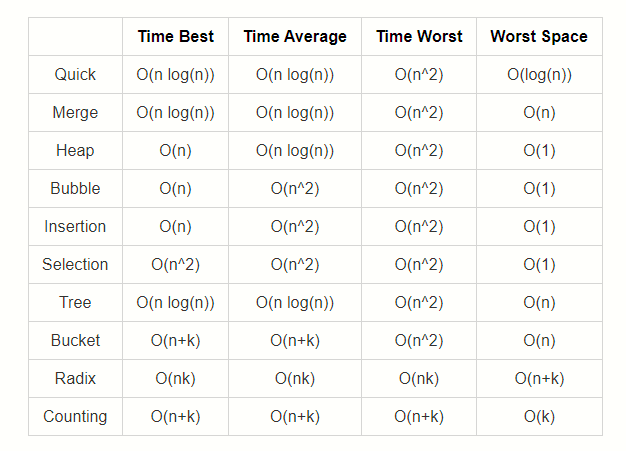
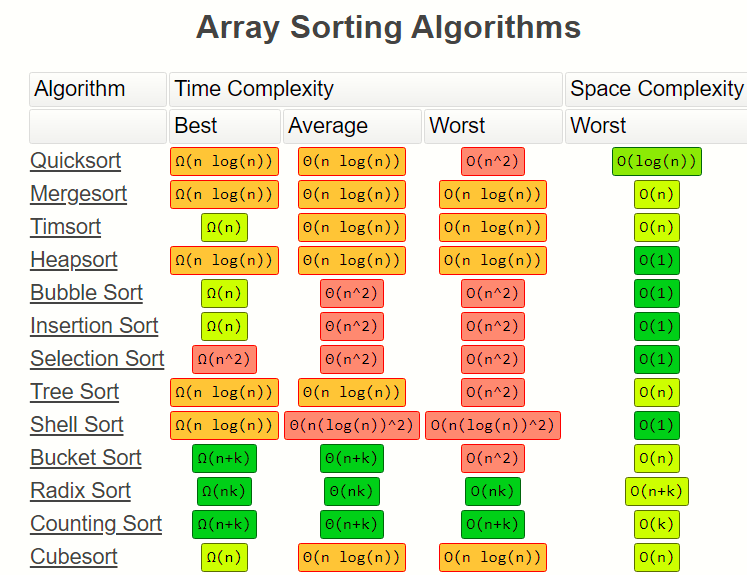
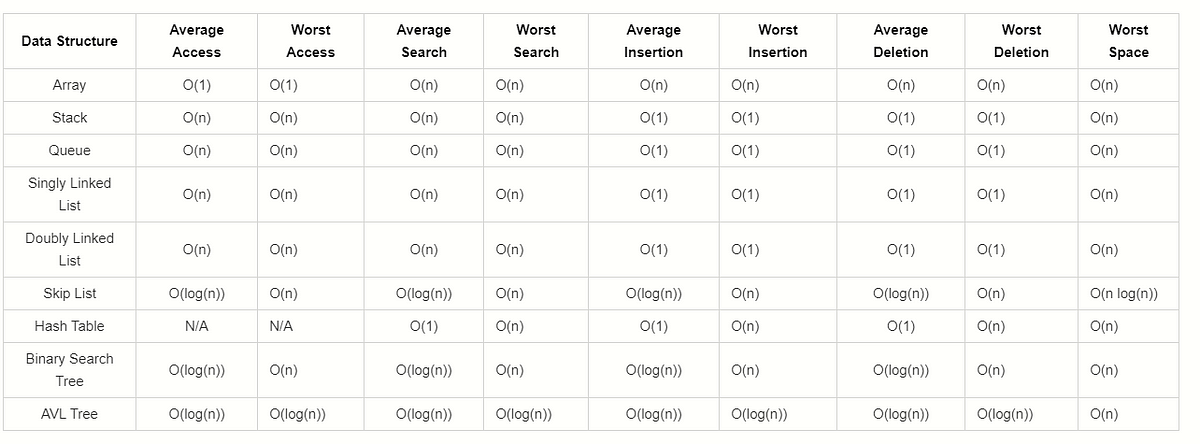
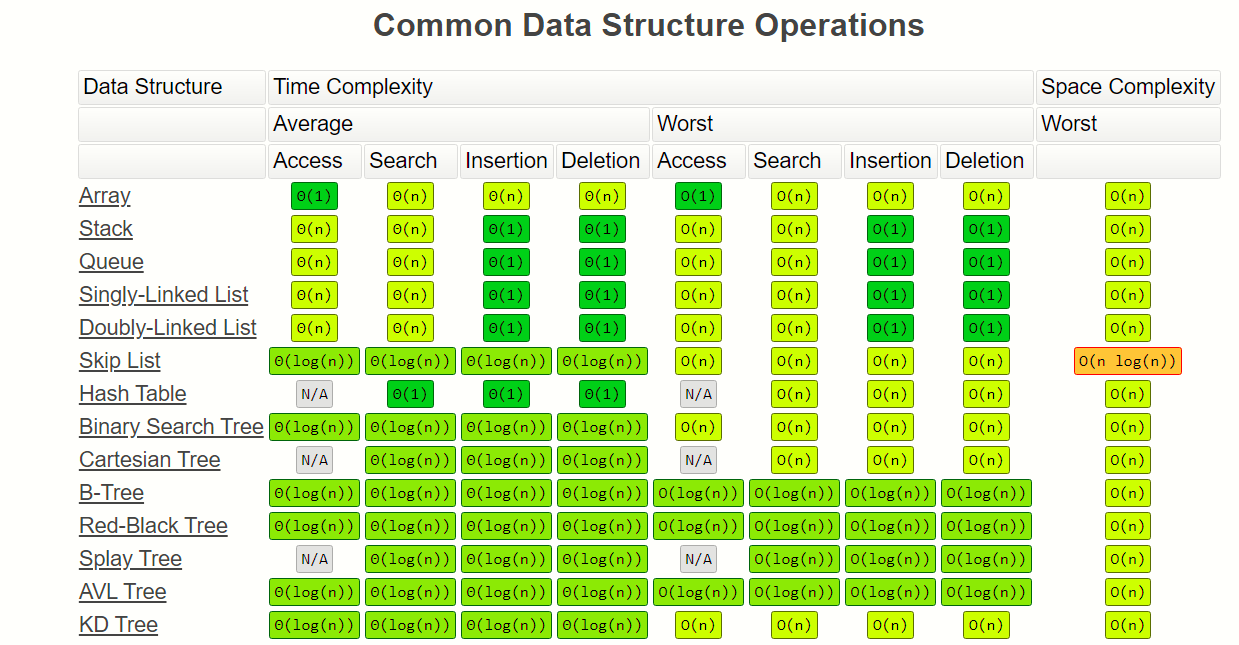
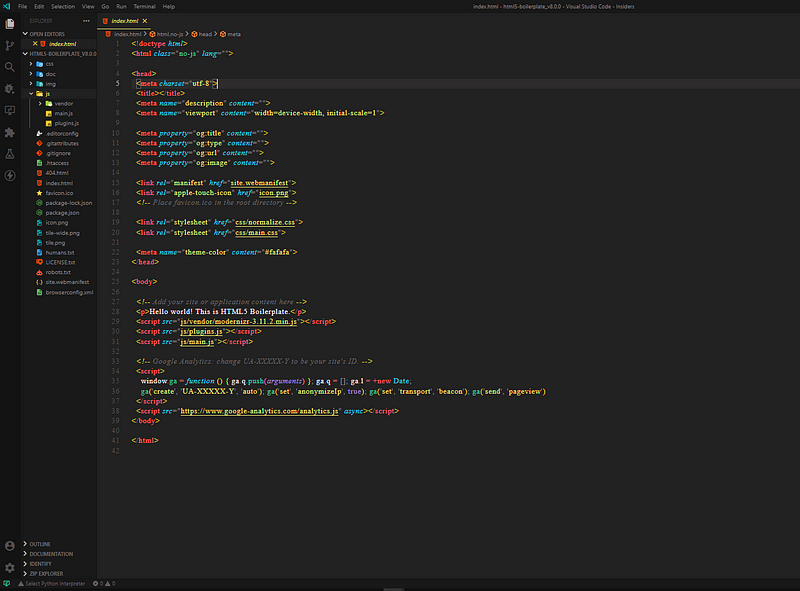
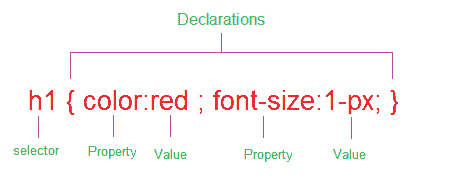
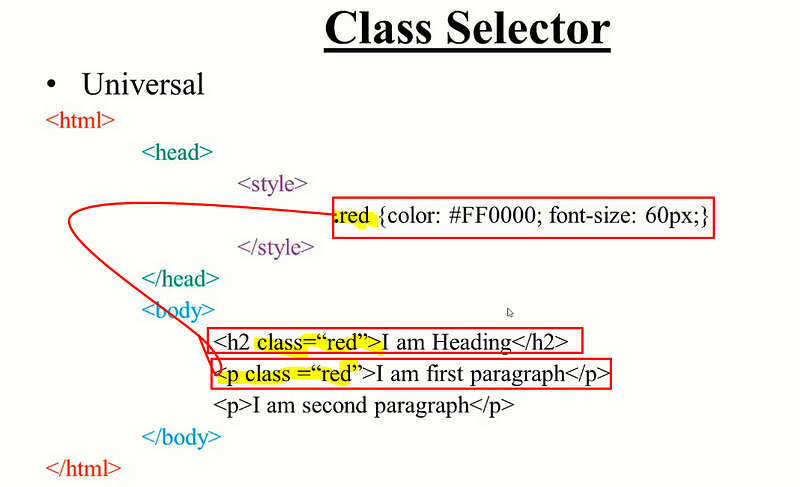
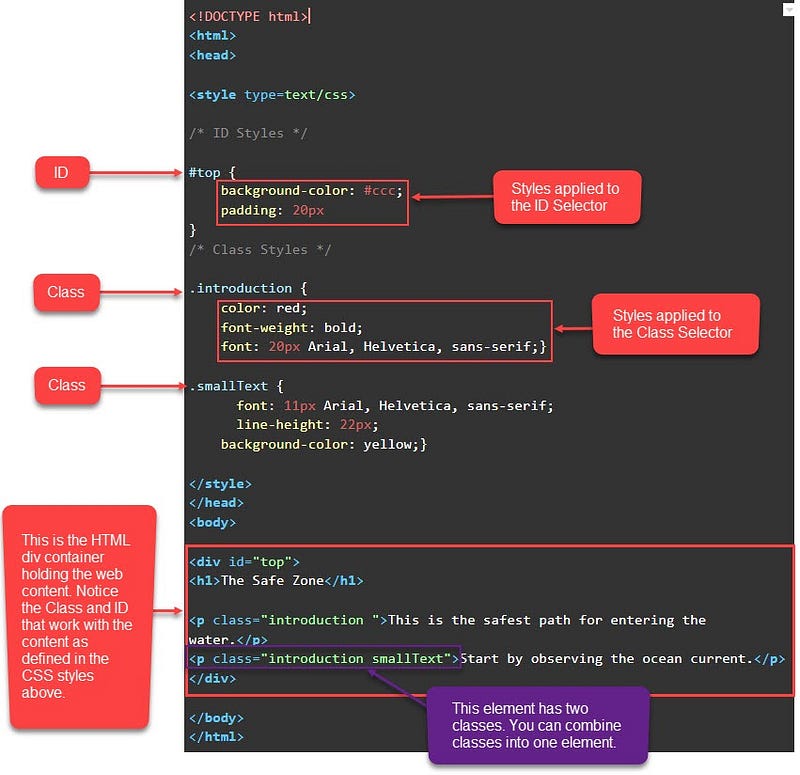
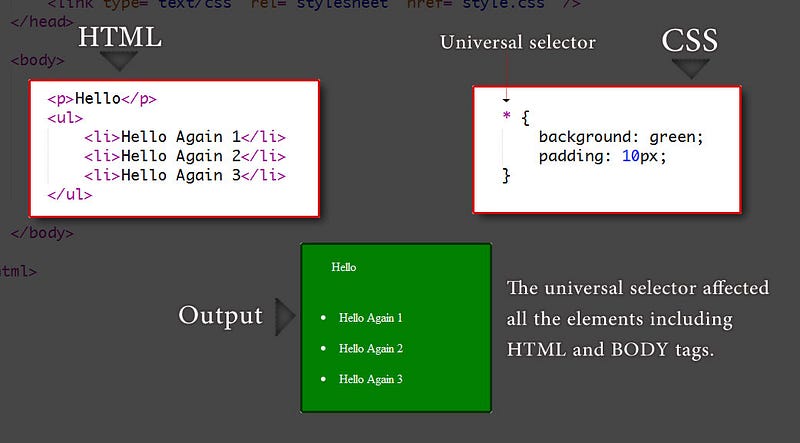
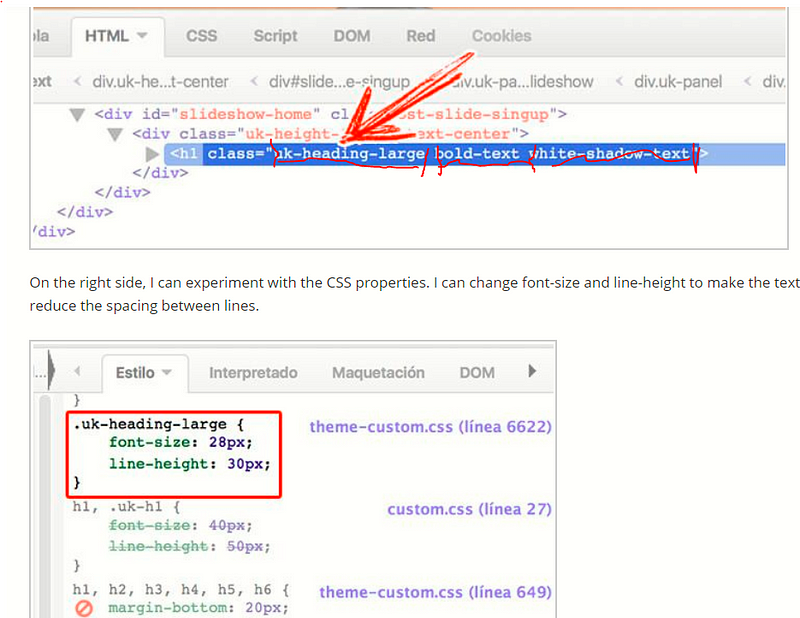
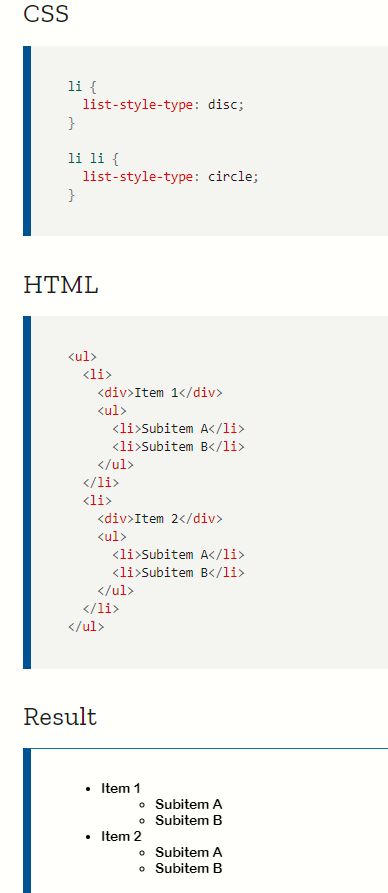


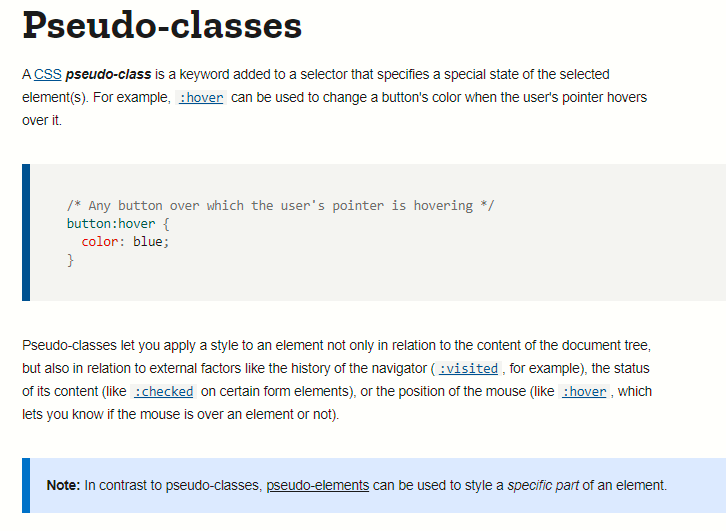


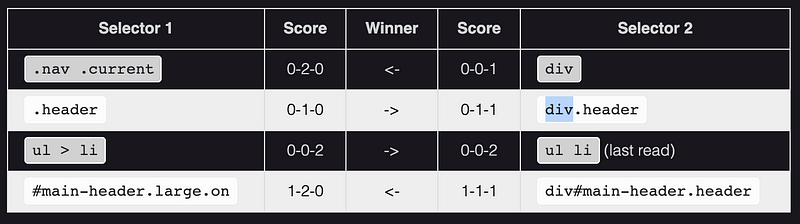
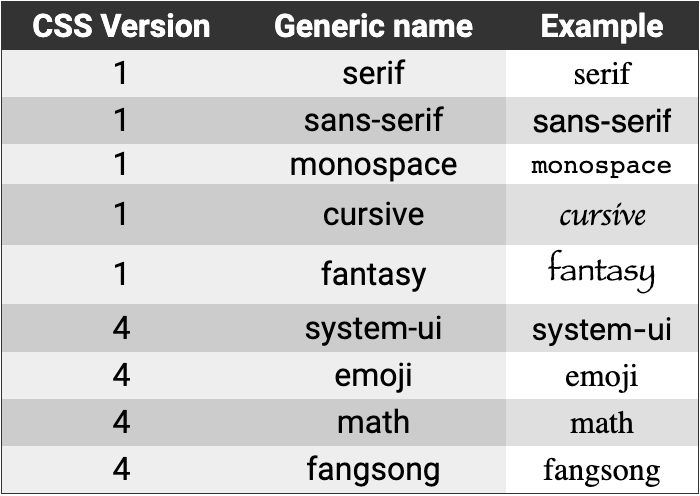
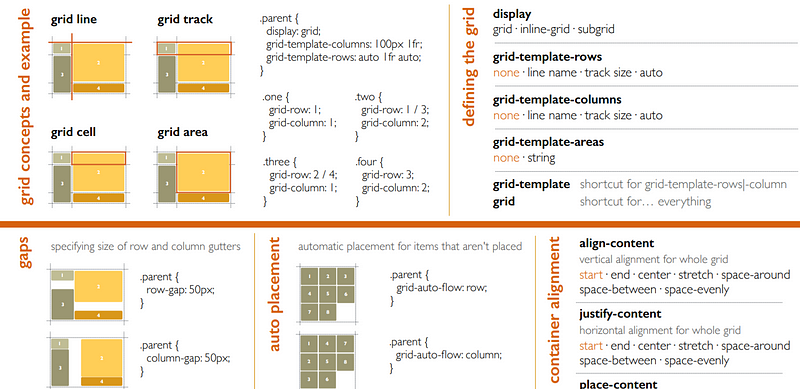


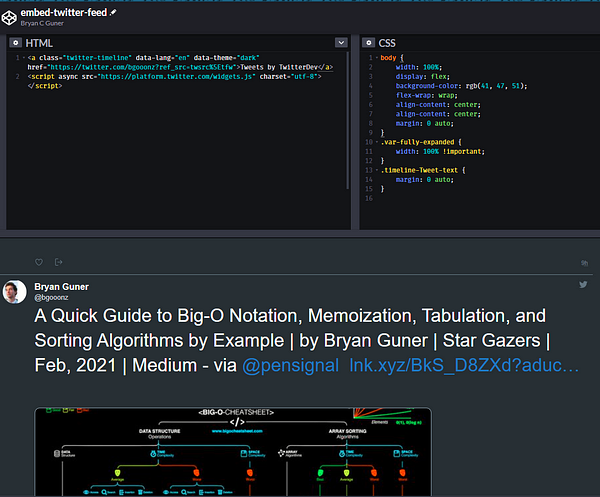


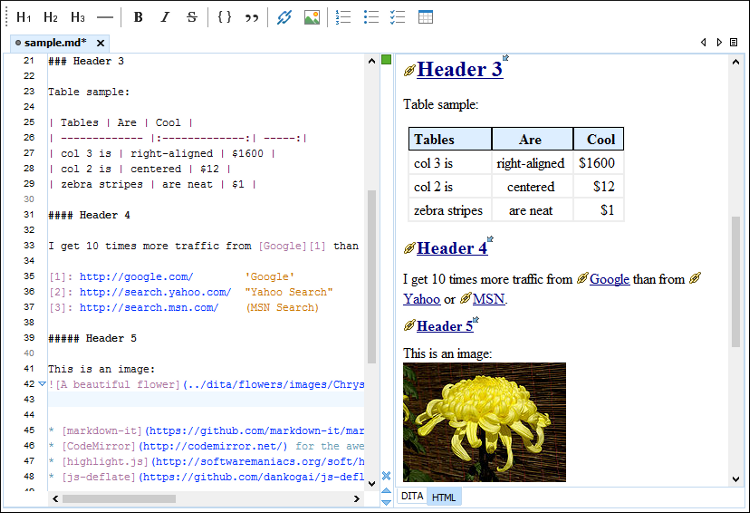

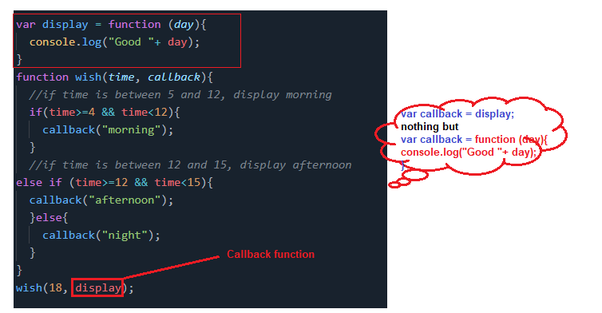


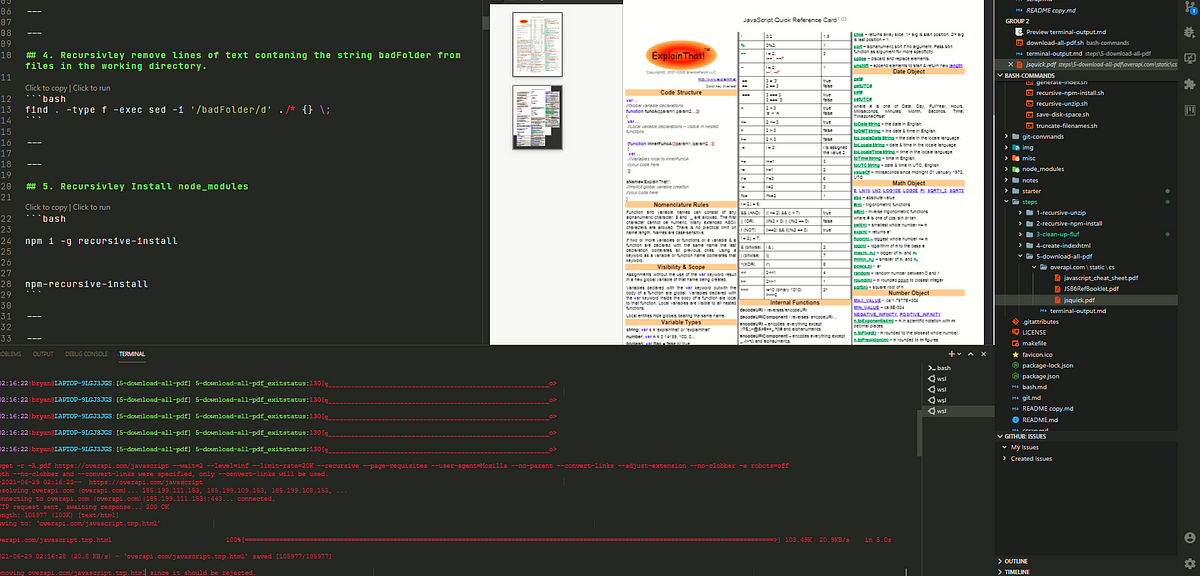
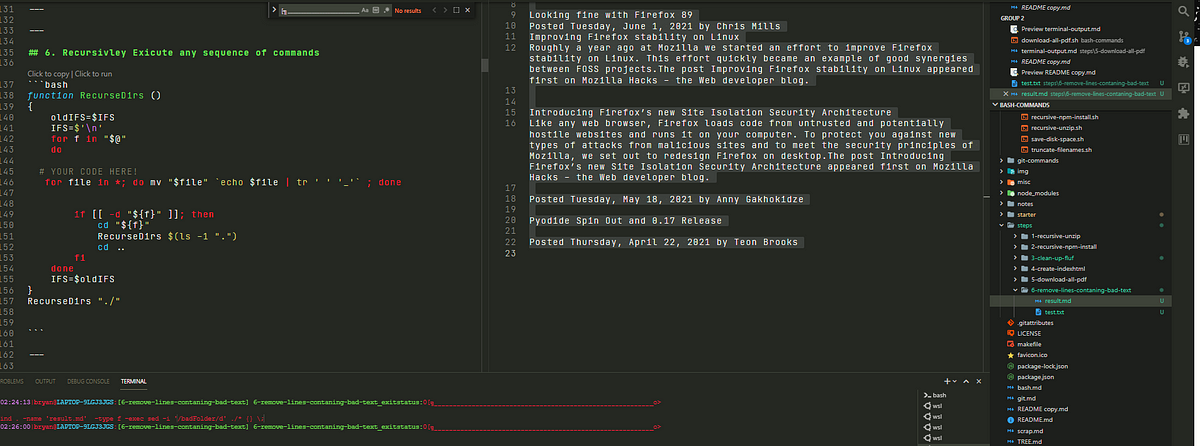
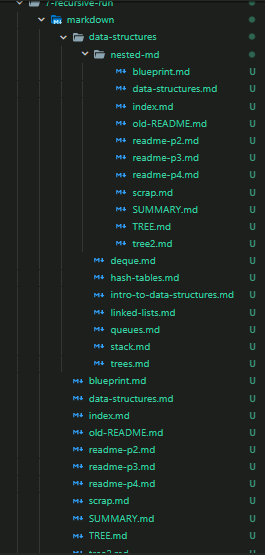
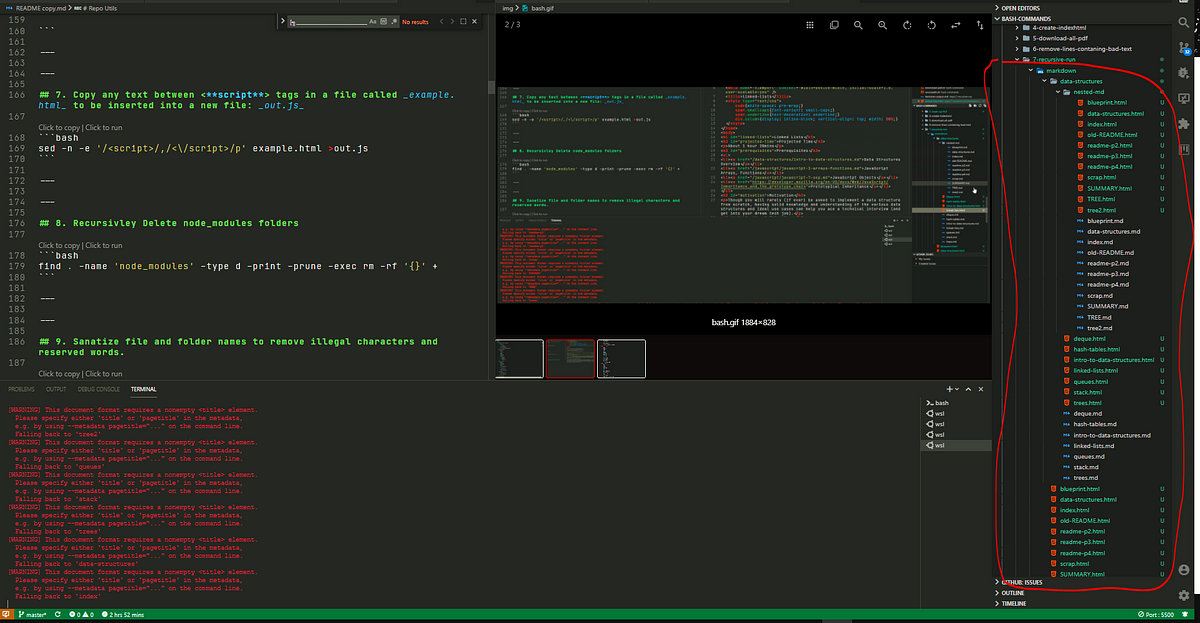


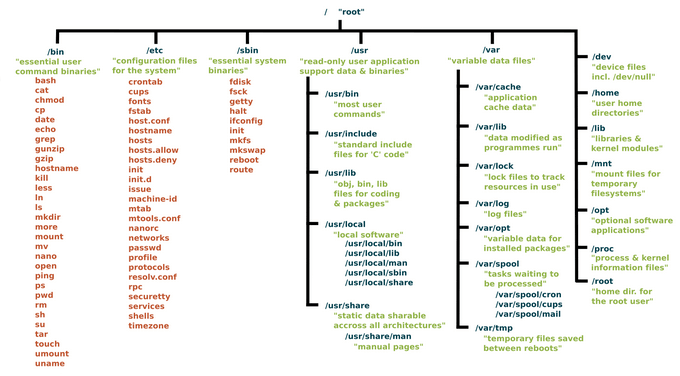

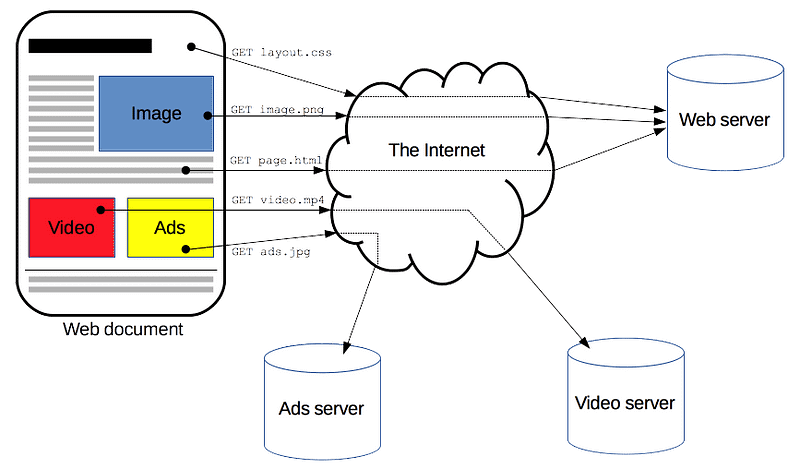
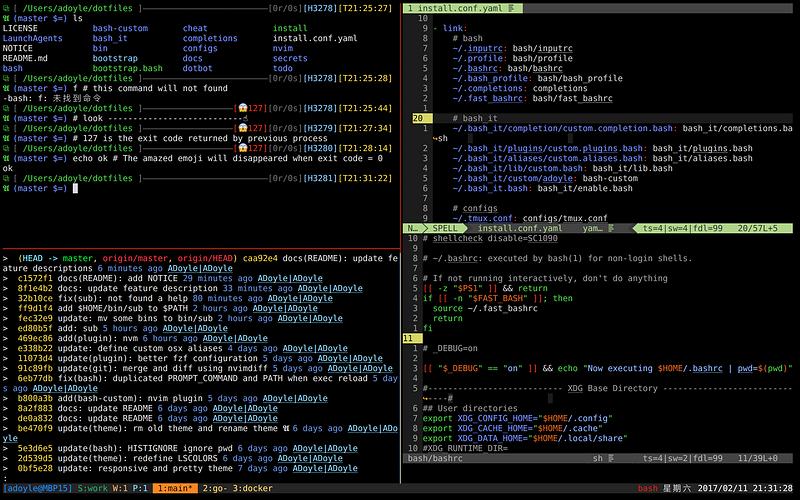


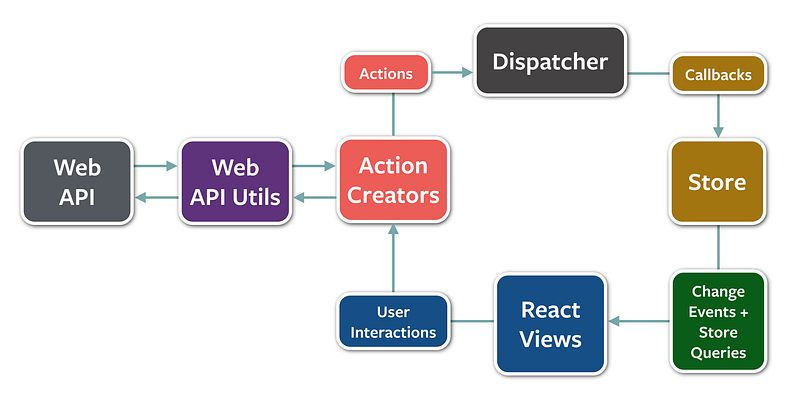


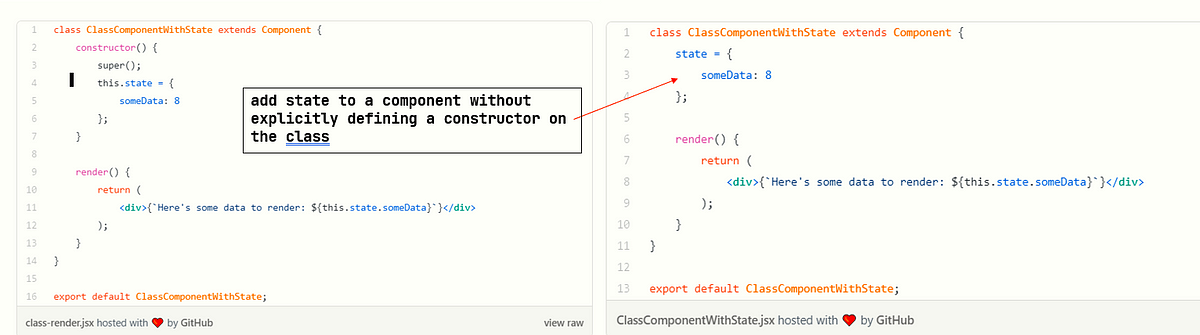
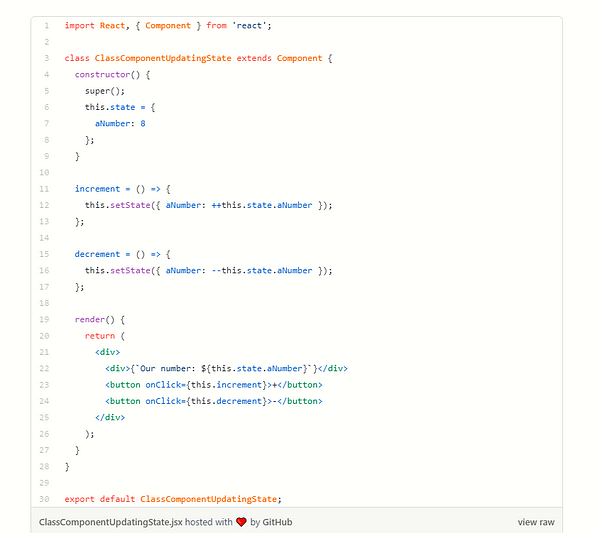
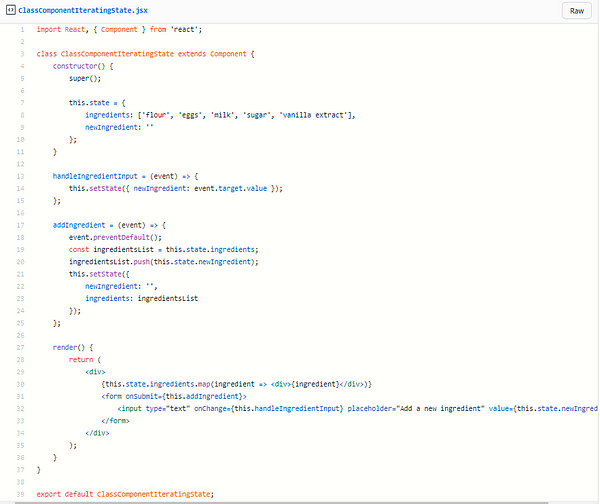
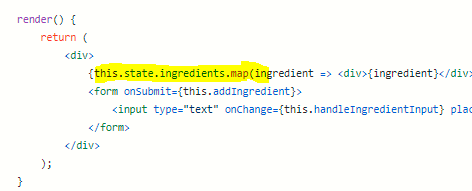

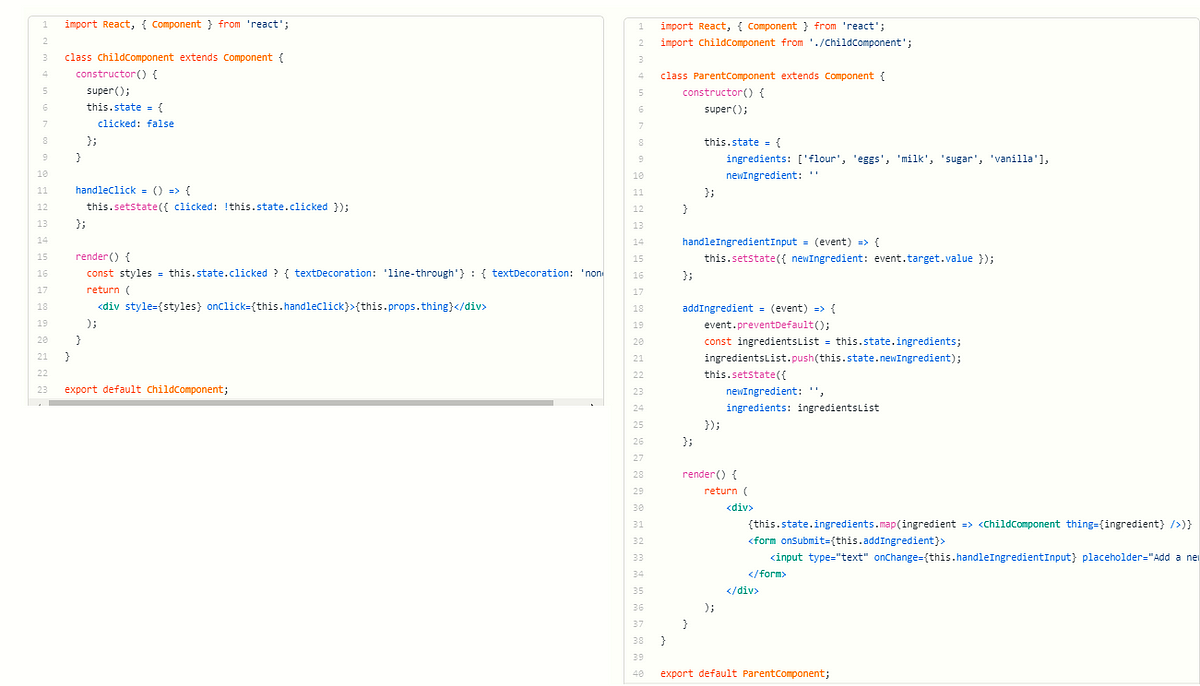
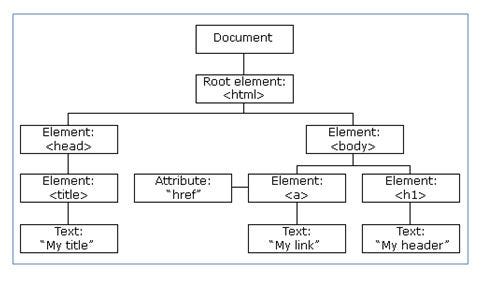


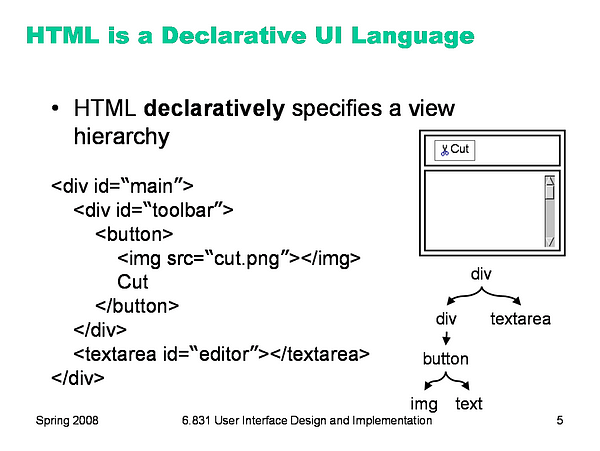

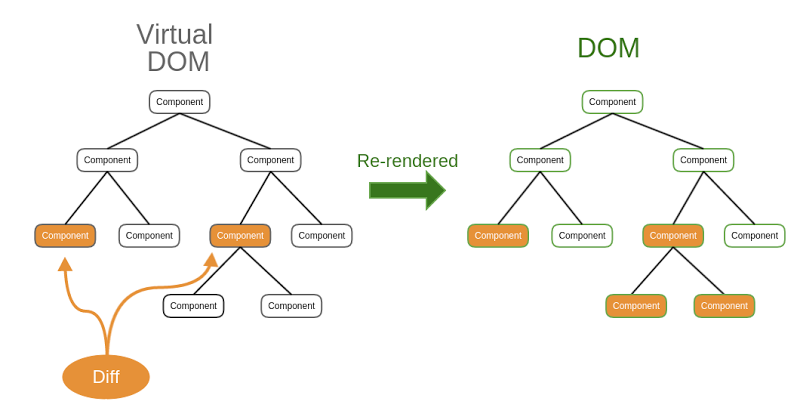


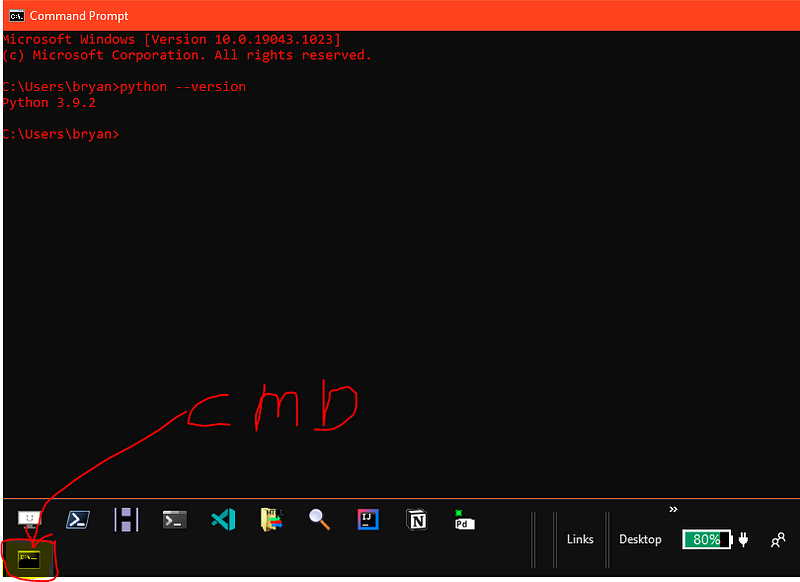
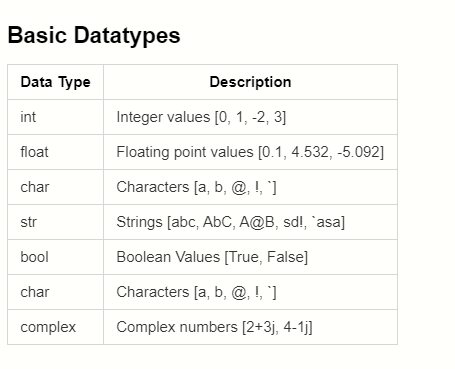
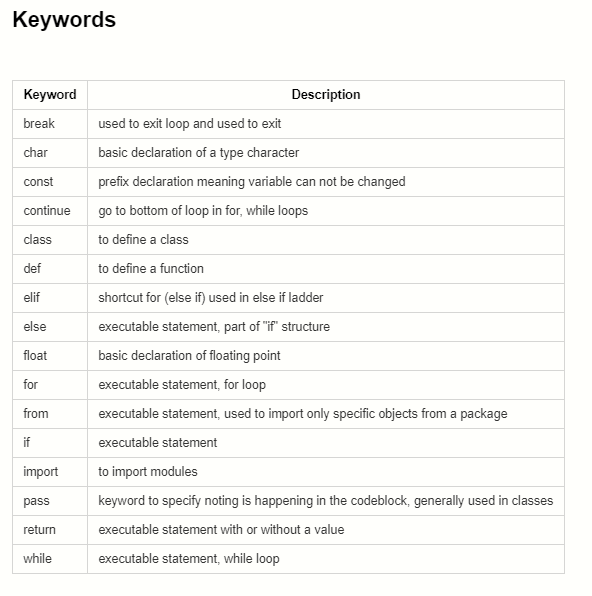
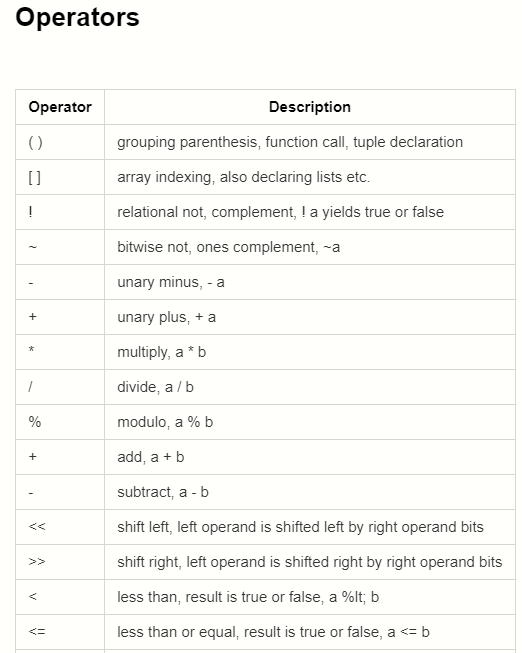
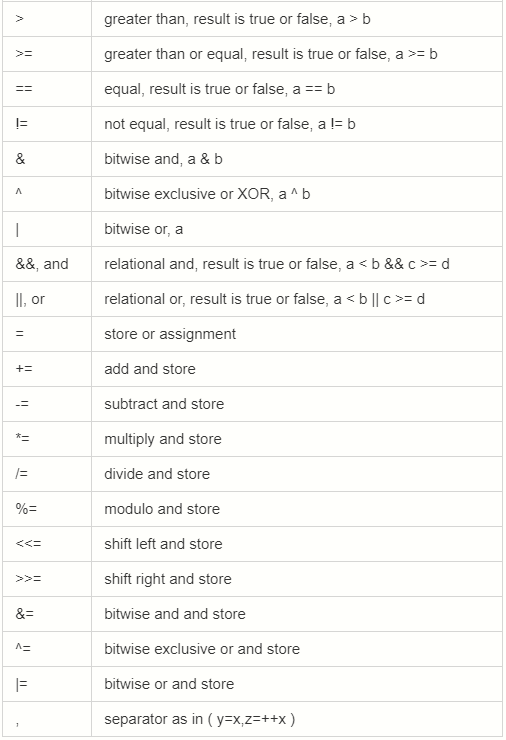

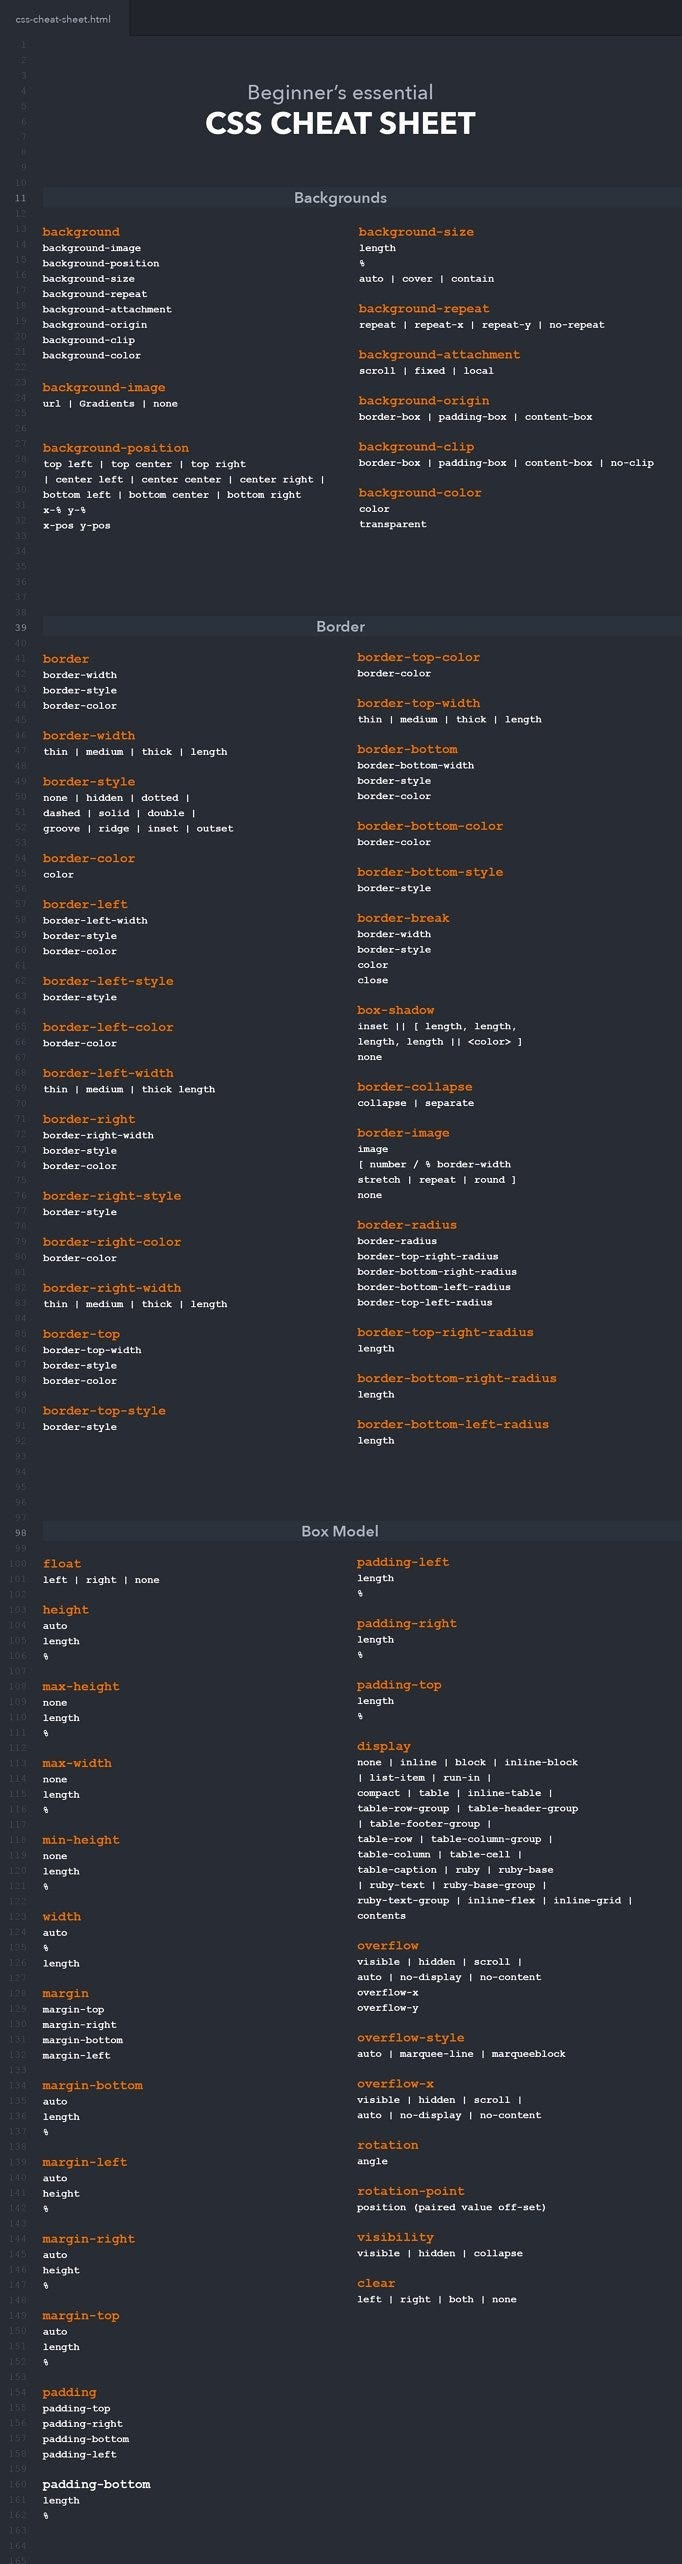


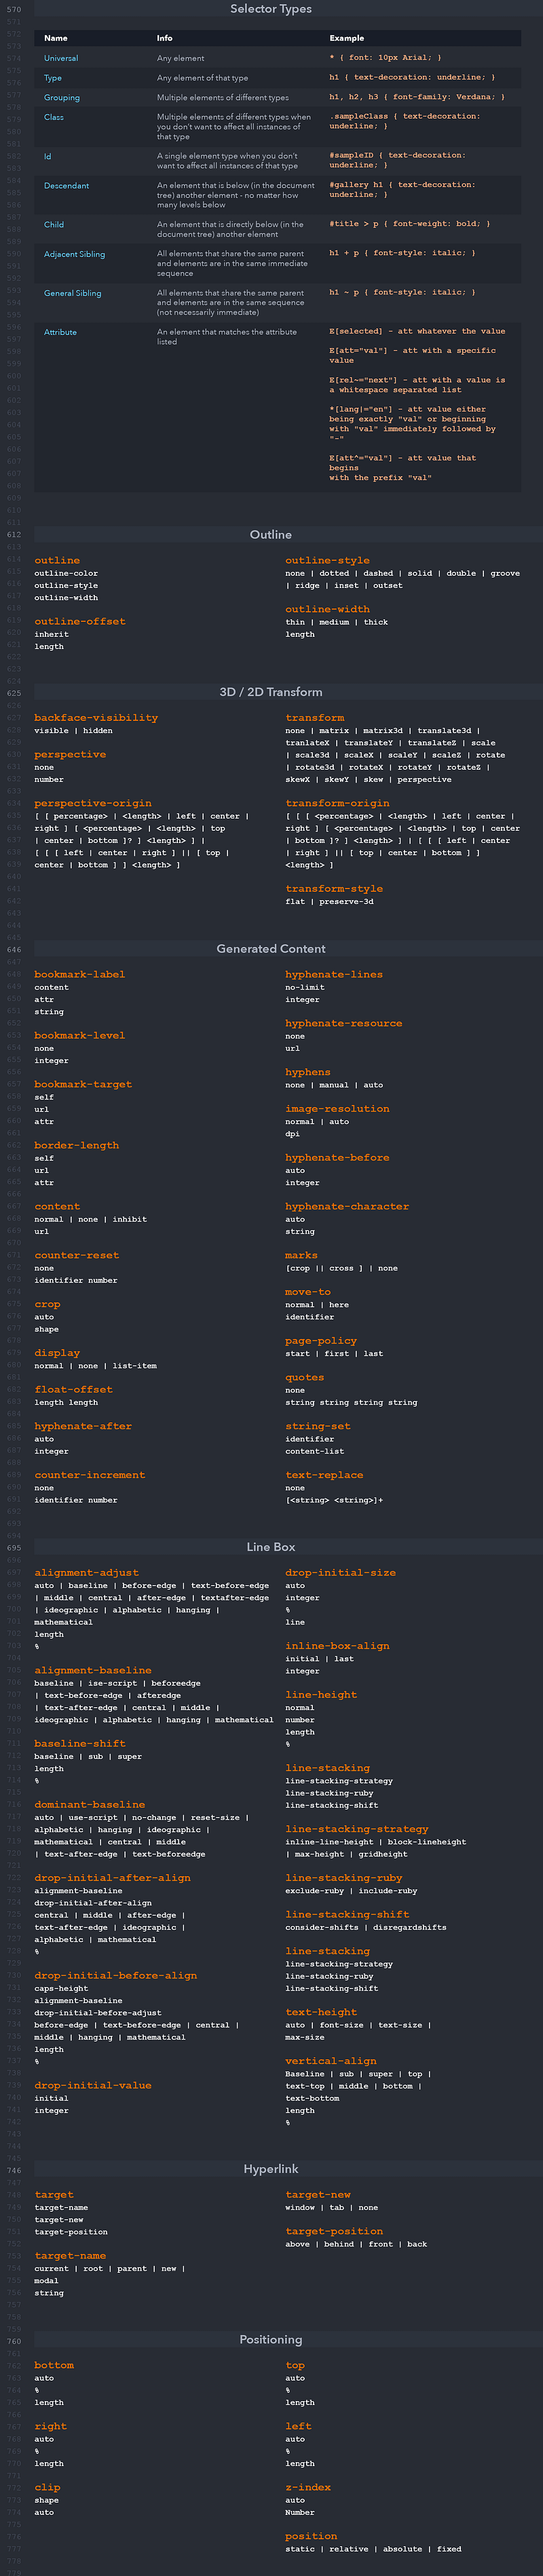

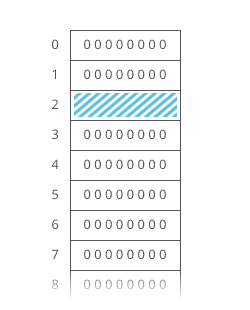
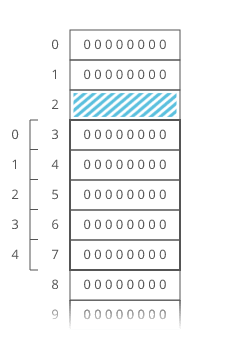
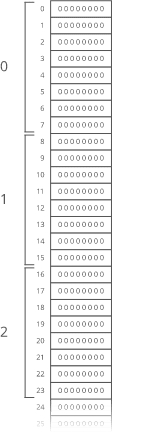

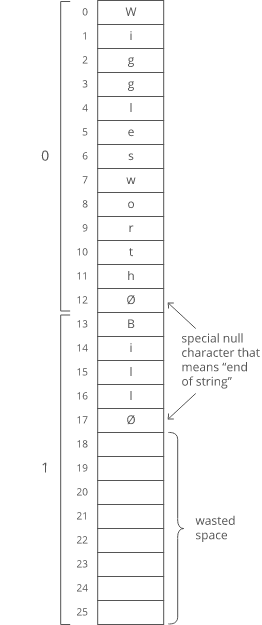
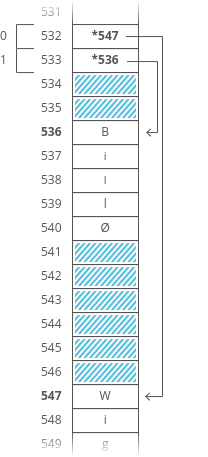
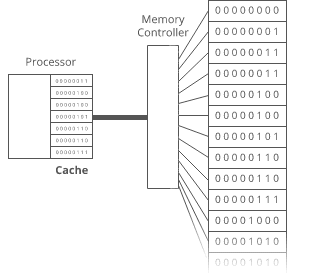

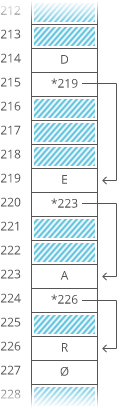
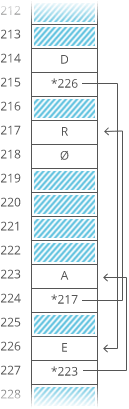

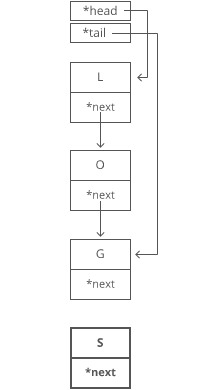
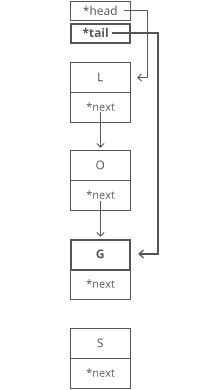
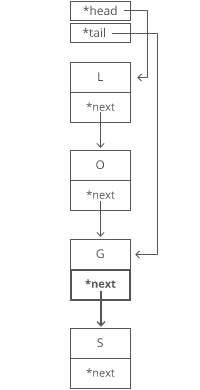
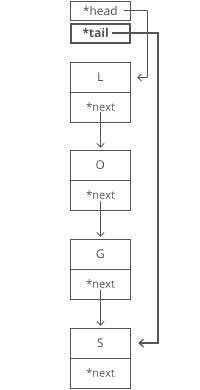
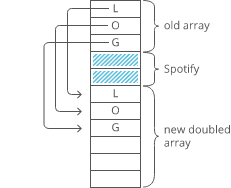
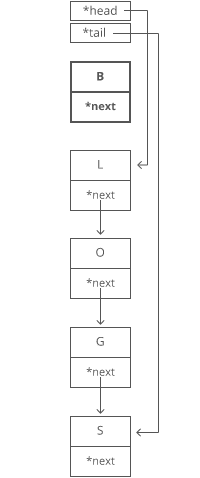
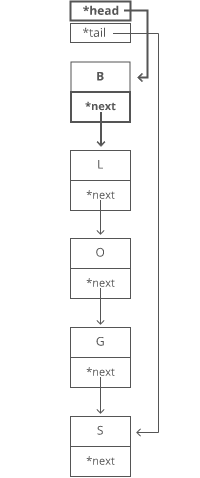
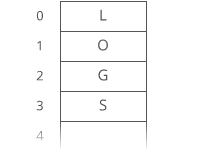
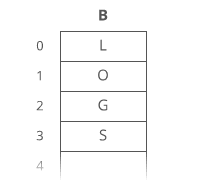
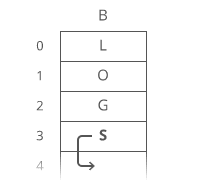
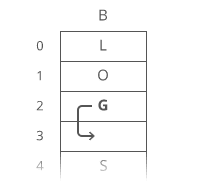
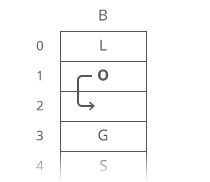

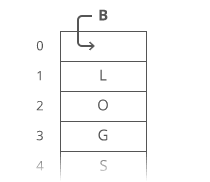
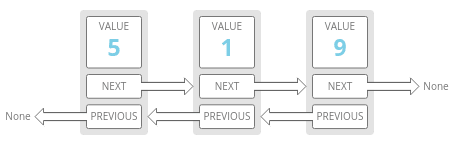

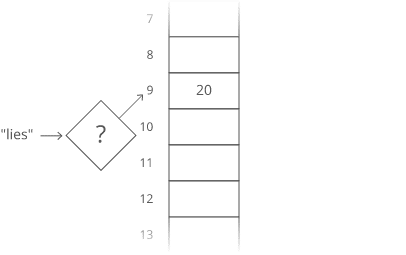
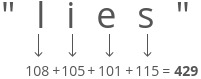
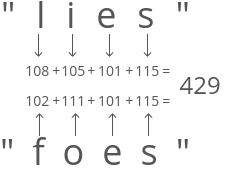
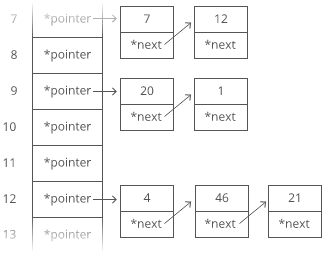
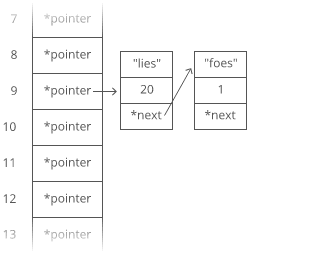
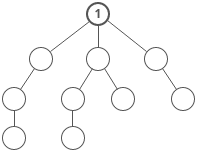
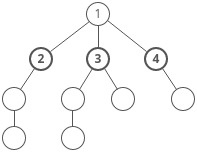
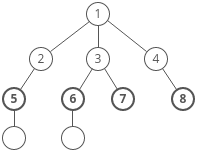
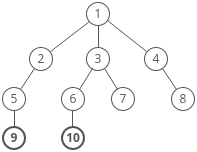
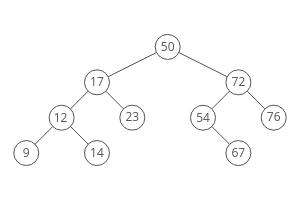
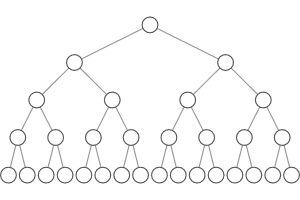


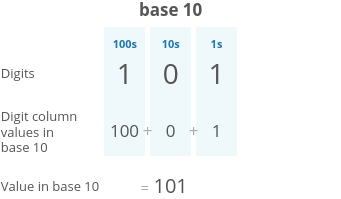

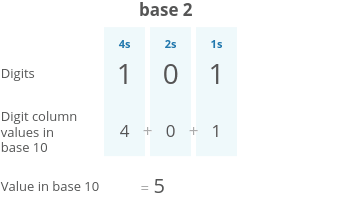
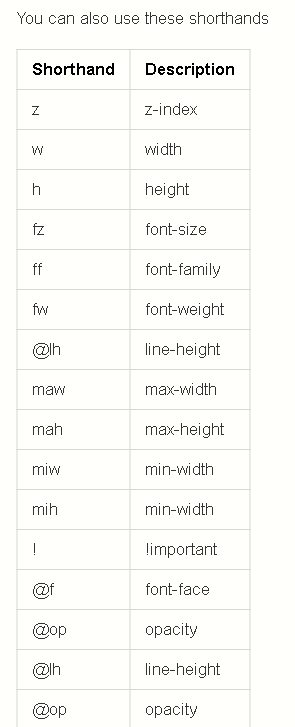


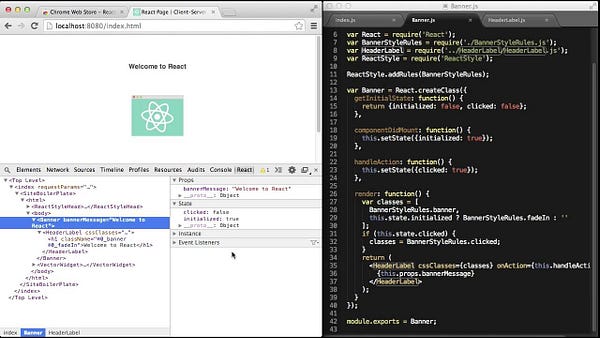


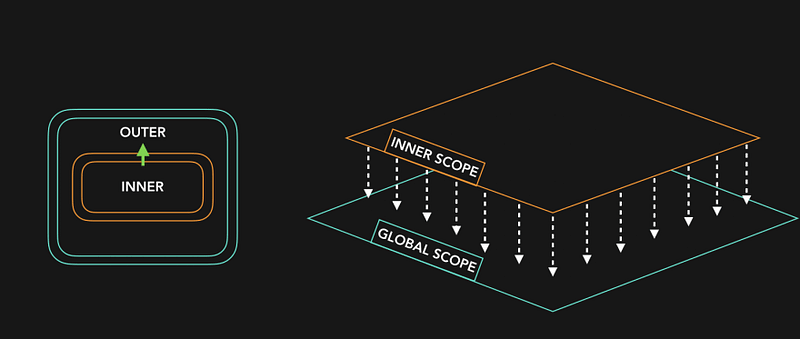
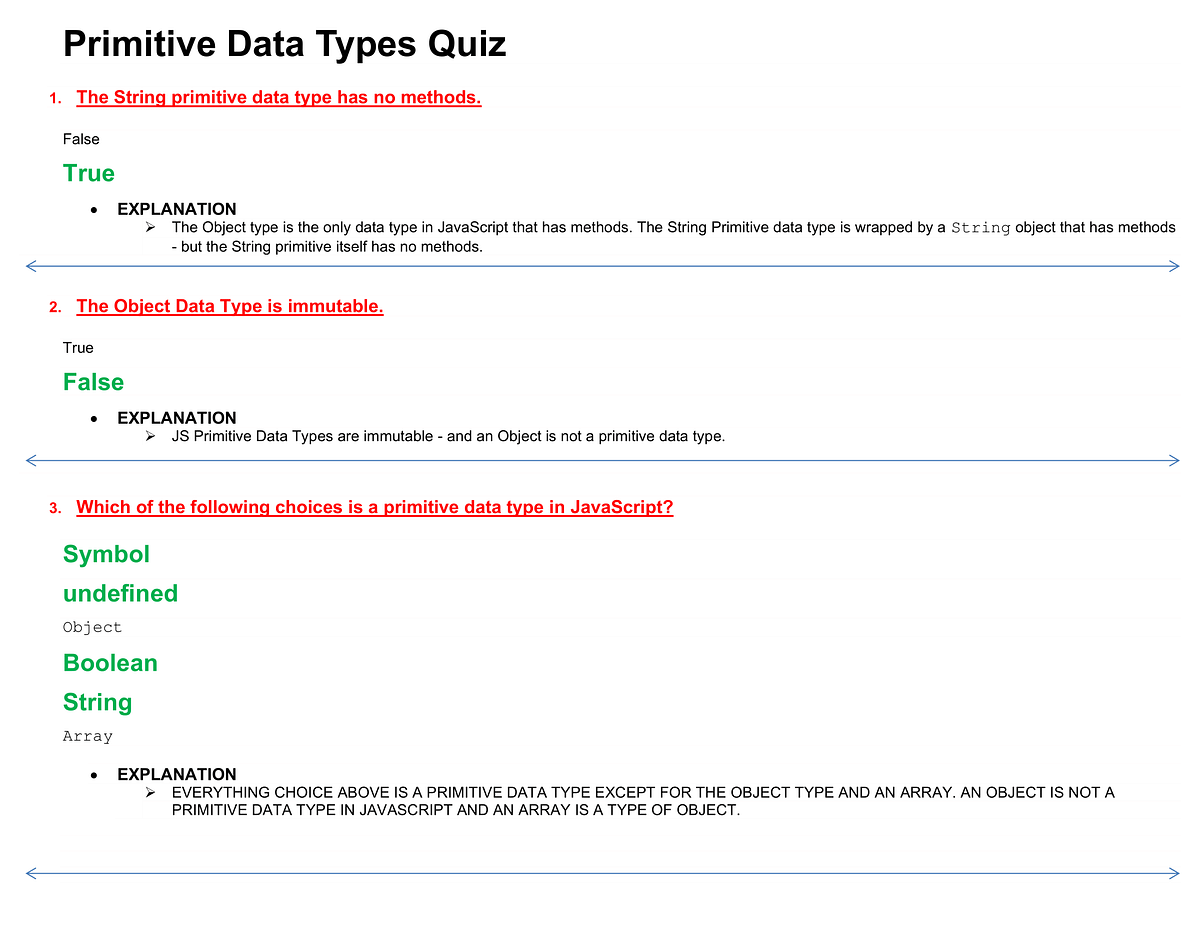

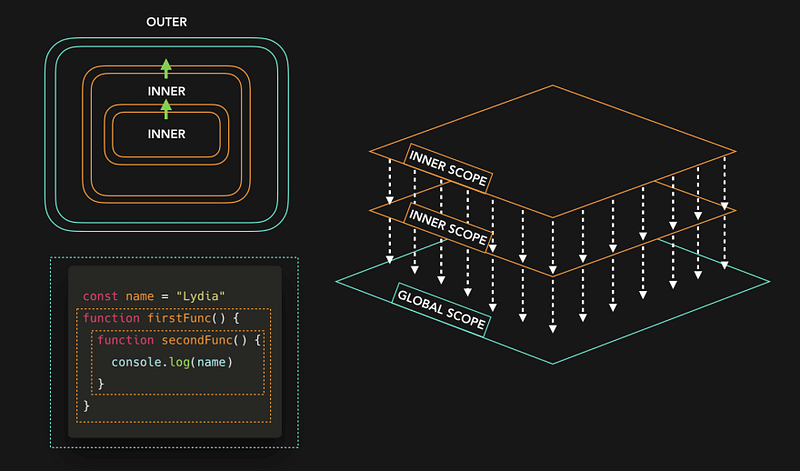
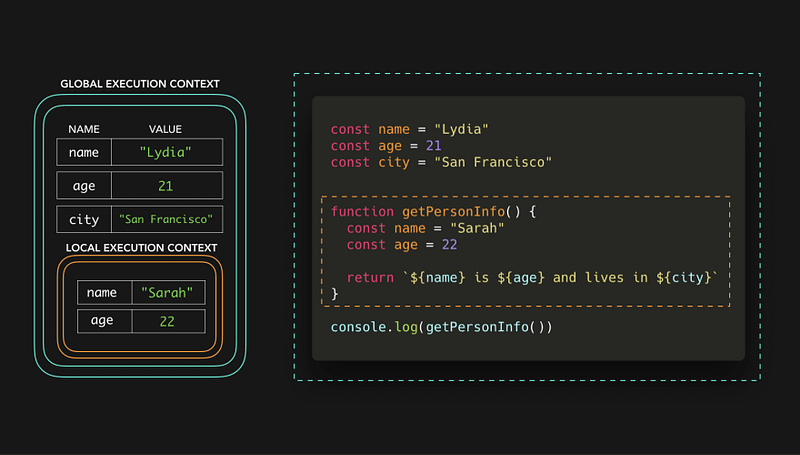

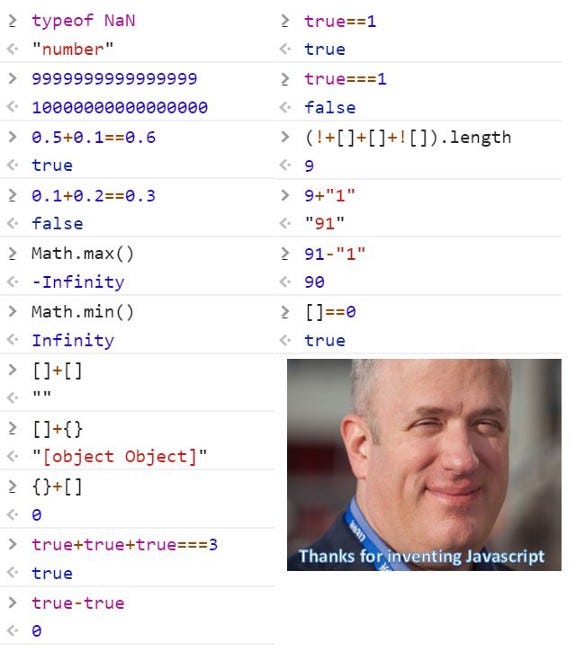


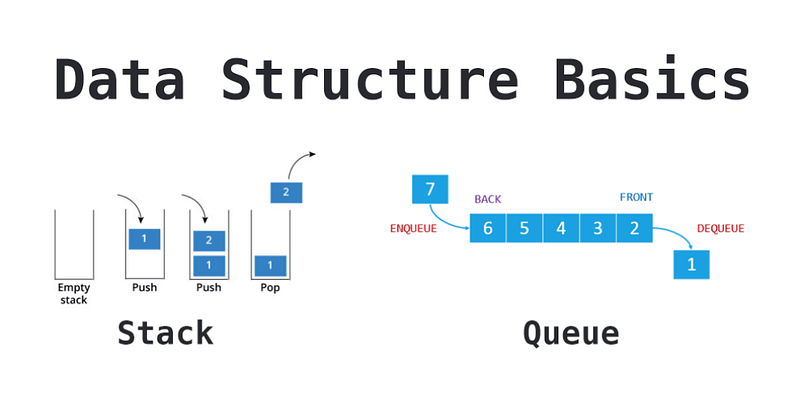

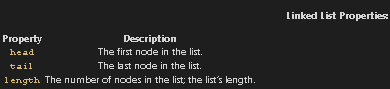
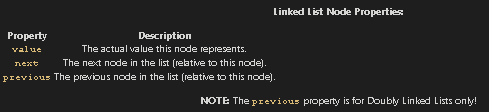


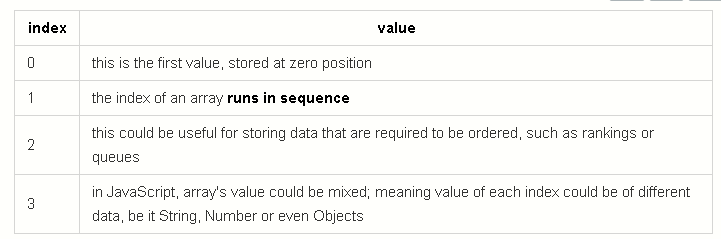

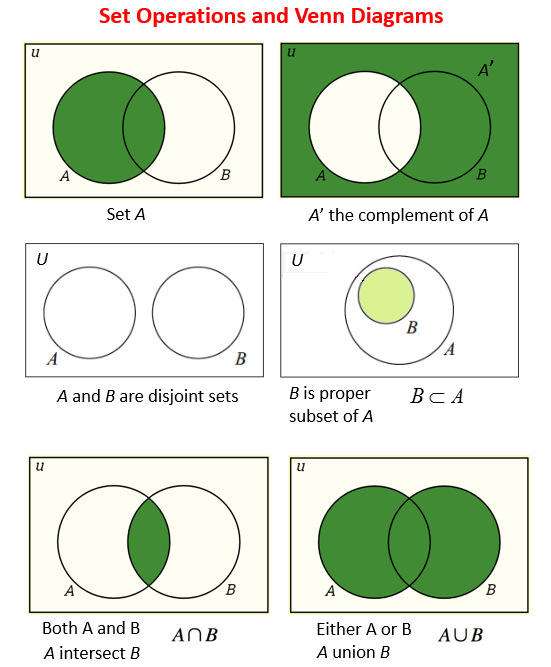
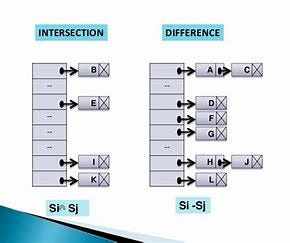

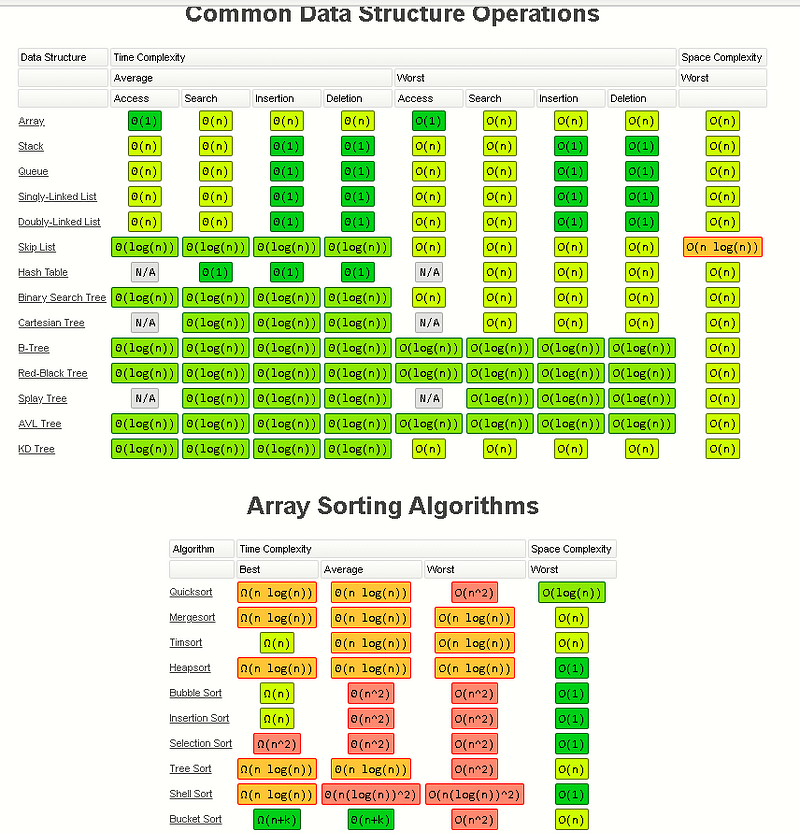
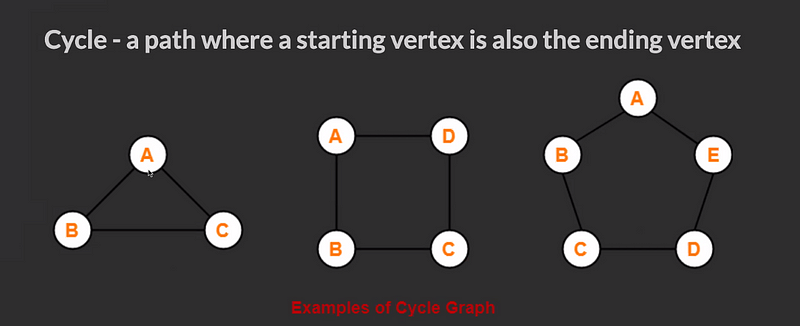

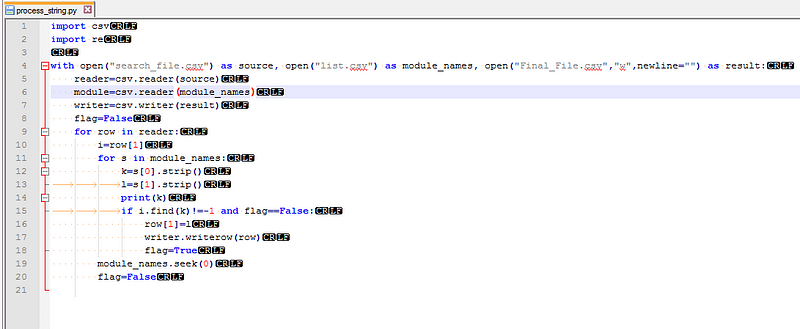

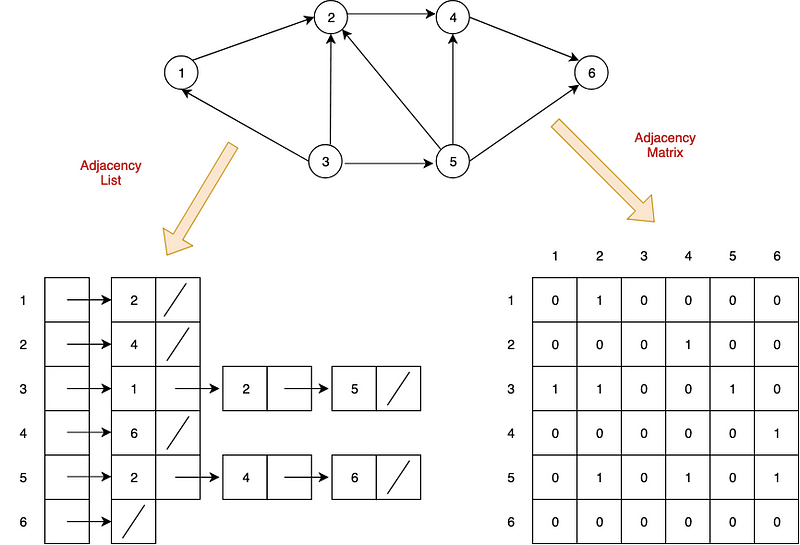
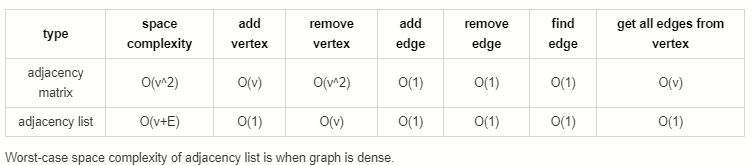
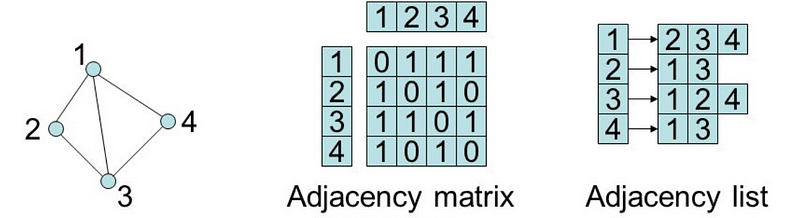


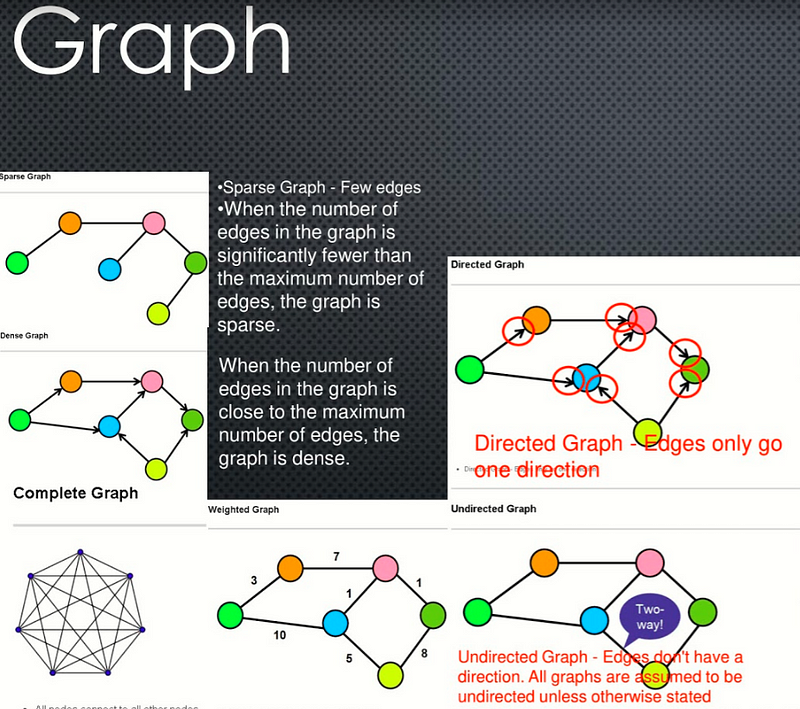
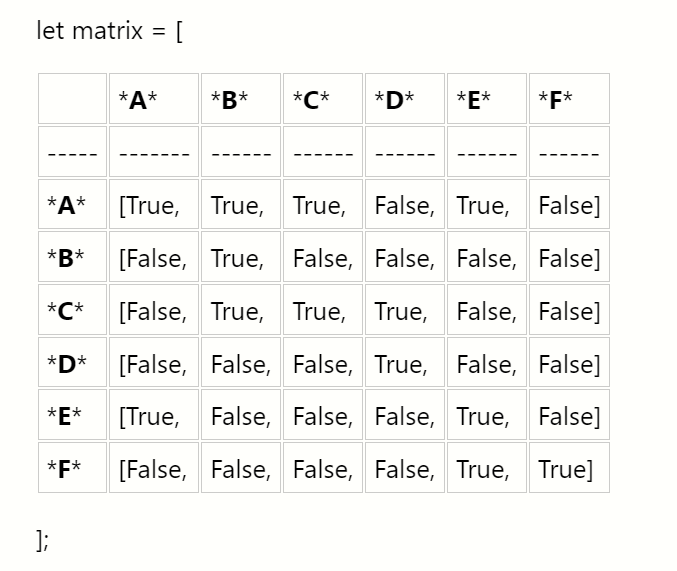


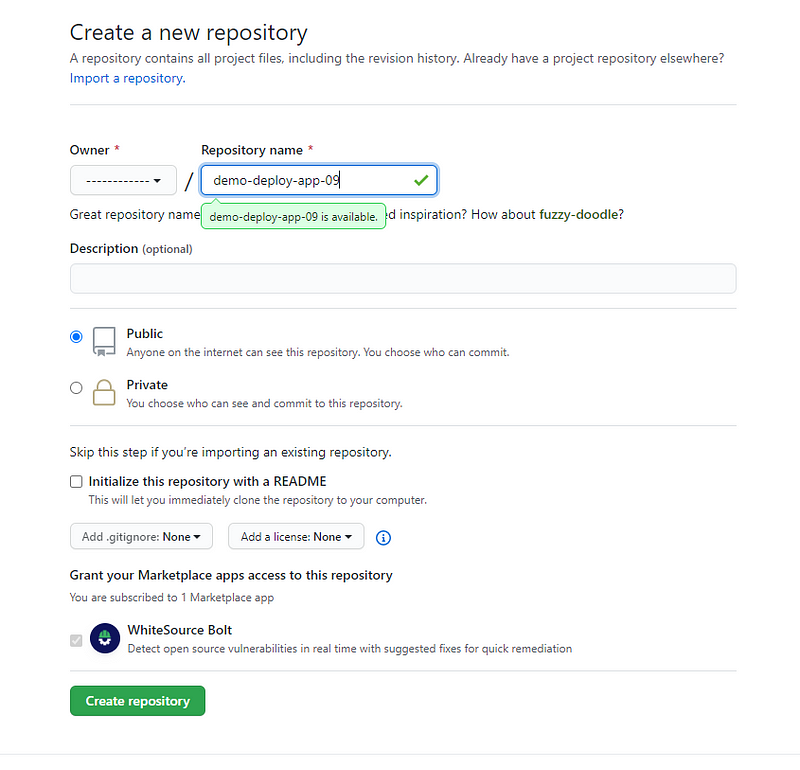
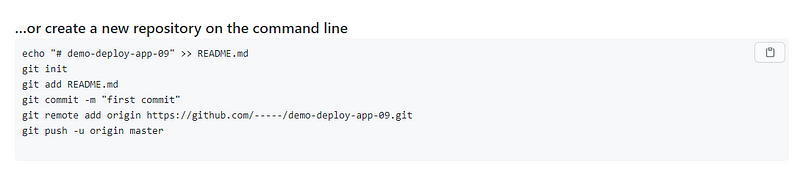
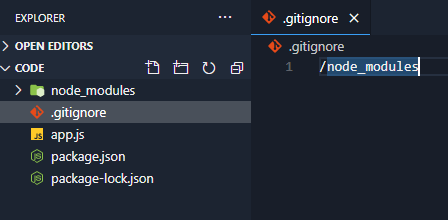
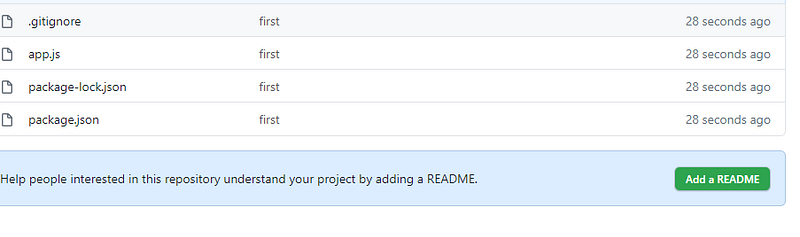


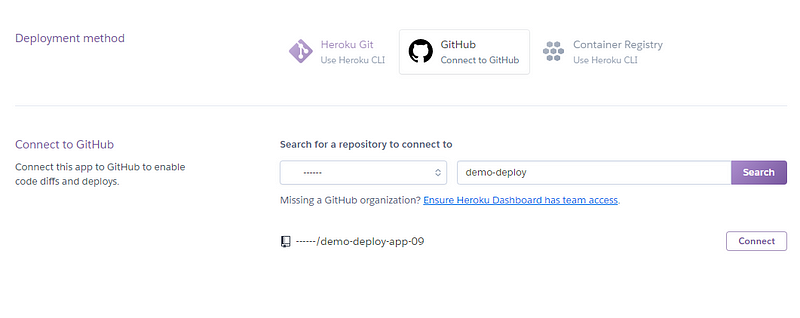
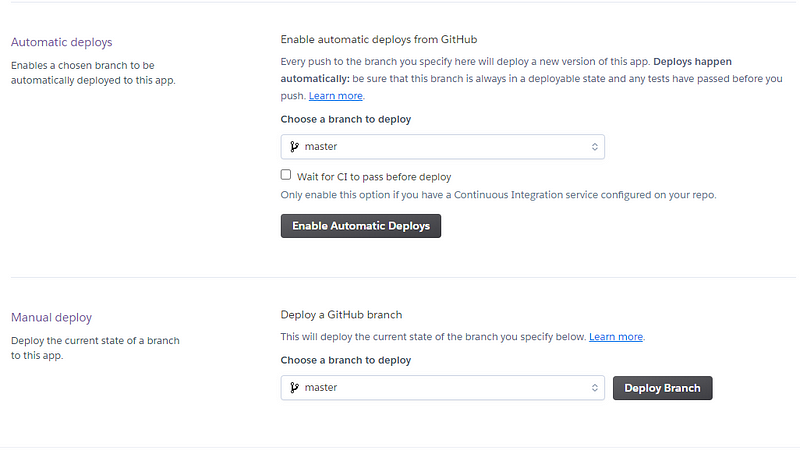


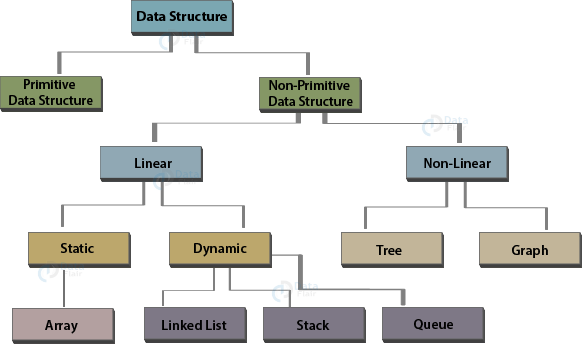


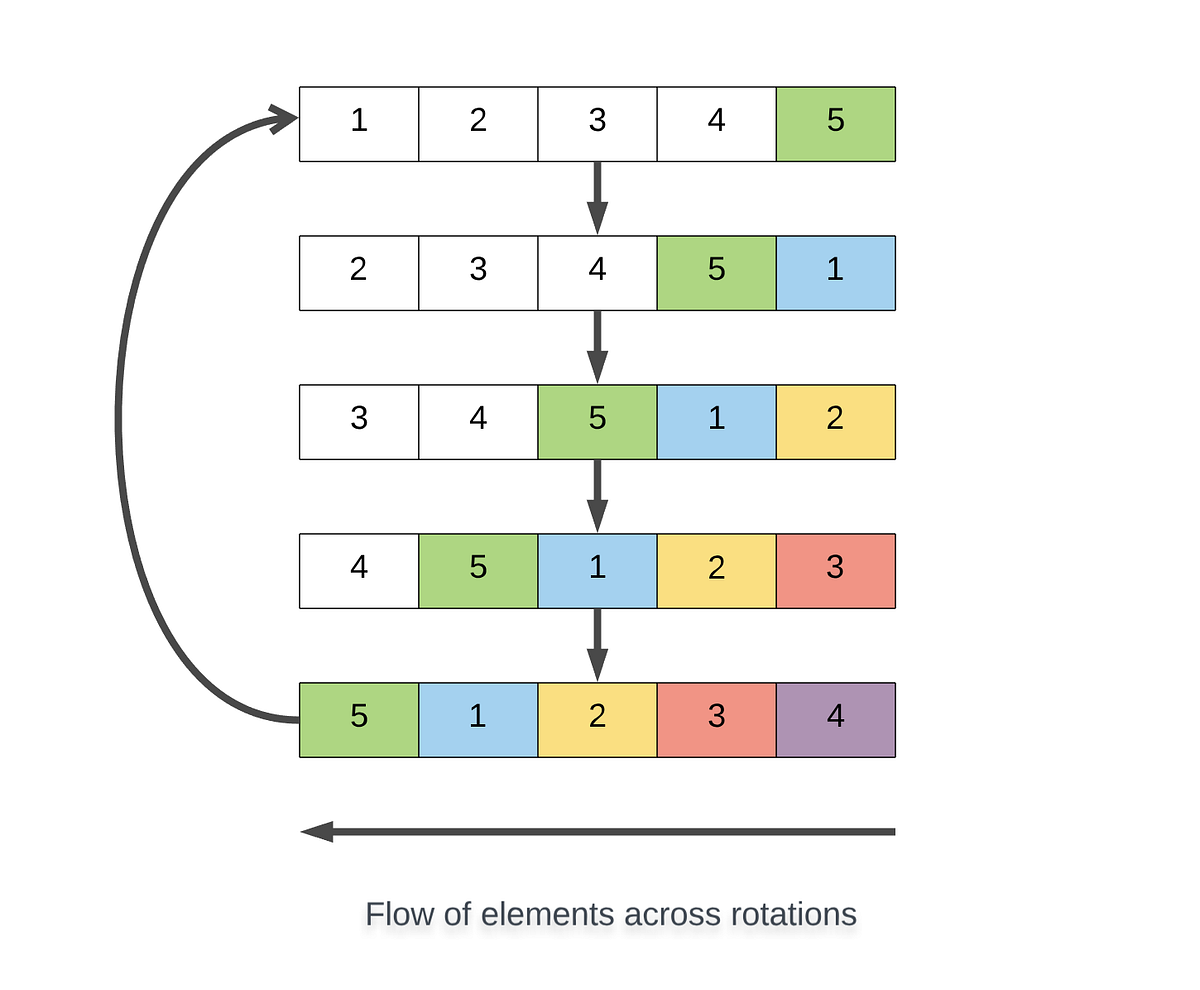

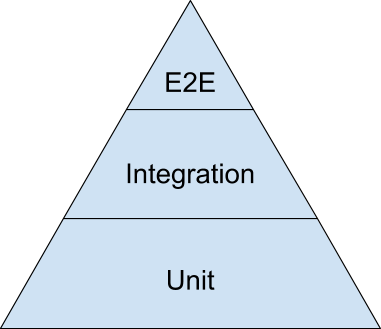


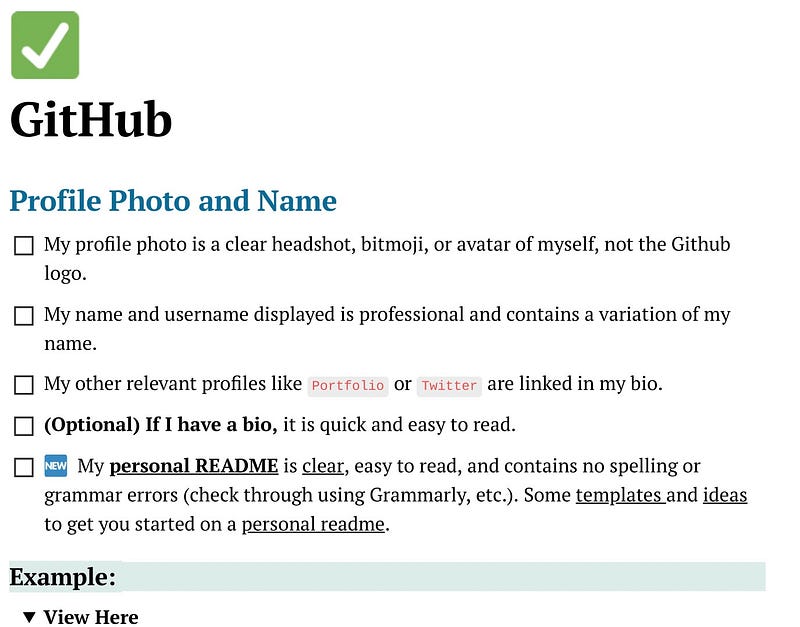
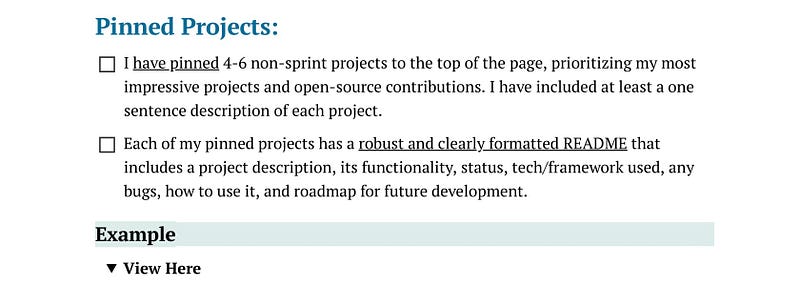


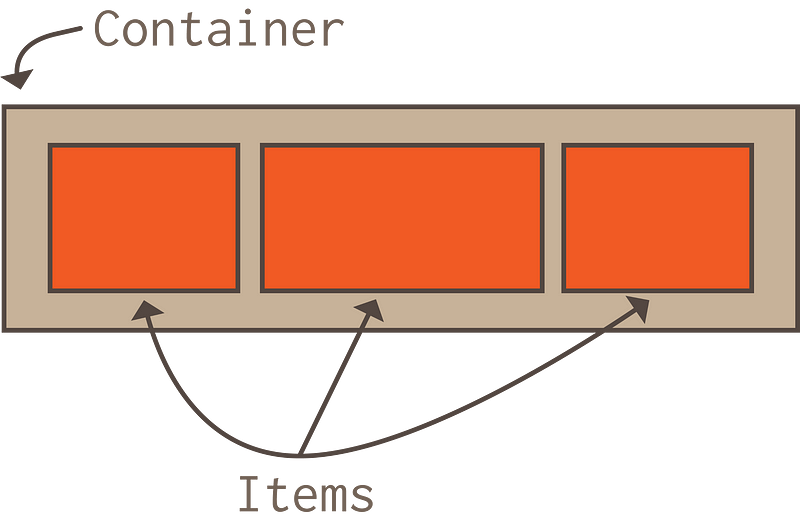


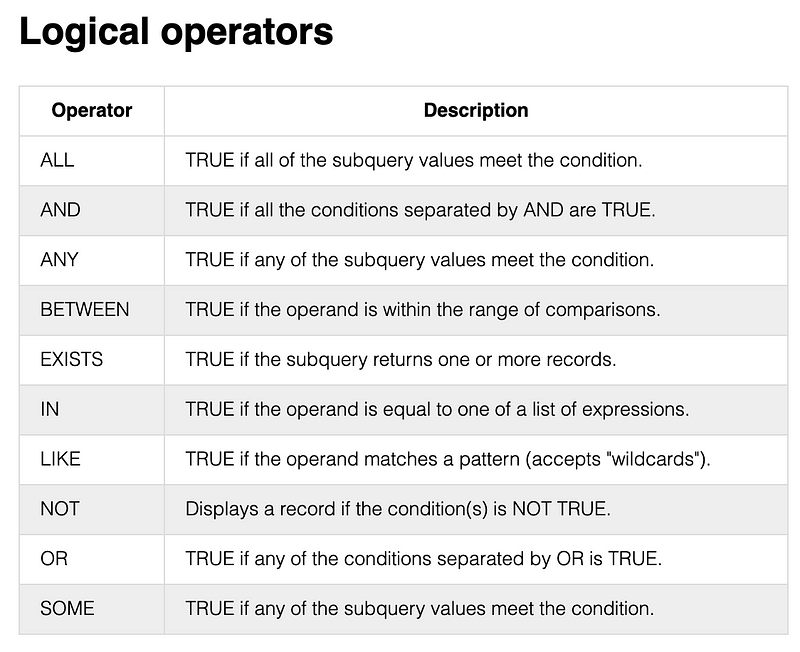

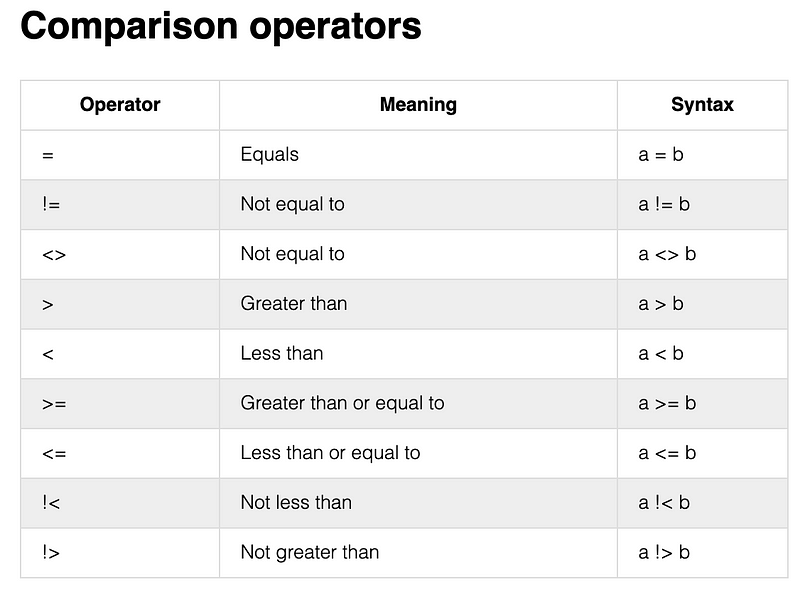
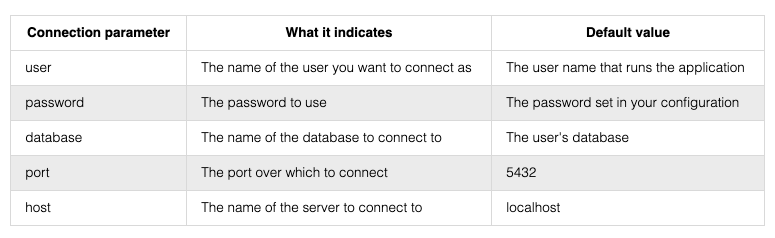


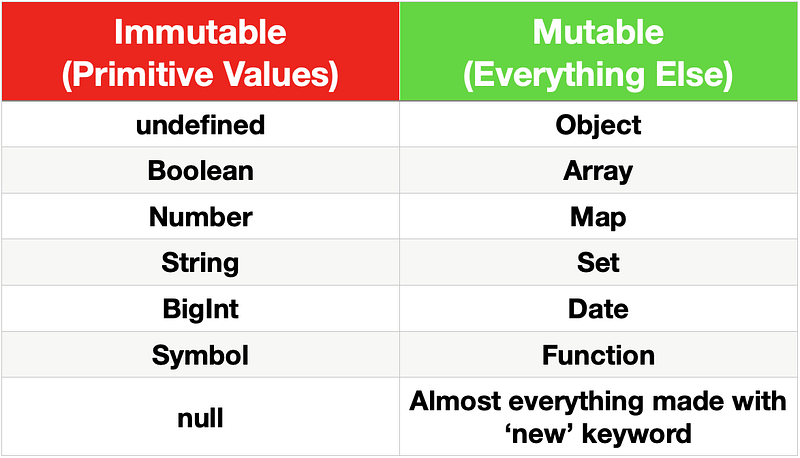
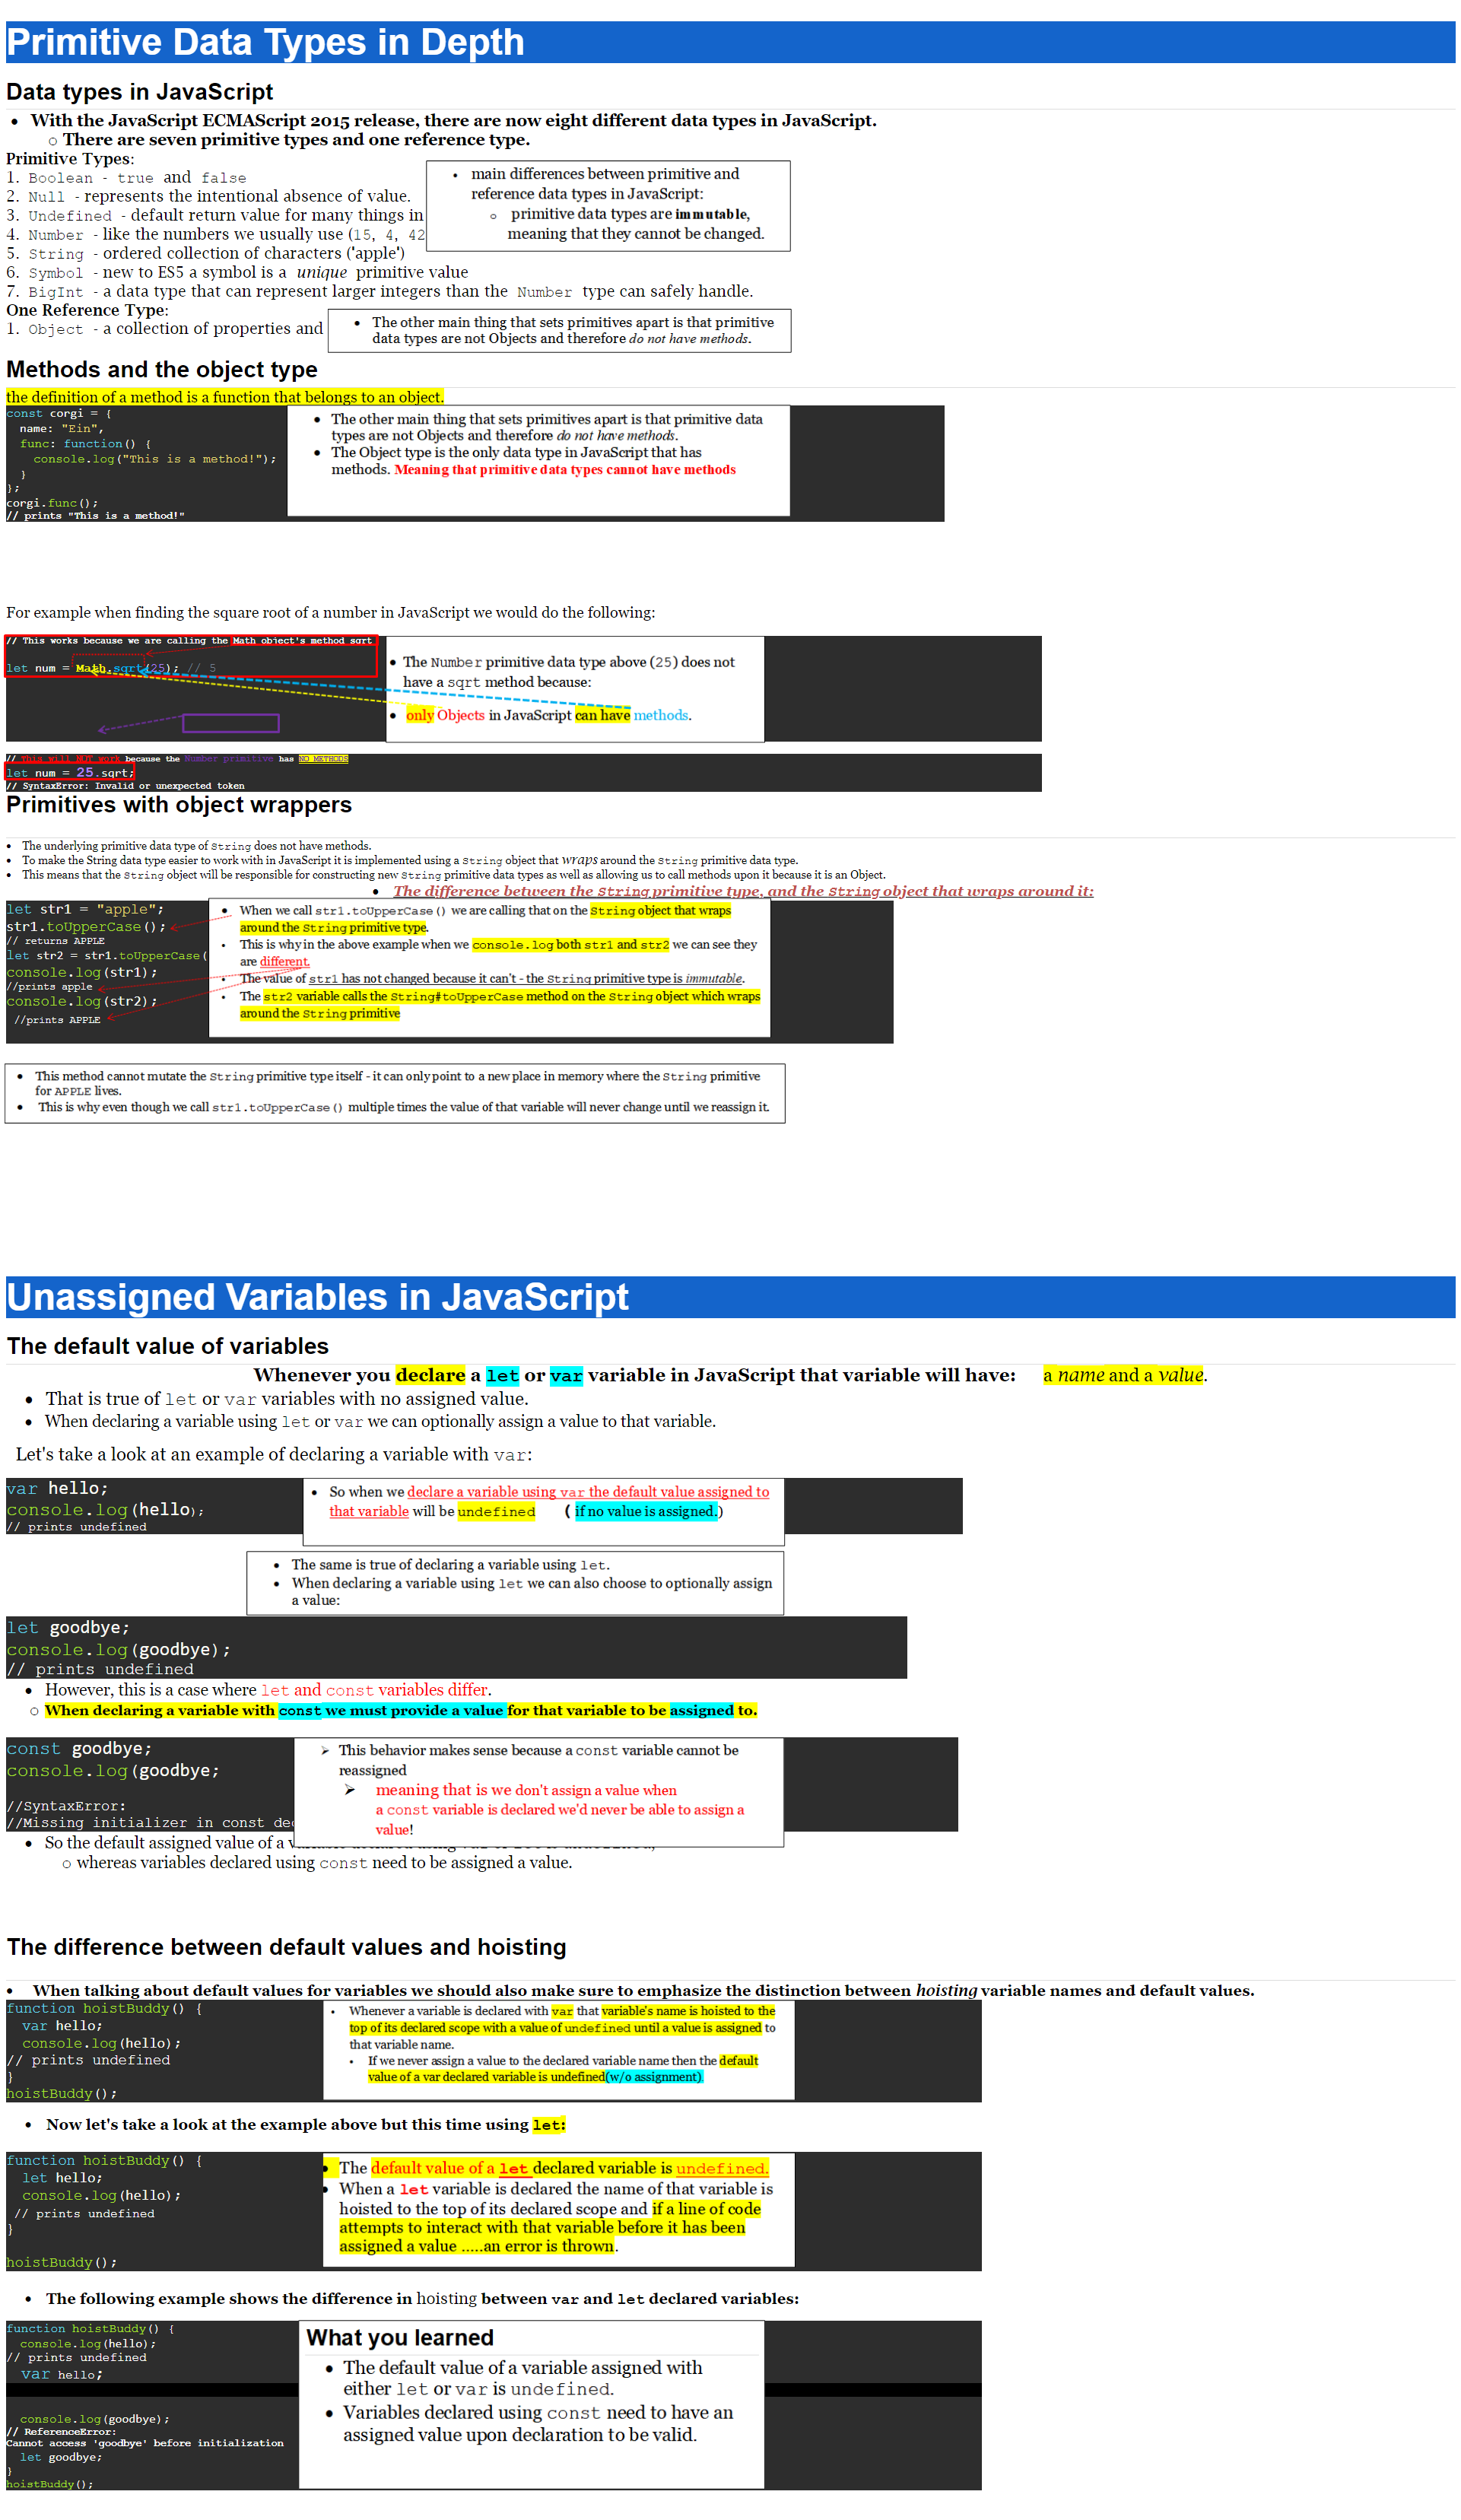


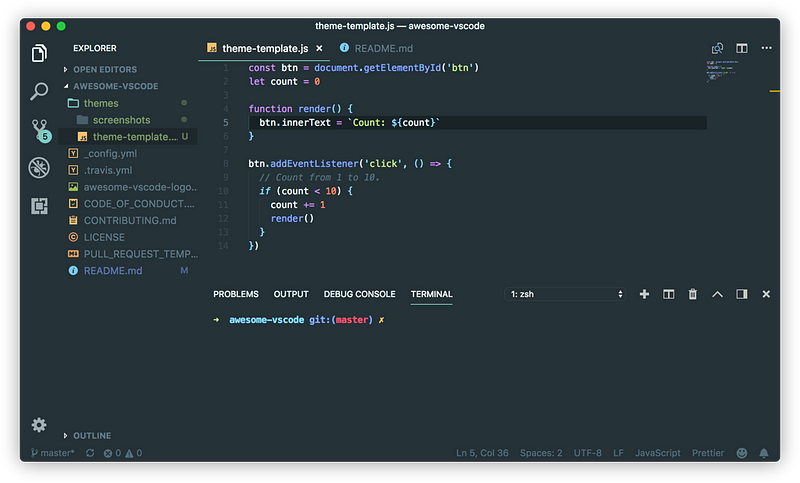
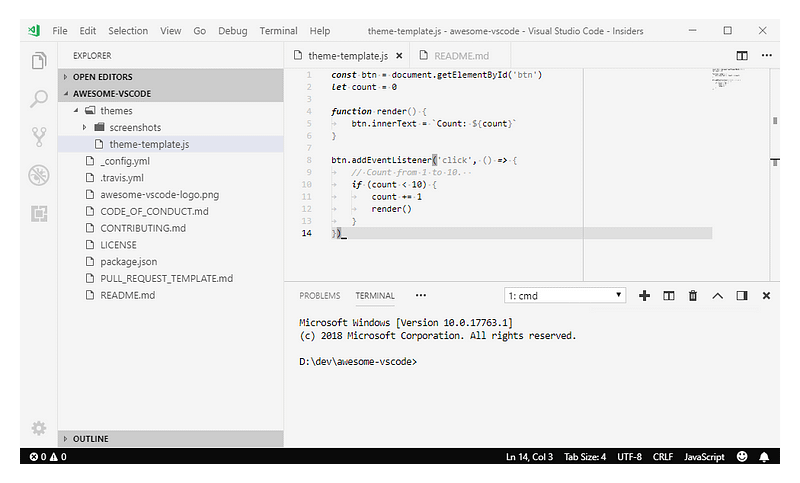
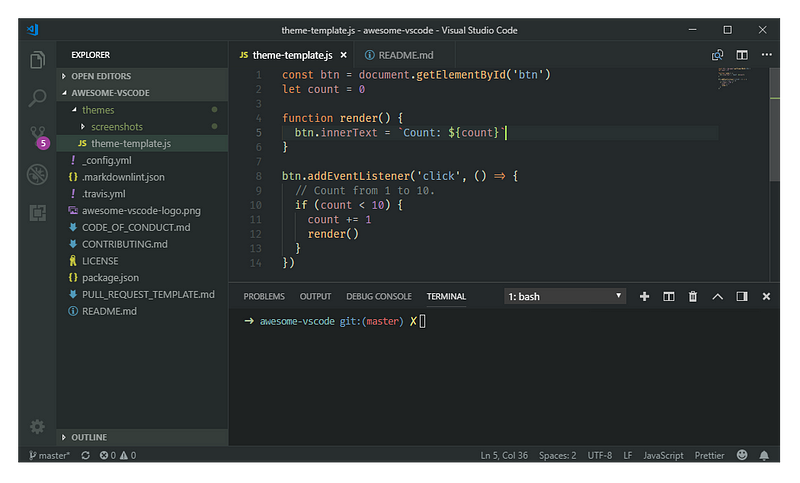
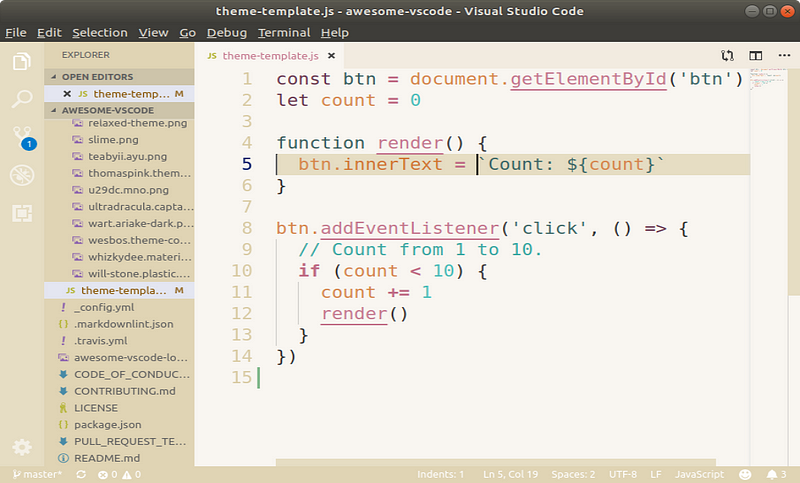

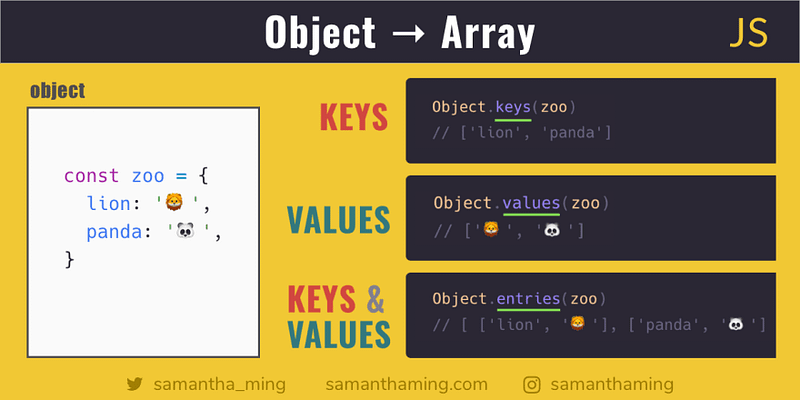


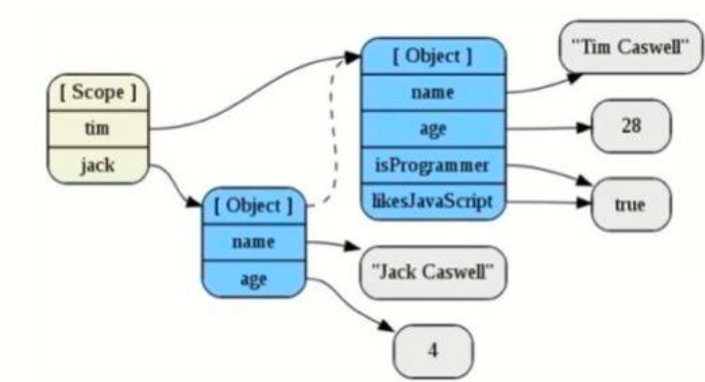
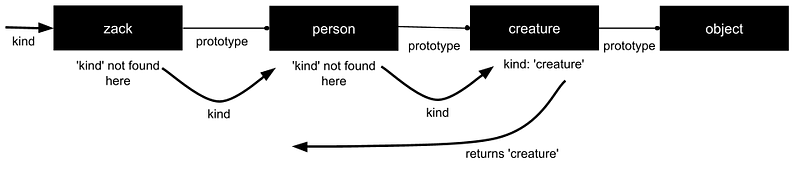
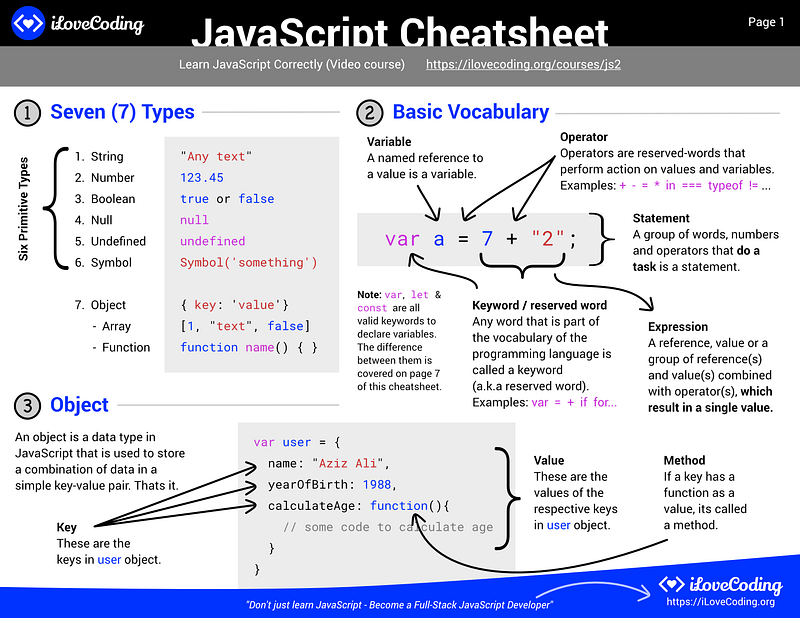


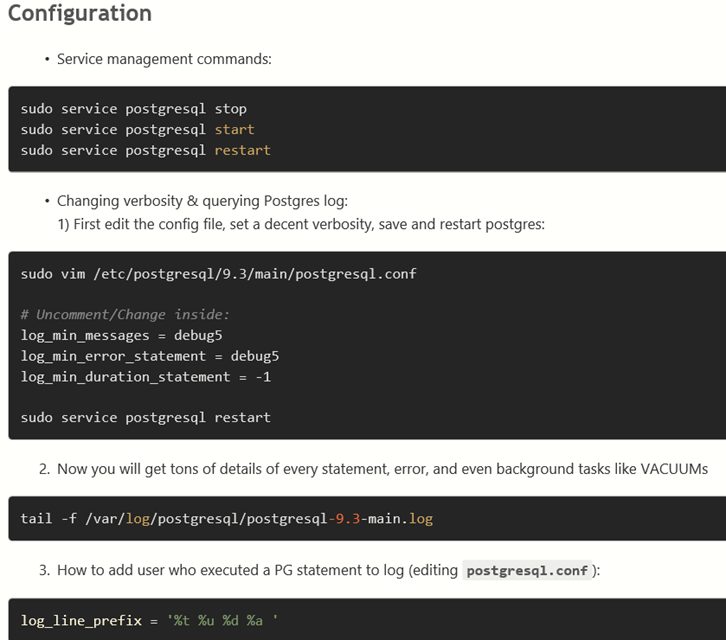
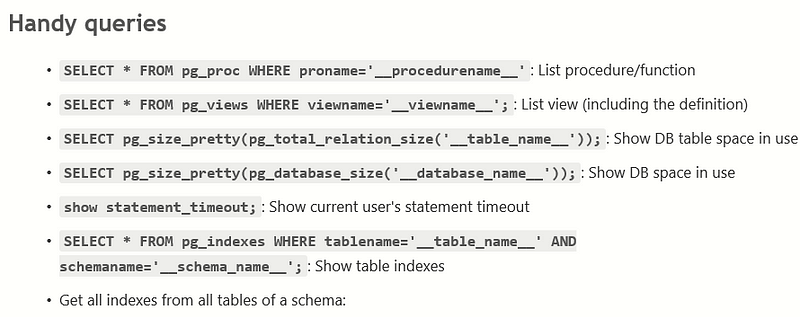
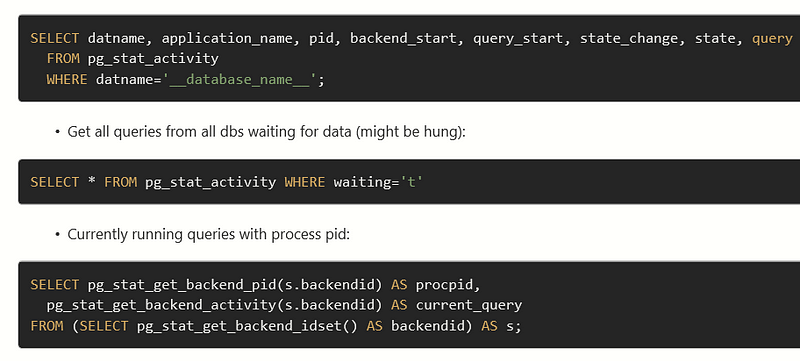

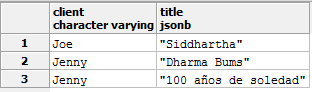

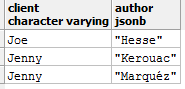
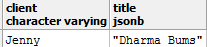
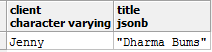


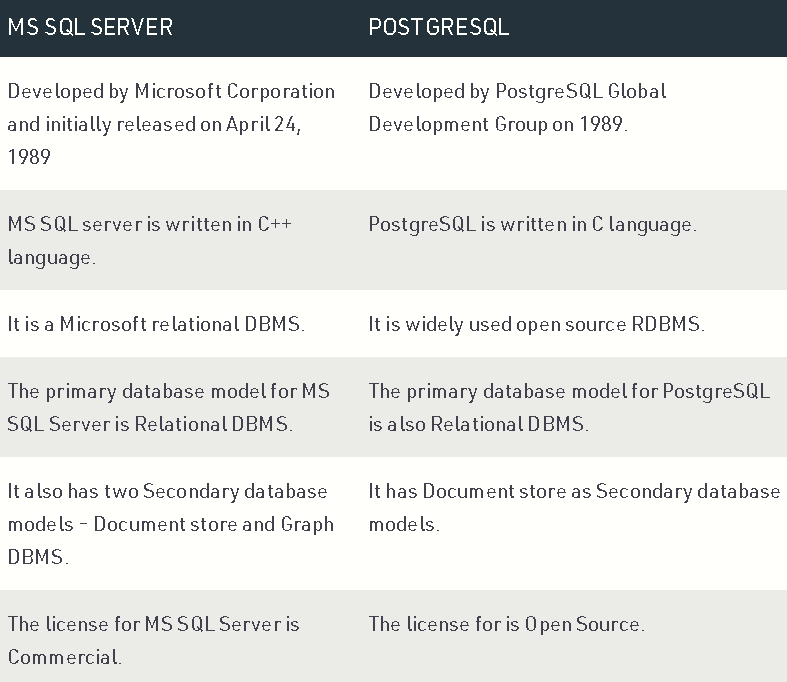
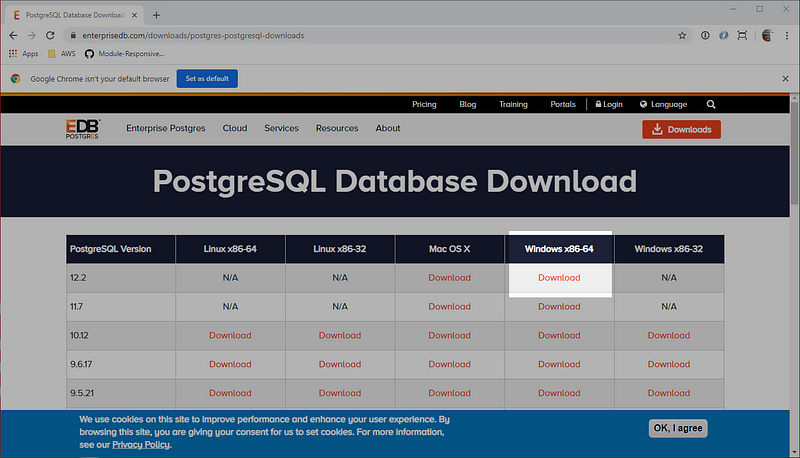

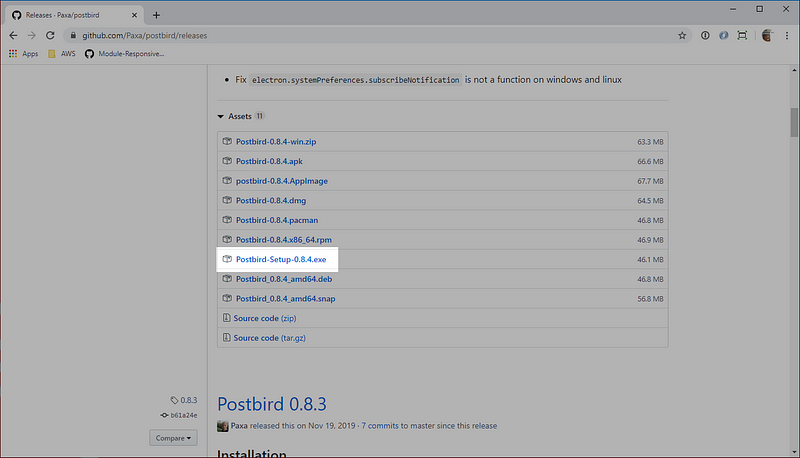


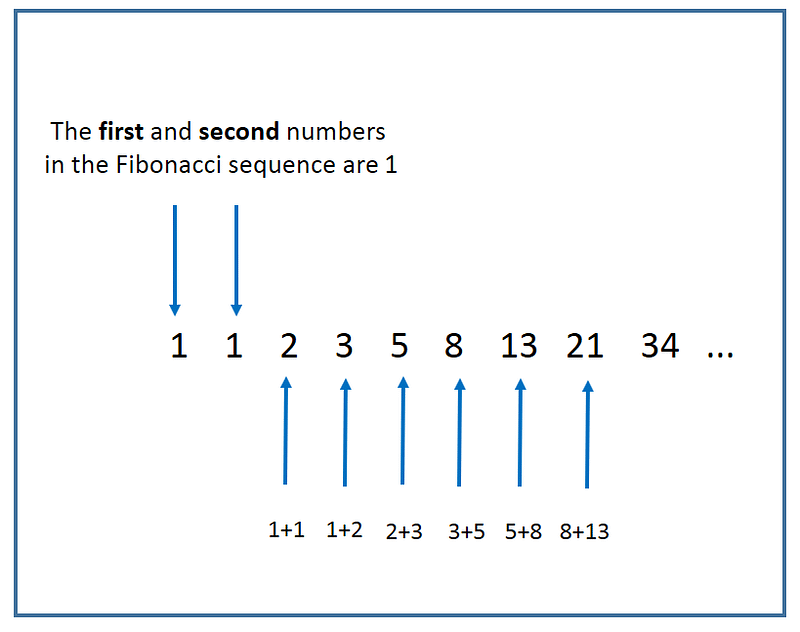

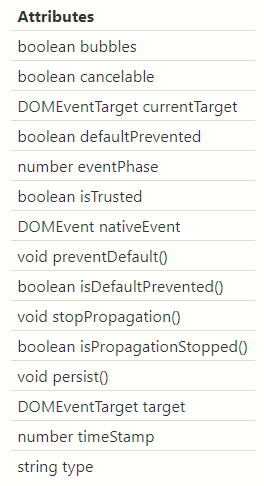
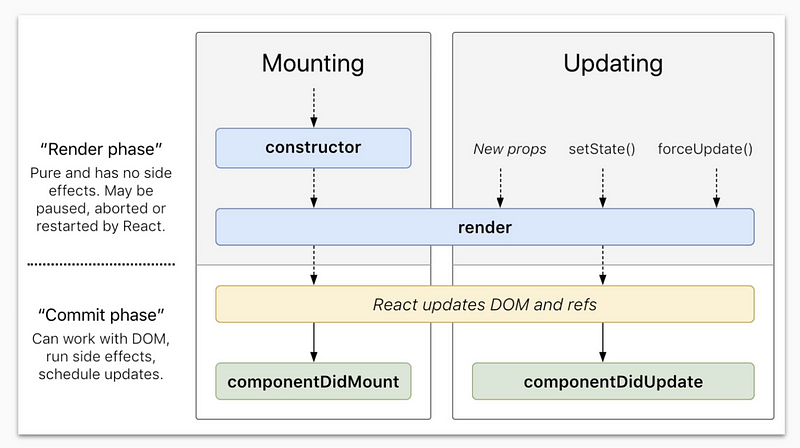

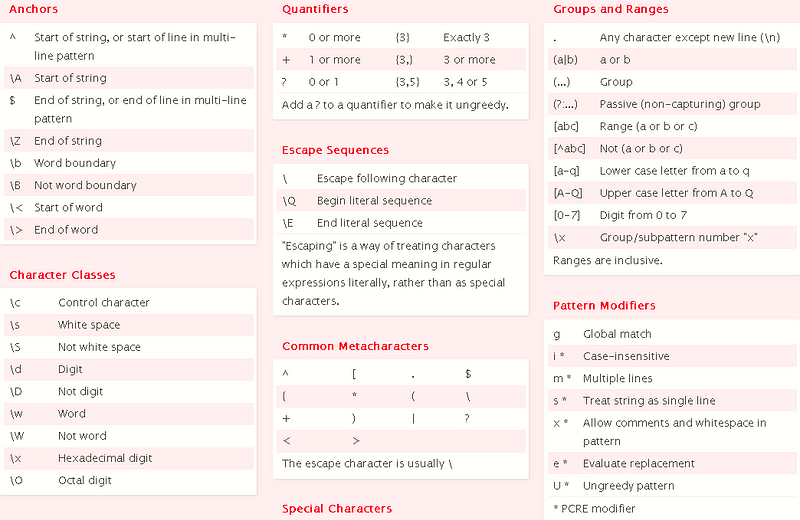

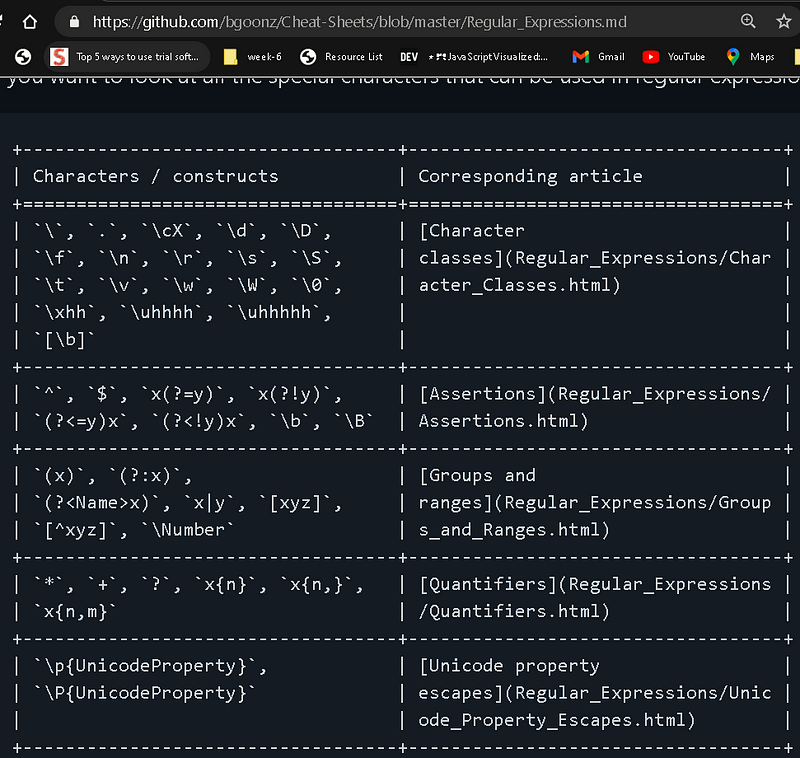