This page describes how to build and run containers from scratch, and configure container networking from scratch
using the command line tools, chroot, unshare, ip and the Linux kernel feature, Namespaces. We will also demonstrate how to use them.
- Linux x86_64 Host
- chroot ─ a user-space program to change the root filesystem of the calling process.
- unshare ─ a user-space program to run a program in new namespace that isolates the process ID, mount, IPC, network, and so on.
- Linux Namespaces ─ a feature of the Linux kernel that partitions kernel resources such that one set of processes sees one set of resources, while another set of processes sees a different set of resources.
chroot
    ├── alpine-linux
    │   ├── bin
    │   ├── dev
    │   ├── etc
    │   ├── home
    │   ├── lib
    │   ├── media
    │   ├── mnt
    │   ├── opt
    │   ├── proc
    │   ├── root
    │   ├── run
    │   ├── sbin
    │   ├── srv
    │   ├── sys
    │   ├── tmp
    │   ├── usr
    │   └── var
    └── tiny-linux
        ├── bin
        ├── dev
        ├── proc
        ├── sbin
        ├── sys
        └── usr
Create a project directory.
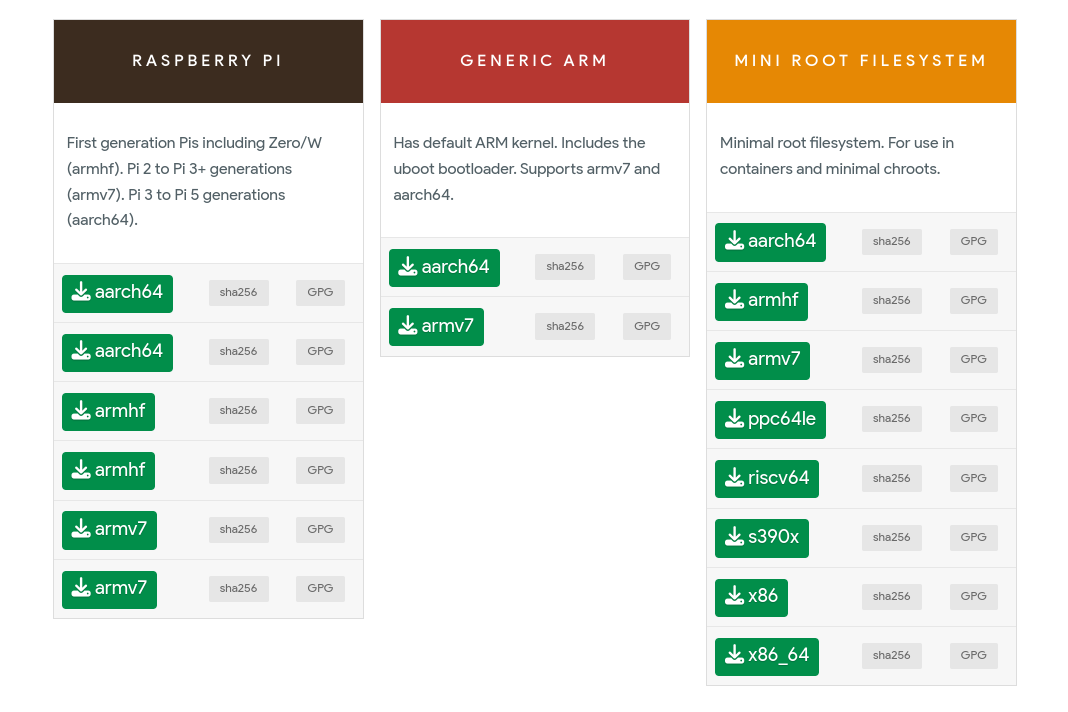
$ mkdir -p chroot/alpine-linuxThen, go to the Alpine Linux official website https://alpinelinux.org/downloads and download the Alpine Linux x86_64 mini root filesystem.
Or,
Download with the curl command line tool.
$ curl -LO https://dl-cdn.alpinelinux.org/alpine/v3.20/releases/x86_64/alpine-minirootfs-3.20.2-x86_64.tar.gzPut the downloaded Alpine Linux mini rootfs alpine-minirootfs-3.20.2-x86_64.tar.gz fle to chroot/alpine-linux and then, extract this mini rootfs tar file.
$ tar -xzvf alpine-minirootfs-3.20.2-x86_64.tar.gzThen, clean up the alpine-minirootfs-3.20.2-x86_64.tar.gz tar file.
$ rm alpine-minirootfs-3.20.2-x86_64.tar.gz[zawzaw@fedora-linux:~/chroot]$ tree -d
├── alpine-linux
├── bin
├── dev
├── etc
├── home
├── lib
├── media
├── mnt
├── opt
├── proc
├── root
├── run
├── sbin
├── srv
├── sys
├── tmp
├── usr
└── varThen, run the chroot command to change root filesystem and mount the proc virtual filesystem.
sudo chroot alpine-linux /bin/shmount -t proc proc /procThen, test some commands like cat /etc/os-release, ls and check the Linux kernel version with cat /proc/version.
/ # cat /etc/os-release
NAME="Alpine Linux"
ID=alpine
VERSION_ID=3.20.2
PRETTY_NAME="Alpine Linux v3.20"
HOME_URL="https://alpinelinux.org/"
BUG_REPORT_URL="https://gitlab.alpinelinux.org/alpine/aports/-/issues"
/ # ls -l
total 0
drwxr-xr-x 1 1000 1000 858 Jul 22 14:34 bin
drwxr-xr-x 1 1000 1000 0 Jul 22 14:34 dev
drwxr-xr-x 1 1000 1000 540 Jul 22 14:34 etc
drwxr-xr-x 1 1000 1000 0 Jul 22 14:34 home
drwxr-xr-x 1 1000 1000 272 Jul 22 14:34 lib
drwxr-xr-x 1 1000 1000 28 Jul 22 14:34 media
drwxr-xr-x 1 1000 1000 0 Jul 22 14:34 mnt
drwxr-xr-x 1 1000 1000 0 Jul 22 14:34 opt
dr-xr-xr-x 1 1000 1000 0 Jul 22 14:34 proc
drwx------ 1 1000 1000 24 Jul 30 04:26 root
drwxr-xr-x 1 1000 1000 0 Jul 22 14:34 run
drwxr-xr-x 1 1000 1000 790 Jul 22 14:34 sbin
drwxr-xr-x 1 1000 1000 0 Jul 22 14:34 srv
drwxr-xr-x 1 1000 1000 0 Jul 22 14:34 sys
drwxr-xr-x 1 1000 1000 0 Jul 22 14:34 tmp
drwxr-xr-x 1 1000 1000 40 Jul 22 14:34 usr
drwxr-xr-x 1 1000 1000 86 Jul 22 14:34 var/ # cat /proc/version
Linux version 6.9.11-200.fc40.x86_64 (mockbuild@6866f5aef808443a9a7e33cf5dcb74af) (gcc (GCC) 14.1.1 20240701 (Red Hat 14.1.1-7), GNU ld version 2.41-37.fc40) #1 SMP PREEMPT_DYNAMIC Thu Jul 25 18:17:34 UTC 2024In that time, you will notice that we will see all processes and network interfaces from our chroot Alpine Linux root filesystem. It means that we have not isolated the process ID (PID) and network. In the next step, we will use the unshare command-line tool to start a process with isolated the process ID (PID) and network.
/ # ps aux
PID   USER     TIME  COMMAND
    1 root      0:08 /usr/lib/systemd/systemd --switched-root --system --deserialize=47 rhgb
    2 root      0:00 [kthreadd]
    3 root      0:00 [pool_workqueue_]
    4 root      0:00 [kworker/R-rcu_g]
    5 root      0:00 [kworker/R-slub_]
    6 root      0:00 [kworker/R-netns]
    8 root      0:01 [kworker/0:0H-kb]
   11 root      0:00 [kworker/R-mm_pe]
   13 root      0:00 [rcu_tasks_kthre]
   14 root      0:00 [rcu_tasks_rude_]
   15 root      0:00 [rcu_tasks_trace]
   16 root      0:17 [ksoftirqd/0]
   17 root      0:13 [rcu_preempt]
   18 root      0:00 [rcu_exp_par_gp_]
   19 root      0:00 [rcu_exp_gp_kthr]
   20 root      0:00 [migration/0]
   21 root      0:00 [idle_inject/0]
   22 root      0:00 [cpuhp/0]
   23 root      0:00 [cpuhp/1]
   24 root      0:00 [idle_inject/1]
   25 root      0:00 [migration/1]
   26 root      0:01 [ksoftirqd/1]
   28 root      0:00 [kworker/1:0H-ev]
   29 root      0:00 [cpuhp/2]
   30 root      0:00 [idle_inject/2]
   31 root      0:00 [migration/2]
...
/ # ip addr show
1: lo: <LOOPBACK,UP,LOWER_UP> mtu 65536 qdisc noqueue state UNKNOWN qlen 1000
link/loopback 00:00:00:00:00:00 brd 00:00:00:00:00:00
inet 127.0.0.1/8 scope host lo
valid_lft forever preferred_lft forever
inet6 ::1/128 scope host noprefixroute
valid_lft forever preferred_lft forever
2: wlo1: <BROADCAST,MULTICAST,UP,LOWER_UP> mtu 1500 qdisc noqueue state UP qlen 1000
link/ether 22:68:40:da:2f:d7 brd ff:ff:ff:ff:ff:ff
inet 192.168.196.170/24 brd 192.168.196.255 scope global dynamic noprefixroute wlo1
valid_lft 3533sec preferred_lft 3533sec
inet6 fe80::c6f8:5e2f:546b:202b/64 scope link noprefixroute
valid_lft forever preferred_lft forever
3: virbr1: <NO-CARRIER,BROADCAST,MULTICAST,UP> mtu 1500 qdisc noqueue state DOWN qlen 1000
link/ether 52:54:00:e4:e6:a6 brd ff:ff:ff:ff:ff:ff
inet 192.168.100.1/24 brd 192.168.100.255 scope global virbr1
valid_lft forever preferred_lft forever
4: virbr0: <NO-CARRIER,BROADCAST,MULTICAST,UP> mtu 1500 qdisc noqueue state DOWN qlen 1000
link/ether 52:54:00:78:99:3e brd ff:ff:ff:ff:ff:ff
inet 192.168.122.1/24 brd 192.168.122.255 scope global virbr0
valid_lft forever preferred_lft forever
5: br-8d6e77262cef: <NO-CARRIER,BROADCAST,MULTICAST,UP> mtu 1500 qdisc noqueue state DOWN
link/ether 02:42:f3:38:f3:3e brd ff:ff:ff:ff:ff:ff
inet 172.31.0.1/24 brd 172.31.0.255 scope global br-8d6e77262cef
valid_lft forever preferred_lft forever
7: br-3088b978c0da: <NO-CARRIER,BROADCAST,MULTICAST,UP> mtu 1500 qdisc noqueue state DOWN
link/ether 02:42:0f:97:48:17 brd ff:ff:ff:ff:ff:ff
inet 192.168.49.1/24 brd 192.168.49.255 scope global br-3088b978c0da
valid_lft forever preferred_lft forever
8: docker0: <BROADCAST,MULTICAST,UP,LOWER_UP> mtu 1500 qdisc noqueue state UP
link/ether 02:42:e5:4f:a7:f5 brd ff:ff:ff:ff:ff:ff
inet 172.30.1.1/16 brd 172.30.255.255 scope global docker0
valid_lft forever preferred_lft forever
inet6 fe80::42:e5ff:fe4f:a7f5/64 scope link
valid_lft forever preferred_lft forever
10: veth07d73e2@if9: <BROADCAST,MULTICAST,UP,LOWER_UP,M-DOWN> mtu 1500 qdisc noqueue master docker0 state UP
link/ether f6:31:23:c3:f9:7d brd ff:ff:ff:ff:ff:ff
inet6 fe80::f431:23ff:fec3:f97d/64 scope link
valid_lft forever preferred_lft foreverWe will use the unshare command-line tool to run a program in a new Linux namespace that isolates the process ID, mount, IPC, network and etc. This is client tool or user-space program to interact with the Linux kernel-space Namespaces.
Run the unshare command with chroot to run a program in specific namespaces, -p, -n
sudo unshare -pn -f chroot alpine-linux /bin/sh-pCreate a new Process IP (PID) namesapce.-nCreate a new Network namespace.
Ref: https://man.archlinux.org/man/unshare.1.en
Mount the procfsvirtual filesystem.
/ # mount -t proc proc /procThen, check running processes and network interfaces on our Alpine Linux container.
/ # ps aux
PID   USER     TIME  COMMAND
    1 root      0:00 /bin/sh
    7 root      0:00 ps aux
/ # ip addr show
1: lo: <LOOPBACK> mtu 65536 qdisc noop state DOWN qlen 1000
link/loopback 00:00:00:00:00:00 brd 00:00:00:00:00:00Now, you will see our Alpine Linux Container with isolated Namespaces PID and Network on the host machine. But, it's shared using CPU and MEM hardware resources.
TLDR;
#!/usr/bin/env sh

#
# CONTAINER (A): Alpine Linux Container
#
ip link add veth0 type veth peer name veth1
ip link set veth1 netns "${ALPINE_CONTAINER_PID}"
ip link set dev veth0 up
ip addr add dev veth1 172.19.35.2/24
ip link set lo up
ip link set veth1 up

#
# CONTAINER (B): Tiny Linux Container
#
ip link add veth2 type veth peer name veth3
ip link set veth3 netns "${TINY_CONTAINER_PID}"
ip link set dev veth2 up
ip addr add dev veth3 172.19.35.3/24
ip link set lo up
ip link set veth3 up

#
# Create a bridge network and bring it up.
#
ip link add br0 type bridge
ip link set veth0 master br0
ip link set veth2 master br0
ip addr add dev br0 172.19.35.1/24
ip link set br0 upchroot
├── alpine-linux ---> Container (A)
├── tiny-linux ---> Container (B)
├── scripts
| ├── create_veth_dev.sh
| ├── start_alpine_linux.sh
| └── start_tiny_linux.sh
For Container (A), we will use the Alpine Linux container mini root filesystem image.
Start Container (A), Alpine Linux Container with fully isolated the PID and Network namespaces.
#!/usr/bin/env sh

sudo unshare -pn \
	-f chroot alpine-linux/ \
	env -i \
	  HOME=/root \
	  HOSTNAME=alpine-linux \
	  HOST=alpine-linux \
	  PATH=/bin:/usr/bin:/sbin:/usr/sbin \
	/bin/sh -s "Alpine Linux Container"
Create a Shell script init.sh and run it.
#!/usr/bin/env sh

mount -t proc proc /proc

printf "#############################\n"
printf "#                           #\n"
printf "#                           #\n"
printf "#  Welcome to Alpine Linux  #\n"
printf "#                           #\n"
printf "#                           #\n"
printf "#############################\n"

printf "\n===================================\n"
printf "ALPINE LINUX OS RELEASE INFORMATION\n"
printf "===================================\n"
cat /etc/os-release

printf "\n=========================\n"
printf "CURRENT RUNNING PROCESSES\n"
printf "=========================\n"
ps aux
Setup a veth network pair, veth0, veth1 on the host machine.
$ sudo ip link add veth0 type veth peer name veth1
$ sudo ip link set veth1 netns "${ALPINE_CONTAINER_PID}"
$ sudo ip link set dev veth0 up
Then, go to Container (A), Alpine Linux Container, and set an IP address, 172.19.35.2 to the veth1 network device.
$ ip addr add dev veth1 172.19.35.2/24
$ ip link set lo up
$ ip link set veth1 upFor Container (B), we will use the Tiny Linux root fileystem image that I've built from the Linux source code.
To download the Tiny Linux root filesystem image, tiny-linux.tar.gz
Start Container (B), Tiny Linux with fully isolated the PID and Network namespaces.
#!/usr/bin/env sh

sudo unshare -pn \
	-f chroot tiny-linux/ \
	env -i \
	  HOME=/root \
	  HOSTNAME=tiny-linux \
	  HOST=tiny-linux \
	  PATH=/bin:/usr/bin:/sbin:/usr/sbin \
	/bin/sh -s "Tiny Linux Container"
Create a Shell script init.sh and run it.
#!/usr/bin/env sh

mount -t proc proc /proc

printf "#############################\n"
printf "#                           #\n"
printf "#                           #\n"
printf "#  Welcome to Tiny Linux    #\n"
printf "#                           #\n"
printf "#                           #\n"
printf "#############################\n"

printf "\n=================================\n"
printf "TINY LINUX OS RELEASE INFORMATION\n"
printf "=================================\n"
cat /proc/version

printf "\n=========================\n"
printf "CURRENT RUNNING PROCESSES\n"
printf "=========================\n"
ps aux
Setup a veth network pair, veth2, veth2 on the host machine.
$ sudo ip link add veth2 type veth peer name veth3
$ sudo ip link set veth3 netns "${TINY_CONTAINER_PID}"
$ sudo ip link set dev veth2 up
Then, go to Container (B), Tiny Linux Container, and set an IP address, 172.19.35.3 to the veth3 network device.
$ ip addr add dev veth3 172.19.35.3/24
$ ip link set lo up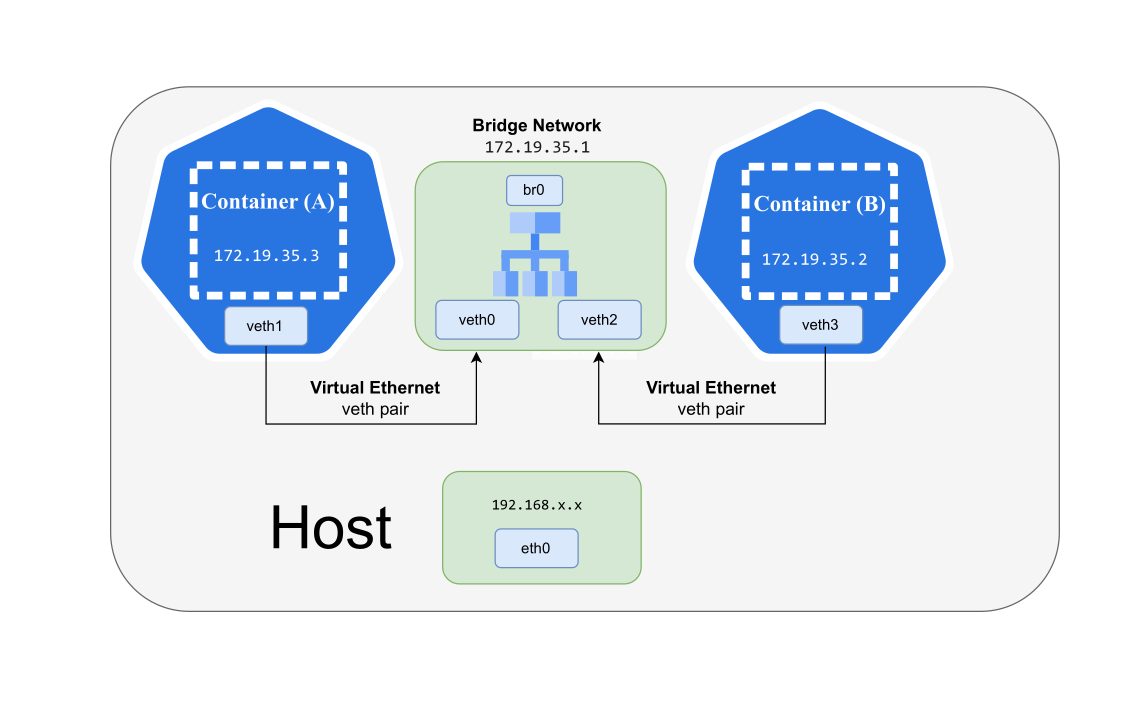
$ ip link set veth3 upWe now have two containers, Container (A) and Container (B), are running in fully isolated PID and Net Linux namesapces. They also have the Virtual Enthernet (VETH) pair in the same Net Linux namespace.
In this section, we will continue to setup a Bridge network to forward the network packets to the two containers.
Setup a Bridge network and attach it to the veth0 and veth2 network interfaces.
$ sudo ip link add br0 type bridge
$ sudo ip link set veth0 master br0
$ sudo ip link set veth2 master br0
Then, set an IP address, 172.19.35.1 to the br0 network interface.
$ sudo ip addr add dev br0 172.19.35.1/24
$ sudo ip link set br0 up
Ref Links: