It is an introductionary material. If you don't need explanation, just the collection of common commands, use my cheatsheets:
- Command line
1.1. different command prompts, terminals, shells
1.2. git bash - Git and Github
2.1. Installation & Setup
2.2. How Git version control works
2.3. Usage, most important commands - Node and npm
- Browser console
introduction & terms
The most basic communication form between you and the computer is writing into a command-line interface. In several situations it is still the best (only?) way to do a task, so it is a must to know the basics. For technical and historical reasons there are multiple names in use for this program, but in general we call it command promt or console in Windows environment and we call it terminal in Mac / Linux environment.
In these programs you're using a shell. Your operation system has a shell, other programs can have a shell too: all the commands you use are defined in the shell. A shell is the interpreter between you and the computer. In different shells some commands may be different.
How does it look like in practice
If you open VS Code and open the terminal inside (Menu, Terminal, New Terminal), you can choose the shell you would like to use. In Windows you will see Command Prompt and PowerShell. In Mac you will see Z shell (zsh) and bash.

No matter which one you choose, you will be able to run the cd command: go to a folder like cd folderName, go on folder up with cd .., go to the computer's root folder with cd /.
Powershell:
PS C:\Users\User> cd /
PS C:\> cd Users
PS C:\Users> cd ..
PS C:\>
Bash:
username@MyMac ~ % cd /
username@MyMac / % cd Users
username@MyMac /Users % cd ..
username@MyMac / %
If you would like to list files, you can type ls. It will work well in bash, Zshell and PowerShell, but not in Command Promt which only accepts dir. In general, I'd recommend you to use PowerShell in Windows and Zshell in Mac as they are the newer, smarter shells. Also, they have the same commands pretty often (for example: PowerShell understands ls and dir too.)
-
To learn to use Terminal in Mac, check Basics in my Terminal tips and tricks gist
-
To learn to use Command Line in Windows, check Basics in my Command Line tips and tricks
Git bash is an application (and shell) which you get by installing Git on your computer. It provides a bit more comfortable Git experience, especially if you work on a Windows computer. It can even handle the commands which you would normally use in a Mac, which is awesome.
To be able to use Git and Github, you should start with installing Git and Signup on Github. It should be a quite straigtforward NextNextFinish, the only thing I always change is the default code editor (VS Code or Nano instead of Vim).
Then the next steps are configuring Git and creating the SSH key.
Click Here for this Setup
-
config your local Git installation. Here is the official article, but basicly it should be like:
  git config --global user.name "John Doe"
  git config --global user.email johndoe@example.com
I also like to set default branch name as main. In the end you can list the whole configuration. You should see in the final lines of the list your email and name.
  git config --global init.defaultBranch main
  git config --list --show-origin
-
next important step is to setup a safe SSH connection between Github and your computer's Git instance. We will generate a secret key in our terminal, copy it to the clipboard, then open Github and paste the ssh key in Github settings. You can find the official article of Git here and here, but basicly it is like:
-
generate a key ([exclamation] replace the example with your email address) ...
ssh-keygen -t ed25519 -C "your_email@example.com"...and then press Enter several times (it is not necessary to setup a password here).
-
now you should run these commands to add the created SSH key to ssh-agent (whatever it means, we don't really care. The point is that we wanna save the SSH key locally and remotely on Github to have secret communication)
In Windows, in a Git Bash terminal:
eval "$(ssh-agent -s)"
ssh-add ~/.ssh/id_ed25519
In Mac:
Open your ssh config file with these commands (or create if does not exist) and paste the given lines
open ~/.ssh/config
touch ~/.ssh/config ----> if does not exist
  Host *
  AddKeysToAgent yes
  UseKeychain yes
  IdentityFile ~/.ssh/id_ed25519
Then run:
ssh-add -K ~/.ssh/id_ed25519
-
-
add it on Github
copy your ssh key to clipboad with this command:pbcopy < ~/.ssh/id_ed25519.pub ---> Mac clip < ~/.ssh/id_ed25519.pub ----> Windows
Then go to Github website, open Menu -> Settings -> SSH and GPG keys, press New SSH key, and paste the SSH key (Ctrl V / Cmd V). Name it as you wish, then click Add SSH key.
The point of using Git is:
- having full code history, being able to go back to earlier versions of a project code
- letting several developers work on the same project, then merge their code changes without suffering
- manage multiple copies on developer computers and a server, while making sure that all these copies are synced
Some basic terms:
Click here to see them
- a git repository is a folder where you have your code, and which folder is tracked by Git. Inside the folder there is a hidden
.gitfolder which stores the full history of your repository. The actual files are just the actual working copies of your code. To save them your last changes you have to make a commit. - a commit is one step in the repository history. Commits contain the changes compared to the previous version
- You can create a new branch to make commits, while keeping main (or another source branch) untouched
- a git merge means that the changes are saved from one branch to another (for example: back to main branch). If there are commits on both branches, Git will merge the series of commits, ordered by the timestamp of them.
- a git remote is the server storage of your code, declared in the git repository. A myapplication repo on Github is the remote of your locally stored myapplication repo, because you cloned it from Github (so this information was already in the repo metadata).
- a git clone is a command to save a git repository to your local machine from the server (Github). Is it not equal to download the repository, because a download is just a copy from the last state of code. It does not have the hidden
.gitfolder which stores all the Git information about the repo: history, branches etc. - a git fork is similar to a branch, but instead of creating a new branch inside the repository, it creates a new repository which knows that it origins from the old repository. Forking happens when a developer would like to use the work of another developer, while having the repo under his own profile. The new repo will be owned by the new developer, while the repo history won't be lost. It is something that you won't need as a beginner
-
you go to github repo, click Code button, select SSH and then copy the code
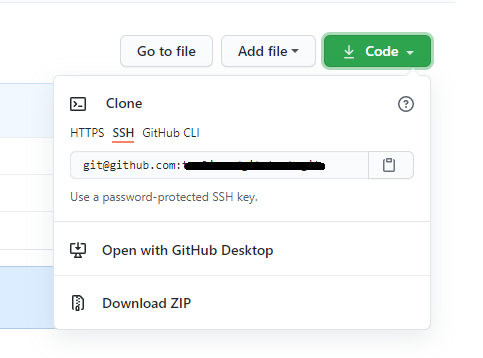
Click here for more
-
in your terminal you type
git cloneand then paste:git clone git@github.com:AmazingCompany/amazingproject.git -
you click Enter, Git clones the repo, then you go into the repository folder
cd amazingprojectif you now type
ls, you will see the content of the repository. If you list hidden files too (ls -lain Mac), you will see the.gitfolder too -
create your own branch
git checkout -b "myfancybranch" -
let's open the folder with VS Code (from menu or
code .) and change a file there, for example write a "hello world" into the README.MD file.git add . ----> add all changes git commit -m "hey world" ----> save changes to a new commit git push ----> save all the changes on Github too
now Git will complain because your branch does not exist yet on Github. It will recommend you a command to have this new remote branch, so you can use it:
git push --set-upstream origin myfancybranchIf you open now Github and click to see the branches, you will see your branch.
-
Now you can click in Github menu to
Pull Requests, then push the buttonNew pull requestand choose in the dropdown selectors that you would like to mergemyfancybranchtomain. Then clickCreate Pull Requestand on the right add a Reviewer. If the reviewer will approve the PR, you will be able to merge.
Now your work is saved to the main branch, your commit is visible in main branch's commit history -
Let's go back to your terminal and change back to the main branch:
git checkout mainNow you can get the new code from the remote. The remote main branch has the merged new commit, but you local main did not get it yet.
git pullAmazing! You have changed your code, merged it to the main branch with a Pull Request and made sure that you have the very same repo state in local and remote. Congrats!
If you would like to make sure that you have the change, you can usegit logto list all the commits on the branch. Your last commit should be on the top.git log
You can download Node.js installer here.
npm means Node Package Manager. It gets installed with Node.js and it is made to manage your Javascript project: installing libraries, adding scripts etc. All this information will be installed in the root folder of your project, in a file called package.json. If you create a new project folder on your computer, you can easily create a package.json with the command npm init.
If you would like to use a package like axios (it is for sending requests to server, for example the backend of your project), you can easily add it to your project. You should type
npm install axiosIt will download axios from npm registry to your computer. You will be able to see it in your package.json, in dependencies. Dependency and its version should be visible there. In your root folder there will be also a node_modules folder which is the storage of the package itself. A package-lock.json file will be also created. This one is generated to have the detailed dependency list - you don't have to take care of it.
At package.json you can find a section for scripts. These are shortcuts for commonly used commands.
For example: You may want to run very often a file called thisisaveryveryveryveryveryverylongfile.js. You can create a script in package.json like:
...
"scripts": {
    "mycommand": "node thisisaveryveryveryveryveryverylongfile.js",
},
...
Then you run in your terminal it like npm run mycommand. All the scripts are to be used like npm run .... Some script names are recognized as standard features, so for them it is also good if you simply run npm start, npm test.
If you right click in your browser and click inspect, you can see the Developer Tools, also known as F12 tool or Inspector Tool. Here you can use several handy tools in the different tabs:
- Browse and live edit the HTML / CSS / Javascript code of the website in
Elements - Select web elements with the selector tool (click the icon or Ctrl Shift C)
- See the logs and run commands in
Console - Check requests in
Networkwhich were ran by your frontend (API calls, images downloaded etc.) - Check the cookies and local storages in
Application - See the Mobile view of the website with
device toggle(click the icon or Ctrl Shift M)