
Trying to learn python using a variety of resources found on the web
End Goal #1: Can we build intermediate and advanced level project
End Goal #2: Can we answer Python Technical questions
- Windows Installation of Python
- Mac Installation of Python
- Case Styles
- Python Data Types
- Building a GUI Deskptop Calculator
Ricky - French Teacher; specializes in Being Awesome. Learning coding and development for the first time.
Priya - Software Developer; specializes in Ruby/Rails. Growing python skills to a confident level of understanding - aka familiar with usage, python specific details, testing, etc.
Windows: Following the Microsoft tutorials
PYTHON:
- Following the Beginner version (Windows Store vs Python on Windows Subsytem for Linux - the dev environment will come later as he begins to work through more intermediate work)
- Installed
Python 3.7from Microsoft Store - Confirmed python and pip versions in PowerShell by using
Python --versionandpip --version
IDE:
- Downloaded VS Code
- Open VS Code and click on "Extensions" (on left of screen) or use
CTRL + SHIFT + X - Search for Python in the extensions menu and install
- Open the Command Palette (
CTRL + SHIFT + P), and typePython: Select Interpreterand select appropriate Python Environment (Python 3.7 Interpretter) - Confirm we see the correct interpretter in the bottom left (if we click on it we are taken to a section to add a new interpreter to the path)
- Open the Terminal (```CTRL + ````)
- In VS Code Terminal (which should be PowerShell by default), enter
python - You should now see what version you are in as you enter the "Python world"
- Type
print("Hello World")and hit enter/return - We see a printout of "Hello World"
- Type
exit()orquit()orCTRL + Zto exit "Python World"
GIT:
- Installed git using Windows defaults
Mac: Following the docs
-
Mac OS X Comes with Python 2.7 out the box, tested in my terminal using
python --versionand got responsePython 2.7.16(Okay for learning) -
However, we want Python 3 (better for development)
COMPILER:
- We are first downloading GCC (GNU Compiler Collection - a compiler system)
- First checked my system, using
xcode-select --versiongave mexcode-select version 2373 - Using
gcc --versiongave me:Configured with: --prefix=/Library/Developer/CommandLineTools/usr --with-gxx-include-dir=/Library/Developer/CommandLineTools/SDKs/MacOSX10.15.sdk/usr/include/c++/4.2.1 Apple clang version 12.0.0 (clang-1200.0.32.27) Target: x86_64-apple-darwin19.6.0 Thread model: posix InstalledDir: /Library/Developer/CommandLineTools/usr/bin - This means I have Command Line Tools from Apple which has GCC
PACKAGE MANAGER:
- Install Homebrew - I already have it
- I checked my system with
brew -vorbrew --versionand got backHomebrew 2.5.10... - Opened
~/.profileand addedexport PATH="/usr/local/opt/python/libexec/bin:$PATH"to the very bottom - Installed Python 3 with
brew install python - Took about 2 minutes to fully install
- Confirmed using
python3 --version, I now seePython 3.8.2
PIP:
- Check installation of pip and that it is pointing to the correct Python
- Use
python3 -m pip --versionand got backpip 19.2.3 from /Library/Developer/CommandLineTools/Library/Frameworks/Python3.framework/Versions/3.8/lib/python3.8/site-packages/pip (python 3.8) - Success! (I can also use
pip3 --version)
PIPENV:
Ricky (beginner, Windows)
- What are cases (camelCase, PascalCase, snake_case, and kebab-case)
- What are datatypes and specific to Python ones
- Practicing on PowerShell
- Practicing on VS Code
- Practicing on W3Schools Website
Priya (intermediate, Mac)
- We are going to build a GUI calculator (it looks a lot like the calculator preloaded in the system!) resource
- Old Concept: GUI
- Graphical User Interface
- Even thought we love web and mobile applications, there is still a need to traditional desktop applications!
- New Concept: PyQT
- Python library
- It is a "python binding for Qt"
- Qt is a framework written in
C++ - From RealPython: "a set of C++ libraries and development tools that include platform-independent abstractions for Graphical User Interfaces (GUI), as well as networking, threads, regular expressions, SQL databases, SVG, OpenGL, XML, and many other powerful features. "
- We are working with PyQt5 in this tutorial
-
SetupStuffForThisProject - Let's install PyQt, the docs if you are "building from source"
- You can also use
binary wheels. Resource for Understanding- To summarize: wheels are components that help make package installation faster and more stable
- Since we are okay with system-wide installation (not worrying about virtual environments right now)
- Since we have Pyton 3.5 and later, we can use our package manager pip: CLI
pip3 install pyqt5 - Got back
Successfully installed PyQt5-sip-12.8.1 pyqt5-5.15.2
- Create our first PyQt Application (Starting with that "Hello World")
- Download source code for use throughout tutorials
- Create a directory (I am in Coding/learning/python/gui_calculator)
- Inside your project directory, create (touch) a file,
hello.py- Step 1: Import QApplication
- Step 1: Import required PyQt 5.0 Widgets
"""Simple Hello World example with PyQt5.""" # understanding the triple quotes (https://www.geeksforgeeks.org/triple-quotes-in-python/)
# Handles the exit status of the application
import sys #The sys module provides information about constants, functions and methods of the Python interpreter. (https://www.python-course.eu/sys_module.php)

# Step 1. Import `QApplication` and all the required widgets
from PyQt5.QtWidgets import QApplication # manages the GUI applications control flow and main settings. Contains the main event loop (where all events from the window system and other sources are processed and dispatched)
from PyQt5.QtWidgets import QLabel # Used for displaying text or an image. No user interaction functionality is provided.
from PyQt5.QtWidgets import QWidget # The base class of ass user interface object. It can receive mouse, keyboard, or other events from the window system & paint a represenation of itself on the screen
- Step 2: Create an instance of QApplication
- Add the following code to
hello.py
# Step 2: Create an instance of QApplication
app = QApplication(sys.argv) #Deals with initializatoin and gives you access to command line arguments
        # sys.argv contains the list of command-line arguments passed into a Python script. If your application is not going to accept command line arguments, then you can use an empty list instead of sys.argv. That is, you can do something like app = QApplication([]).
- Add the following code to
- Step 3: Create an instance of your application's GUI
- Add the following code to
hello.py
# Step 3. Create an instance of your application's GUI (we are using QWidget)
window = QWidget() # set a global? variable 'window' to an executable version of QWidget
window.setWindowTitle('PyQt5 App') # sets the title bar (https://doc.qt.io/qt-5/qwidget.html#top-level-and-child-widgets)
window.setGeometry(100, 100, 280, 80) # sets the geometry of the widget, relative to its parent and excluding the window frame (https://docs.huihoo.com/qt/3.3/qwidget.html#setGeometry)
        # define the size of the window and where to place it
        # .setGeometry(x, y, w, h)
        # x and y coordinates which define where the window is placed
        # w and h determine the actual width and height of the window
window.move(60, 15) # Sets the position of the widget within its parent widget (https://docs.huihoo.com/qt/3.3/qwidget.html#move)
        # .move(x, y)
        # Defines placement in the window
helloMsg = QLabel('<h1>Hello World!</h1>', parent=window) # sets a variable that executes QLabel and makes a header on the parent window
helloMsg.move(60, 15) # Set the position of helloMsg

# NOTES
    # To avoid memory leaks, you should always make sure that any QWidget object has a parent, with the sole exception of top-level windows.
    # parent-child: A widget that doesn’t have a parent is a main window or a top-level window; A widget that has a parent (which is always another widget) is contained (or shown) within its parent.
- Add the following code to
- Step 4: Show your application's GUI
- Add the following code to
hello.py
# Step 4. Show your application's GUI
window.show() # Adds a new event to the application's event queue; shows the widget and all its children
        # if size or position has changed, this ensures move and resize has opens before it is shown
- Add the following code to
- Step 5: Run your application's event loop (or main loop)
- Add the following code to
hello.py
# Step 5. Run your application's event loop (or main loop)
sys.exit(app.exec_()) # The exec() call starts the event-loop and will block until the application quits. If an exit code has been set, exec() will return it after the event-loop terminates. It is good practice to pass on this exit code to sys.exit() - but it is not strictly necessary. Without the explicit call to sys.exit(), the script will automatically exit with a code of 0 after the last line of code has been executed. A non-zero exit code is usually used to inform the calling process that an error occurred.
- Add the following code to
- Step 6: #SuccessKidMemeGoesHere
- CLI:
python3 hello.py - Running this script opens a cute window!, mine even came through on dark mode! => black bg white txt
- CLI:
- Step 7: Celebrate your success! You did it - you've created your first PyQt GUI desktop application

- Code style
- PEP 8 Convention
- Written by Guido van Rossum (the original author of Python), alone with Barry Warsaw (known for work with Python and GNU Mailman, and Nick Coghlan (known for work with Python and founding the PyCon Australia Education Seminar)
- Good resource for understanding and seeing naming convention with examples
- PyQt Convention
- Since this was built on top of Qt (and that was written in C++), it uses camelCase in naming convention which we will follow and use in this project
-
PriyaDay1ProjectUnderstandingPyQt - Basics of PyQt (let's get the building blocks figured out so we can build our house), direct link
- Widgets:
- Rectangular-shaped graphical components
- Examples: Buttons, Labels, Line Edits (Forms), Combo boxes (drop downs), Radio buttons, ETC
- Layout managers:
- You CAN use
.resize()and.move()to arrange sets of widgets to create a GUI that is "coherent and functional" - However, this means manual calculations, further calculations for the resize event, and you will have to update all calculations if you make changes to your layout or change widgets
- SO... Use Layout Managers
- Classes that allow you to place your widgets where you need them in whatever size you'd like
- This also means that on a resize event, the widgets are automatically adjusted
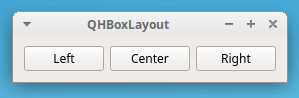
- Practice Example Horizontal (new file:
h_layout.py):
"""Horizontal layout example."""
import sys

from PyQt5.QtWidgets import QApplication
from PyQt5.QtWidgets import QHBoxLayout # Lines up widgets horizontally (layout manager)
from PyQt5.QtWidgets import QPushButton # Provides a command button (widget)
from PyQt5.QtWidgets import QWidget

app = QApplication(sys.argv) # Initializer
window = QWidget() # Executable widget
window.setWindowTitle("QHBoxLayout") # sets window title
layout = QHBoxLayout() # Executable layout manager
layout.addWidget(QPushButton("Left")) # adds a widget to the manager that is a button titled 'Left'
layout.addWidget(QPushButton("Center")) # adds a widget to the manager that is a button titled 'Center'
layout.addWidget(QPushButton("Right")) # adds a widget to the manager that is a button titled 'Right'
window.setLayout(layout) # sets the layout made above
window.show() # allows it to show
sys.exit(app.exec_()) # Executes the event loop until the window is closed
- Run it with
python3 h_layout.py - Look at that pretty, click-able application!
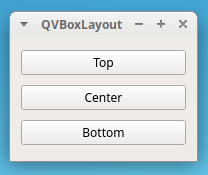
- Practice Example Vertical (new file
v_layout.py):
"""Vertical layout example."""
import sys

from PyQt5.QtWidgets import QApplication
from PyQt5.QtWidgets import QPushButton
from PyQt5.QtWidgets import QVBoxLayout # # Lines up widgets vertically (layout manager)
from PyQt5.QtWidgets import QWidget

app = QApplication(sys.argv)
window = QWidget()
window.setWindowTitle("QVBoxLayout")
layout = QVBoxLayout() # Makes an executable variable using the Vertical Layout Manager Class
layout.addWidget(QPushButton("Top")) # Top button
layout.addWidget(QPushButton("Center"))
layout.addWidget(QPushButton("Bottom"))
window.setLayout(layout)
window.show()
sys.exit(app.exec_())
- Run it with
python3 v_layout.py - Look at the result :)
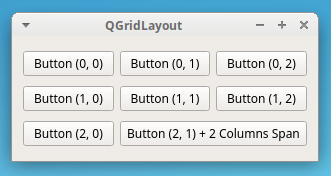
- Practice Example Grid (new file
g_layout.py):
"""Grid layout example."""
import sys

from PyQt5.QtWidgets import QApplication
from PyQt5.QtWidgets import QGridLayout # Imports the Grid Layout Manager class
from PyQt5.QtWidgets import QPushButton
from PyQt5.QtWidgets import QWidget

app = QApplication(sys.argv)
window = QWidget()
window.setWindowTitle("QGridLayout")
layout = QGridLayout() # Here is the grid class manager
layout.addWidget(QPushButton("Button (0, 0)"), 0, 0) # The String defines the title of the button; # The Integers define the position
layout.addWidget(QPushButton("Button (0, 1)"), 0, 1)
layout.addWidget(QPushButton("Button (0, 2)"), 0, 2)
layout.addWidget(QPushButton("Button (1, 0)"), 1, 0)
layout.addWidget(QPushButton("Button (1, 1)"), 1, 1)
layout.addWidget(QPushButton("Button (1, 2)"), 1, 2)
layout.addWidget(QPushButton("Button (2, 0)"), 2, 0)
layout.addWidget(QPushButton("Button (2, 1) + 2 Columns Span"), 2, 1, 1, 2) # The integers here represent 2 column span - but why isn't it: 2, 1, 2, 2?. when I experimented and put that in, it brought the double span button a little further down the grid (off kilter with button (2,0))
window.setLayout(layout)
window.show()
sys.exit(app.exec_())
- Run it with
python3 g_layout.py - Look at the result :)
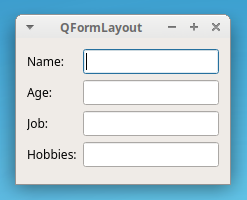
- Practice Example Form (new file
f_layout.py):
"""Form layout example."""
import sys

from PyQt5.QtWidgets import QApplication
from PyQt5.QtWidgets import QFormLayout # Imports the form layout manager class
from PyQt5.QtWidgets import QLineEdit # Widget that allows for text editable sections (aka, the form)
from PyQt5.QtWidgets import QWidget

app = QApplication(sys.argv)
window = QWidget()
window.setWindowTitle("QFormLayout")
layout = QFormLayout() # Executable form class
layout.addRow("Name:", QLineEdit()) # Adds labeled forms
layout.addRow("Age:", QLineEdit())
layout.addRow("Job:", QLineEdit())
layout.addRow("Hobbies:", QLineEdit())
window.setLayout(layout)
window.show()
sys.exit(app.exec_())
- Run it with
python3 f_layout.py - Look at the result :)
- You CAN use
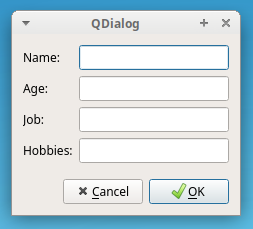
- Dialogs:
- Main Window-Style Application:
QMainWindow, a typical desktop application - Dialog-Style Application:
QDialog, more like a form window - fill this out and submit - Example Dialog (new file
dialog.py):
"""Dialog-Style application."""
import sys

from PyQt5.QtWidgets import QApplication
from PyQt5.QtWidgets import QDialog # Dialog class
from PyQt5.QtWidgets import QDialogButtonBox #Submit buttons?
from PyQt5.QtWidgets import QFormLayout # Form layout manager
from PyQt5.QtWidgets import QLineEdit # Widgets for forms
from PyQt5.QtWidgets import QVBoxLayout # Vertical layout manager


class Dialog(QDialog): # Line 12 creates a full class Dialog for the GUI, which inherits from QDialog.
    """Dialog."""

    def __init__(self, parent=None):
        """Initializer."""
        super().__init__(parent)
        self.setWindowTitle("QDialog")
        dlgLayout = QVBoxLayout() # Sets up a vertical layout for the application  # Line 19 assigns a QVBoxLayout object to dlgLaout.
        formLayout = QFormLayout() # sets up a form layout to take in the information # Line 20 assigns a QVFormLayout object to formLayout.
        formLayout.addRow("Name:", QLineEdit()) # Line 21 to 24 add widgets to formLayout.
        formLayout.addRow("Age:", QLineEdit())
        formLayout.addRow("Job:", QLineEdit())
        formLayout.addRow("Hobbies:", QLineEdit())
        dlgLayout.addLayout(formLayout) # This adds the form layout to the vertical layout # Line 25 uses dlgLayout to arrange all the widgets on the form.
        btns = QDialogButtonBox() # setups up dialog buttons # Line 26 provides a convenient object to place the dialog buttons.
        btns.setStandardButtons(QDialogButtonBox.Cancel | QDialogButtonBox.Ok) # 2 buttons = cancel and ok # Lines 27 and 28 add two standard buttons: Ok and Cancel.
        dlgLayout.addWidget(btns) # adds the buttons to the vertical layout
        self.setLayout(dlgLayout) # sets layout of self


if __name__ == "__main__": # Lines 32 to 36 wrap the boilerplate code in an if __name__ == '__main__': idiom. This is considered a best practice for Pythonistas.
    app = QApplication(sys.argv)
    dlg = Dialog()
    dlg.show()
    sys.exit(app.exec_())
- Run it with
python3 dialog.py - Look at the result :)
- Main Window-Style Application:
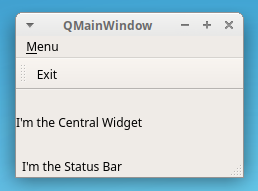
- Main windows
- Main Window-Style Application:
QMainWindow, a typical desktop application - Example Main (new file
main_window.py):
"""Main Window-Style application."""
import sys

from PyQt5.QtWidgets import QApplication
from PyQt5.QtWidgets import QLabel
from PyQt5.QtWidgets import QMainWindow
from PyQt5.QtWidgets import QStatusBar
from PyQt5.QtWidgets import QToolBar

class Window(QMainWindow): # Line 10 creates a class Window that inherits from QMainWindow.
    """Main Window."""
    def __init__(self, parent=None):
        """Initializer."""
        super().__init__(parent)
        self.setWindowTitle("QMainWindow") # Line 15 sets the window’s title.
        self.setCentralWidget(QLabel("I'm the Central Widget")) # Line 16 sets a QLabel as the central widget.
        self._createMenu() # Lines 17 to 19 call private methods in the lines that follow in order to create different GUI elements
        self._createToolBar() # Lines 17 to 19 call private methods in the lines that follow in order to create different GUI elements
        self._createStatusBar() # Lines 17 to 19 call private methods in the lines that follow in order to create different GUI elements

    def _createMenu(self): # Lines 21 to 23 create the main menu.
        self.menu = self.menuBar().addMenu("&Menu")
        self.menu.addAction("&Exit", self.close)

    def _createToolBar(self): # Lines 25 to 28 create the toolbar.
        tools = QToolBar()
        self.addToolBar(tools)
        tools.addAction("Exit", self.close)

    def _createStatusBar(self): # Lines 30 to 33 create the status bar.
        status = QStatusBar()
        status.showMessage("I'm the Status Bar")
        self.setStatusBar(status)


if __name__ == "__main__":
    app = QApplication(sys.argv)
    win = Window()
    win.show()
    sys.exit(app.exec_())
- Run it with
python3 main_window.py - Look at the result :)
- Main Window-Style Application:
- Applications
- The most basic class
QApplicationcontrols the flow as well as its main settings- Some responsibilities include:
- Handling initialization and finalization
- Providing the event loop and event handling
- Handling most of the system-wide and application-wide settings
- Providing access to global information, such as the application’s directory, screen size, and so on
- Parsing common command-line arguments
- Defining the application’s look and feel
- Providing localization capabilities
- Most Important: It hanles the event loop and the entire event handling mechanism
- Event loops
- Gui application are event-drive - which meaas that the functions and methods are exectued in response to user actions, aka events(click button, select item, entering text, pressing keys, etc)
- Events are handles by the event loop (or main loop)
- Event loops are infinite in which events are processed and dispatched
- Event loops work until the application is terminated
- Because of historical syntax (see Python2 having
execkeyword), you can use both.exec()**.exec_()with Python3
- Signals and slots
- If events are the actions, widgets are the action/event-catchers
- In response to an event, a widget will emit a signal (signal = a message that announces a change in state)
- This signal will NOT perform an action
- To trigger an action, connect it to a slot (slot = performs the action whenever the signal is emitted)
- Python callbacks can be slots
- Example Signals and Slots (new file
signals_slots.py)
"""Signals and slots example."""
import sys

from PyQt5.QtWidgets import QApplication
from PyQt5.QtWidgets import QLabel
from PyQt5.QtWidgets import QPushButton
from PyQt5.QtWidgets import QVBoxLayout
from PyQt5.QtWidgets import QWidget

def greeting(): # create greeting(), which you’ll use as a slot.
    """Slot function."""
    if msg.text():
        msg.setText("")
    else:
        msg.setText("Hello World!")

app = QApplication(sys.argv)
window = QWidget()
window.setWindowTitle("Signals, and Slots")
layout = QVBoxLayout()

btn = QPushButton("Greet")
btn.clicked.connect(greeting)  # Connect clicked to greeting() # connect the button’s clicked signal to greeting()

layout.addWidget(btn)
msg = QLabel("")
layout.addWidget(msg)
window.setLayout(layout)
window.show()
sys.exit(app.exec_())
- Call it with
python3 signals_slots.py - Look here for result :)
- Example PARTIALS for Signals and Slots (new file
signals_slots_partial.py
"""Signals and slots example."""
import functools # For this code to work, you need to import functools first (the partial language)
import sys

from PyQt5.QtWidgets import QApplication
from PyQt5.QtWidgets import QLabel
from PyQt5.QtWidgets import QPushButton
from PyQt5.QtWidgets import QVBoxLayout
from PyQt5.QtWidgets import QWidget


def greeting(who):
    """Slot function."""
    if msg.text():
        msg.setText("")
    else:
        msg.setText(f"Hello {who}") # Now, greeting() needs to receive an argument called who.


app = QApplication(sys.argv)
window = QWidget()
window.setWindowTitle("Signals, and Slots")
layout = QVBoxLayout()

btn = QPushButton("Greet")
btn.clicked.connect(functools.partial(greeting, "World!")) # connect this new version of greeting() to the btn.clicked signal # If your slot function needs to receive extra arguments, then you can pass them in by using functools.partial.
# TRY CHANGING "World!" AND SEE WHAT HAPPENS!!!! => This is the "dynamic" variable declaration

layout.addWidget(btn)
msg = QLabel("")
layout.addWidget(msg)
window.setLayout(layout)
window.show()
sys.exit(app.exec_())
- Call it with
python3 signals_slots_partial.py - Look here for result :)
-
PriyaDay1ProjectBeginningCode - Creating a Calculator with Python and PyQt, direct link
- Initial Notes:
- We are using MVC here
- A step-by-step of our future MVC pattern interacting with out GUI Application:
- The user performs an action or request (event) on the view (GUI).
- The view notifies the controller about the user’s action.
- The controller gets the user’s request and queries the model for a response.
- The model processes the controller query, performs the required operations, and returns an answer or result.
- The controller receives the model’s answer and updates the view accordingly.
- The user finally sees the requested result on the view.
- We are using the above pattern for our GUI Calculator
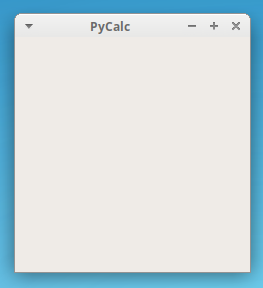
- Make a Skeleton:
- In your project, make a new file
pycalc.py(Side note: I moved all my practice files into a folder labelled practice so that pycalc.py is at the root of the gui_calculator folder) - Input the following code
#!/usr/bin/env python3
# Above is a 'shebang line' => which defines where the interpreter is located
"""PyCalc is a simple calculator built using Python3 and PyQt5."""
import sys

# Import QApplication and the required widgets from PyQt5.QtWidgets
from PyQt5.QtWidgets import QApplication # import the required modules and classes from PyQt5.QtWidgets
from PyQt5.QtWidgets import QMainWindow # import the required modules and classes from PyQt5.QtWidgets
from PyQt5.QtWidgets import QWidget # import the required modules and classes from PyQt5.QtWidgets

__version__ = '0.1' # Is this versioning the calculator?
__author__ = 'Leodanis Pozo Ramos'  # Who is the author here? - He is one of the authors at RealPython

# Create a subclass of QMainWindow to setup the calculator's GUI
class PyCalcUi(QMainWindow): # creates the GUI with the class PyCalcUi. Note that this class inherits from QMainWindow
    """PyCalc's View (GUI)."""
    def __init__(self):
        """View initializer."""
        super().__init__()
        # Set some main window's properties
        self.setWindowTitle('PyCalc') # sets the window’s title to PyCalc
        self.setFixedSize(235, 235) # uses .setFixedSize() to give the window a fixed size # This ensures that the user won’t be able to resize the window
        # Set the central widget # The widget will expand to take up all the space in the window by default
        self._centralWidget = QWidget(self) # creates a QWidget object to play the role of a central widget. Remember that since your GUI class inherits from QMainWindow, you need a central widget. This object will be the parent for the rest of the GUI component.
        self.setCentralWidget(self._centralWidget)

# Client code
def main(): # defines your calculator’s main function, which is considered a best practice # This function will be the entry point to the application
    """Main function."""
    # Create an instance of QApplication
    pycalc = QApplication(sys.argv) # creates a QApplication object pycalc
    # Show the calculator's GUI
    view = PyCalcUi()
    view.show() # shows the GUI with view.show()
    # Execute the calculator's main loop
    sys.exit(pycalc.exec_()) # runs the application’s event loop with pycalc.exec_()

if __name__ == '__main__':
    main()
- If you run the script (
python3 pycalc.py), you should get this back - aka your GUI Application Skeleton
- In your project, make a new file
- Completing the View:
- Hold the Phones - it doesn't look like a calculator yet!
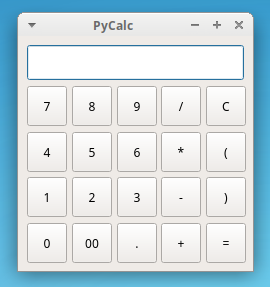
- We are going add the display and buttons for the numbers/operators/clearing-display
- Update your code (to make it easier to read, it is the entire file, instead of showing ONLY the code updates)
#!/usr/bin/env python3
# Above is a 'shebang line' => which defines where the interpreter is located
"""PyCalc is a simple calculator built using Python3 and PyQt5."""
import sys

# Import QApplication and the required widgets from PyQt5.QtWidgets
from PyQt5.QtWidgets import QApplication # import the required modules and classes from PyQt5.QtWidgets
from PyQt5.QtWidgets import QMainWindow # import the required modules and classes from PyQt5.QtWidgets
from PyQt5.QtWidgets import QWidget # import the required modules and classes from PyQt5.QtWidgets
from PyQt5.QtCore import Qt # Qt is set of cross-platform C++ libraries that implement high-level APIs for accessing many aspects of modern desktop and mobile systems. These include location and positioning services, multimedia, NFC and Bluetooth connectivity, a Chromium based web browser, as well as traditional UI development.
from PyQt5.QtWidgets import QGridLayout # Imports grid layout manager
from PyQt5.QtWidgets import QLineEdit # Imports text edit widgets
from PyQt5.QtWidgets import QPushButton # Import button widgets
from PyQt5.QtWidgets import QVBoxLayout # Imports vertical layout manager

__version__ = '0.1' # Is this versioning the calculator?
__author__ = 'Leodanis Pozo Ramos'  # Who is the author here? - He is one of the authors at RealPython

# Create a subclass of QMainWindow to setup the calculator's GUI
class PyCalcUi(QMainWindow): # creates the GUI with the class PyCalcUi. Note that this class inherits from QMainWindow
    """PyCalc's View (GUI)."""
    def __init__(self):
        """View initializer."""
        super().__init__()
        # Set some main window's properties
        self.setWindowTitle('PyCalc') # sets the window’s title to PyCalc
        self.setFixedSize(235, 235) # uses .setFixedSize() to give the window a fixed size # This ensures that the user won’t be able to resize the window
        # Sets the general layout
        self.generalLayout = QVBoxLayout()
        # Set the central widget # The widget will expand to take up all the space in the window by default
        self._centralWidget = QWidget(self) # creates a QWidget object to play the role of a central widget. Remember that since your GUI class inherits from QMainWindow, you need a central widget. This object will be the parent for the rest of the GUI component.
        self.setCentralWidget(self._centralWidget)
        self._centralWidget.setLayout(self.generalLayout)
        # Create the display and the buttons
        self._createDisplay() # These buttons don't work without defining the behavior (see def on ln 38)
        self._createButtons() # These buttons don't work without defining the behavior first (see def on ln 49)

    def _createDisplay(self):
        """Create the display."""
        # Create the display widget
        self.display = QLineEdit() # create the display widget
        # Set some display's properties
        self.display.setFixedHeight(35) # The display has a fixed height of 35 pixels
        self.display.setAlignment(Qt.AlignRight) # The display shows the text as left-aligned
        self.display.setReadOnly(True) # The display is set to read-only to avoid direct editing
        # Add the display to the general layout
        self.generalLayout.addWidget(self.display) # adds the display to the calculator’s general layout

    def _createButtons(self):
        """Create the buttons."""
        self.buttons = {} # First create an empty dictionary || datatype:dictionary - think hash from Ruby
        buttonsLayout = QGridLayout() # Use a grid layout for the buttons section
        # Button text | position on the QGridLayout
        # BELOW: Take the empty dictionary and update to hold each button's text and position (KEY = What is displayed; VALUE = Coordinates for position)
        buttons = {'7': (0, 0),
                   '8': (0, 1),
                   '9': (0, 2),
                   '/': (0, 3),
                   'C': (0, 4),
                   '4': (1, 0),
                   '5': (1, 1),
                   '6': (1, 2),
                   '*': (1, 3),
                   '(': (1, 4),
                   '1': (2, 0),
                   '2': (2, 1),
                   '3': (2, 2),
                   '-': (2, 3),
                   ')': (2, 4),
                   '0': (3, 0),
                   '00': (3, 1),
                   '.': (3, 2),
                   '+': (3, 3),
                   '=': (3, 4),
                  }
        # Create the buttons and add them to the grid layout
        for btnText, pos in buttons.items():
            self.buttons[btnText] = QPushButton(btnText) # We are inside the loop here - creates the buttons and adds them to the layout
            self.buttons[btnText].setFixedSize(40, 40) # Sets every button to fixed size 40x40
            buttonsLayout.addWidget(self.buttons[btnText], pos[0], pos[1])
        # Add buttonsLayout to the general layout
        self.generalLayout.addLayout(buttonsLayout)

    # BUT WHAT IF YOU WANT TO UPDATE THE DICTIONARY? I MEAN - DO WE REALLY HAVE TO SET STATIC INFORMATION FOR THE BUTTONS?
        # .setDisplayText() to set and update the display’s text
        # .displayText() to get the current display’s text
        # .clearDisplay() to clear the display’s text

    def setDisplayText(self, text): # uses .setText() to set and update the display’s text, and .setFocus() to set the cursor’s focus on the display
        """Set display's text."""
        self.display.setText(text)
        self.display.setFocus()

    def displayText(self): # is a getter method that returns the display’s current text. When the user clicks on the equals sign (=), the program will use the return value of .displayText() as the math expression to be evaluated
        """Get display's text."""
        return self.display.text()

    def clearDisplay(self): # sets the display’s text to an empty string ('') so the user can introduce a new math expression
        """Clear the display."""
        self.setDisplayText('')

# Client code
def main(): # defines your calculator’s main function, which is considered a best practice # This function will be the entry point to the application
    """Main function."""
    # Create an instance of QApplication
    pycalc = QApplication(sys.argv) # creates a QApplication object pycalc
    # Show the calculator's GUI
    view = PyCalcUi()
    view.show() # shows the GUI with view.show()
    # Execute the calculator's main loop
    sys.exit(pycalc.exec_()) # runs the application’s event loop with pycalc.exec_()

if __name__ == '__main__':
    main()
- After running the script, my application opened! It looks so cute!
- Making a Controller - getting that MVC logic working:
- Let's make a controller class
- Update your code (to make it easier to read, it is the entire file, instead of showing ONLY the code updates)
# MVC
    # Model - coming soon
    # Controller - is class PyCalcCtrl
        # main is like a runner/index file
    # View - is class PyCalcUi

#!/usr/bin/env python3
# Above is a 'shebang line' => which defines where the interpreter is located
"""PyCalc is a simple calculator built using Python3 and PyQt5."""
import sys

from functools import partial # import this in to connect signals with methods that need to take an extra argument

# Import QApplication and the required widgets from PyQt5.QtWidgets
from PyQt5.QtWidgets import QApplication # import the required modules and classes from PyQt5.QtWidgets
from PyQt5.QtWidgets import QMainWindow # import the required modules and classes from PyQt5.QtWidgets
from PyQt5.QtWidgets import QWidget # import the required modules and classes from PyQt5.QtWidgets
from PyQt5.QtCore import Qt # Qt is set of cross-platform C++ libraries that implement high-level APIs for accessing many aspects of modern desktop and mobile systems. These include location and positioning services, multimedia, NFC and Bluetooth connectivity, a Chromium based web browser, as well as traditional UI development.
from PyQt5.QtWidgets import QGridLayout # Imports grid layout manager
from PyQt5.QtWidgets import QLineEdit # Imports text edit widgets
from PyQt5.QtWidgets import QPushButton # Import button widgets
from PyQt5.QtWidgets import QVBoxLayout # Imports vertical layout manager

__version__ = '0.1' # Is this versioning the calculator?
__author__ = 'Leodanis Pozo Ramos'  # Who is the author here? - He is one of the authors at RealPython

# Create a subclass of QMainWindow to setup the calculator's GUI
class PyCalcUi(QMainWindow): # creates the GUI with the class PyCalcUi. Note that this class inherits from QMainWindow
    """PyCalc's View (GUI)."""
    def __init__(self):
        """View initializer."""
        super().__init__()
        # Set some main window's properties
        self.setWindowTitle('PyCalc') # sets the window’s title to PyCalc
        self.setFixedSize(235, 235) # uses .setFixedSize() to give the window a fixed size # This ensures that the user won’t be able to resize the window
        # Sets the general layout
        self.generalLayout = QVBoxLayout()
        # Set the central widget # The widget will expand to take up all the space in the window by default
        self._centralWidget = QWidget(self) # creates a QWidget object to play the role of a central widget. Remember that since your GUI class inherits from QMainWindow, you need a central widget. This object will be the parent for the rest of the GUI component.
        self.setCentralWidget(self._centralWidget)
        self._centralWidget.setLayout(self.generalLayout)
        # Create the display and the buttons
        self._createDisplay() # These buttons don't work without defining the behavior (see def on ln 38)
        self._createButtons() # These buttons don't work without defining the behavior first (see def on ln 49)

    def _createDisplay(self):
        """Create the display."""
        # Create the display widget
        self.display = QLineEdit() # create the display widget
        # Set some display's properties
        self.display.setFixedHeight(35) # The display has a fixed height of 35 pixels
        self.display.setAlignment(Qt.AlignRight) # The display shows the text as left-aligned
        self.display.setReadOnly(True) # The display is set to read-only to avoid direct editing
        # Add the display to the general layout
        self.generalLayout.addWidget(self.display) # adds the display to the calculator’s general layout

    def _createButtons(self):
        """Create the buttons."""
        self.buttons = {} # First create an empty dictionary || datatype:dictionary - think hash from Ruby
        buttonsLayout = QGridLayout() # Use a grid layout for the buttons section
        # Button text | position on the QGridLayout
        # BELOW: Take the empty dictionary and update to hold each button's text and position (KEY = What is displayed; VALUE = Coordinates for position)
        buttons = {'7': (0, 0),
                   '8': (0, 1),
                   '9': (0, 2),
                   '/': (0, 3),
                   'C': (0, 4),
                   '4': (1, 0),
                   '5': (1, 1),
                   '6': (1, 2),
                   '*': (1, 3),
                   '(': (1, 4),
                   '1': (2, 0),
                   '2': (2, 1),
                   '3': (2, 2),
                   '-': (2, 3),
                   ')': (2, 4),
                   '0': (3, 0),
                   '00': (3, 1),
                   '.': (3, 2),
                   '+': (3, 3),
                   '=': (3, 4),
                  }
        # Create the buttons and add them to the grid layout
        for btnText, pos in buttons.items():
            self.buttons[btnText] = QPushButton(btnText) # We are inside the loop here - creates the buttons and adds them to the layout
            self.buttons[btnText].setFixedSize(40, 40) # Sets every button to fixed size 40x40
            buttonsLayout.addWidget(self.buttons[btnText], pos[0], pos[1])
        # Add buttonsLayout to the general layout
        self.generalLayout.addLayout(buttonsLayout)

    # BUT WHAT IF YOU WANT TO UPDATE THE DICTIONARY? I MEAN - DO WE REALLY HAVE TO SET STATIC INFORMATION FOR THE BUTTONS?
        # .setDisplayText() to set and update the display’s text
        # .displayText() to get the current display’s text
        # .clearDisplay() to clear the display’s text

    def setDisplayText(self, text): # uses .setText() to set and update the display’s text, and .setFocus() to set the cursor’s focus on the display
        """Set display's text."""
        self.display.setText(text)
        self.display.setFocus()

    def displayText(self): # is a getter method that returns the display’s current text. When the user clicks on the equals sign (=), the program will use the return value of .displayText() as the math expression to be evaluated
        """Get display's text."""
        return self.display.text()

    def clearDisplay(self): # sets the display’s text to an empty string ('') so the user can introduce a new math expression
        """Clear the display."""
        self.setDisplayText('')


# BUT WHAT IF WE NEED A CONTROLLER CLASS
    # What does the controller class need to do:
        # Access the GUI’s public interface
        # Handle the creation of math expressions
        # Connect button clicked signals with the appropriate slots

# Create a Controller class to connect the GUI and the model
class PyCalcCtrl:
    """PyCalc Controller class."""
    def __init__(self, view): # This is also passing the view (PyCalcUi class from ln22), but I'm unsure how? (From the tutorial: The first thing you do is give PyCalcCtrl an instance of the view PyCalcUi. You’ll use this instance to gain full access to the view’s public interface). OHHHH! When we got down to updating `main` below, I found where 'view' connects 'PyCalcUi'
        """Controller initializer."""
        self._view = view
        # Connect signals and slots
        self._connectSignals()

    def _buildExpression(self, sub_exp): # This is going to handle the math expression
        """Build expression."""
        expression = self._view.displayText() + sub_exp # also updates the calculator’s display in response to user input
        self._view.setDisplayText(expression)

    def _connectSignals(self): # connect the printable buttons with ._buildExpression() # allows your users to create math expressions by clicking on the calculator’s buttons
        """Connect signals and slots."""
        for btnText, btn in self._view.buttons.items():
            if btnText not in {'=', 'C'}:
                btn.clicked.connect(partial(self._buildExpression, btnText))  # connect the clear button (C) to ._view.clearDisplay(). This method will clear up the text on the display.
        self._view.buttons['C'].clicked.connect(self._view.clearDisplay)

# HOWEVER - For this new controller class to work, you need to update main():

# Client code
def main(): # defines your calculator’s main function, which is considered a best practice # This function will be the entry point to the application
    """Main function."""
    # Create an instance of QApplication
    pycalc = QApplication(sys.argv) # creates a QApplication object pycalc
    # Show the calculator's GUI
    view = PyCalcUi()
    view.show() # shows the GUI with view.show()
    # Create instances of the model and the controller
    PyCalcCtrl(view=view) # This is what tells the controller's initialize method that the 'view' comes from the PyCalcUi (the view variable that is set a few lines above)
    # Execute the calculator's main loop
    sys.exit(pycalc.exec_()) # runs the application’s event loop with pycalc.exec_()

if __name__ == '__main__':
    main()
- And now the buttons output on the display!
- Put in a Model:
- Reminder of MVC logic:
- Model = Business/Data/Mathematical logic
- View = Presentation/Exposure logic
- Controller = Interaction/Application/Business
- Let's make a model class
- Update your code (to make it easier to read, it is the entire file, instead of showing ONLY the code updates)
# MVC
    # Model - coming soon
    # Controller - is class PyCalcCtrl
        # main is like a runner/index file
    # View - is class PyCalcUi

#!/usr/bin/env python3
# Above is a 'shebang line' => which defines where the interpreter is located
"""PyCalc is a simple calculator built using Python3 and PyQt5."""
import sys

from functools import partial # import this in to connect signals with methods that need to take an extra argument

# Import QApplication and the required widgets from PyQt5.QtWidgets
from PyQt5.QtWidgets import QApplication # import the required modules and classes from PyQt5.QtWidgets
from PyQt5.QtWidgets import QMainWindow # import the required modules and classes from PyQt5.QtWidgets
from PyQt5.QtWidgets import QWidget # import the required modules and classes from PyQt5.QtWidgets
from PyQt5.QtCore import Qt # Qt is set of cross-platform C++ libraries that implement high-level APIs for accessing many aspects of modern desktop and mobile systems. These include location and positioning services, multimedia, NFC and Bluetooth connectivity, a Chromium based web browser, as well as traditional UI development.
from PyQt5.QtWidgets import QGridLayout # Imports grid layout manager
from PyQt5.QtWidgets import QLineEdit # Imports text edit widgets
from PyQt5.QtWidgets import QPushButton # Import button widgets
from PyQt5.QtWidgets import QVBoxLayout # Imports vertical layout manager

__version__ = '0.1' # Is this versioning the calculator?
__author__ = 'Leodanis Pozo Ramos'  # Who is the author here? - He is one of the authors at RealPython

# Create a subclass of QMainWindow to setup the calculator's GUI
class PyCalcUi(QMainWindow): # creates the GUI with the class PyCalcUi. Note that this class inherits from QMainWindow
    """PyCalc's View (GUI)."""
    def __init__(self):
        """View initializer."""
        super().__init__()
        # Set some main window's properties
        self.setWindowTitle('PyCalc') # sets the window’s title to PyCalc
        self.setFixedSize(235, 235) # uses .setFixedSize() to give the window a fixed size # This ensures that the user won’t be able to resize the window
        # Sets the general layout
        self.generalLayout = QVBoxLayout()
        # Set the central widget # The widget will expand to take up all the space in the window by default
        self._centralWidget = QWidget(self) # creates a QWidget object to play the role of a central widget. Remember that since your GUI class inherits from QMainWindow, you need a central widget. This object will be the parent for the rest of the GUI component.
        self.setCentralWidget(self._centralWidget)
        self._centralWidget.setLayout(self.generalLayout)
        # Create the display and the buttons
        self._createDisplay() # These buttons don't work without defining the behavior (see def on ln 38)
        self._createButtons() # These buttons don't work without defining the behavior first (see def on ln 49)

    def _createDisplay(self):
        """Create the display."""
        # Create the display widget
        self.display = QLineEdit() # create the display widget
        # Set some display's properties
        self.display.setFixedHeight(35) # The display has a fixed height of 35 pixels
        self.display.setAlignment(Qt.AlignRight) # The display shows the text as left-aligned
        self.display.setReadOnly(True) # The display is set to read-only to avoid direct editing
        # Add the display to the general layout
        self.generalLayout.addWidget(self.display) # adds the display to the calculator’s general layout

    def _createButtons(self):
        """Create the buttons."""
        self.buttons = {} # First create an empty dictionary || datatype:dictionary - think hash from Ruby
        buttonsLayout = QGridLayout() # Use a grid layout for the buttons section
        # Button text | position on the QGridLayout
        # BELOW: Take the empty dictionary and update to hold each button's text and position (KEY = What is displayed; VALUE = Coordinates for position)
        buttons = {'7': (0, 0),
                   '8': (0, 1),
                   '9': (0, 2),
                   '/': (0, 3),
                   'C': (0, 4),
                   '4': (1, 0),
                   '5': (1, 1),
                   '6': (1, 2),
                   '*': (1, 3),
                   '(': (1, 4),
                   '1': (2, 0),
                   '2': (2, 1),
                   '3': (2, 2),
                   '-': (2, 3),
                   ')': (2, 4),
                   '0': (3, 0),
                   '00': (3, 1),
                   '.': (3, 2),
                   '+': (3, 3),
                   '=': (3, 4),
                  }
        # Create the buttons and add them to the grid layout
        for btnText, pos in buttons.items():
            self.buttons[btnText] = QPushButton(btnText) # We are inside the loop here - creates the buttons and adds them to the layout
            self.buttons[btnText].setFixedSize(40, 40) # Sets every button to fixed size 40x40
            buttonsLayout.addWidget(self.buttons[btnText], pos[0], pos[1])
        # Add buttonsLayout to the general layout
        self.generalLayout.addLayout(buttonsLayout)

    # BUT WHAT IF YOU WANT TO UPDATE THE DICTIONARY? I MEAN - DO WE REALLY HAVE TO SET STATIC INFORMATION FOR THE BUTTONS?
        # .setDisplayText() to set and update the display’s text
        # .displayText() to get the current display’s text
        # .clearDisplay() to clear the display’s text

    def setDisplayText(self, text): # uses .setText() to set and update the display’s text, and .setFocus() to set the cursor’s focus on the display
        """Set display's text."""
        self.display.setText(text)
        self.display.setFocus()

    def displayText(self): # is a getter method that returns the display’s current text. When the user clicks on the equals sign (=), the program will use the return value of .displayText() as the math expression to be evaluated
        """Get display's text."""
        return self.display.text()

    def clearDisplay(self): # sets the display’s text to an empty string ('') so the user can introduce a new math expression
        """Clear the display."""
        self.setDisplayText('')


# BUT WHAT IF WE NEED A CONTROLLER CLASS
    # What does the controller class need to do:
        # Access the GUI’s public interface
        # Handle the creation of math expressions
        # Connect button clicked signals with the appropriate slots

# Create a Controller class to connect the GUI and the model
class PyCalcCtrl:
    """PyCalc Controller class."""
    def __init__(self, view): # This is also passing the view (PyCalcUi class from ln22), but I'm unsure how? (From the tutorial: The first thing you do is give PyCalcCtrl an instance of the view PyCalcUi. You’ll use this instance to gain full access to the view’s public interface). OHHHH! When we got down to updating `main` below, I found where 'view' connects 'PyCalcUi'
        """Controller initializer."""
        self._view = view
        # Connect signals and slots
        self._connectSignals()

    def _buildExpression(self, sub_exp): # This is going to handle the math expression
        """Build expression."""
        expression = self._view.displayText() + sub_exp # also updates the calculator’s display in response to user input
        self._view.setDisplayText(expression)

    def _connectSignals(self): # connect the printable buttons with ._buildExpression() # allows your users to create math expressions by clicking on the calculator’s buttons
        """Connect signals and slots."""
        for btnText, btn in self._view.buttons.items():
            if btnText not in {'=', 'C'}:
                btn.clicked.connect(partial(self._buildExpression, btnText))  # connect the clear button (C) to ._view.clearDisplay(). This method will clear up the text on the display.
        self._view.buttons['C'].clicked.connect(self._view.clearDisplay)

# HOWEVER - For this new controller class to work, you need to update main():

# BUT WHAT ABOUT THE MATH? It currently doesn't do anything on 'equal'
    # So we hit the Model! It holds the data/business/math logic of an application
    # This is where the methods live to evaluate the operators used by the user
    # This is also where error handling (of the math) would occur

ERROR_MSG = 'ERROR' # sets a global variable/constraint to print string 'ERROR' # Should happen when a user introduces an invalid math expression

# Create a Model to handle the calculator's operation
def evaluateExpression(expression):
    """Evaluate an expression."""
    # Thinking for the future:
        # The try...except block does NOT catch any specific exception, which is not a best practice in Python.
        # The function is based on the use of eval(), which can lead to some serious security issues. The general advice is to only use eval() on trusted input.
    try:
        result = str(eval(expression, {}, {})) # use eval() to evaluate a string as an expression
    except Exception: # If not successful
        result = ERROR_MSG # save the global variable ERROR_MSG to the result

    return result # Return the result # Automatically hits this if the 'try' is successful

# Client code
def main(): # defines your calculator’s main function, which is considered a best practice # This function will be the entry point to the application
    """Main function."""
    # Create an instance of QApplication
    pycalc = QApplication(sys.argv) # creates a QApplication object pycalc
    # Show the calculator's GUI
    view = PyCalcUi()
    view.show() # shows the GUI with view.show()
    # Create instances of the model and the controller
    PyCalcCtrl(view=view) # This is what tells the controller's initialize method that the 'view' comes from the PyCalcUi (the view variable that is set a few lines above)
    # Execute the calculator's main loop
    sys.exit(pycalc.exec_()) # runs the application’s event loop with pycalc.exec_()

if __name__ == '__main__':
    main()
- You can run the script, but it still doesn't work on equal (See below)
- Reminder of MVC logic:
- Fix your controller:
- UH OH! Why doesn't the calculator work when I've added the model?
- Well, we never updated the controller with the model or methods that evalute the final expression
- Update your code (to make it easier to read, it is the entire file, instead of showing ONLY the code updates)
# MVC
    # Model - coming soon
    # Controller - is class PyCalcCtrl
        # main is like a runner/index file
    # View - is class PyCalcUi

#!/usr/bin/env python3
# Above is a 'shebang line' => which defines where the interpreter is located
"""PyCalc is a simple calculator built using Python3 and PyQt5."""
import sys

from functools import partial # import this in to connect signals with methods that need to take an extra argument

# Import QApplication and the required widgets from PyQt5.QtWidgets
from PyQt5.QtWidgets import QApplication # import the required modules and classes from PyQt5.QtWidgets
from PyQt5.QtWidgets import QMainWindow # import the required modules and classes from PyQt5.QtWidgets
from PyQt5.QtWidgets import QWidget # import the required modules and classes from PyQt5.QtWidgets
from PyQt5.QtCore import Qt # Qt is set of cross-platform C++ libraries that implement high-level APIs for accessing many aspects of modern desktop and mobile systems. These include location and positioning services, multimedia, NFC and Bluetooth connectivity, a Chromium based web browser, as well as traditional UI development.
from PyQt5.QtWidgets import QGridLayout # Imports grid layout manager
from PyQt5.QtWidgets import QLineEdit # Imports text edit widgets
from PyQt5.QtWidgets import QPushButton # Import button widgets
from PyQt5.QtWidgets import QVBoxLayout # Imports vertical layout manager

__version__ = '0.1' # Is this versioning the calculator?
__author__ = 'Leodanis Pozo Ramos'  # Who is the author here? - He is one of the authors at RealPython

# ******************************VIEW******************************

# Create a subclass of QMainWindow to setup the calculator's GUI
class PyCalcUi(QMainWindow): # creates the GUI with the class PyCalcUi. Note that this class inherits from QMainWindow
    """PyCalc's View (GUI)."""
    def __init__(self):
        """View initializer."""
        super().__init__()
        # Set some main window's properties
        self.setWindowTitle('PyCalc') # sets the window’s title to PyCalc
        self.setFixedSize(235, 235) # uses .setFixedSize() to give the window a fixed size # This ensures that the user won’t be able to resize the window
        # Sets the general layout
        self.generalLayout = QVBoxLayout()
        # Set the central widget # The widget will expand to take up all the space in the window by default
        self._centralWidget = QWidget(self) # creates a QWidget object to play the role of a central widget. Remember that since your GUI class inherits from QMainWindow, you need a central widget. This object will be the parent for the rest of the GUI component.
        self.setCentralWidget(self._centralWidget)
        self._centralWidget.setLayout(self.generalLayout)
        # Create the display and the buttons
        self._createDisplay() # These buttons don't work without defining the behavior (see def on ln 38)
        self._createButtons() # These buttons don't work without defining the behavior first (see def on ln 49)

    def _createDisplay(self):
        """Create the display."""
        # Create the display widget
        self.display = QLineEdit() # create the display widget
        # Set some display's properties
        self.display.setFixedHeight(35) # The display has a fixed height of 35 pixels
        self.display.setAlignment(Qt.AlignRight) # The display shows the text as left-aligned
        self.display.setReadOnly(True) # The display is set to read-only to avoid direct editing
        # Add the display to the general layout
        self.generalLayout.addWidget(self.display) # adds the display to the calculator’s general layout

    def _createButtons(self):
        """Create the buttons."""
        self.buttons = {} # First create an empty dictionary || datatype:dictionary - think hash from Ruby
        buttonsLayout = QGridLayout() # Use a grid layout for the buttons section
        # Button text | position on the QGridLayout
        # BELOW: Take the empty dictionary and update to hold each button's text and position (KEY = What is displayed; VALUE = Coordinates for position)
        buttons = {'7': (0, 0),
                   '8': (0, 1),
                   '9': (0, 2),
                   '/': (0, 3),
                   'C': (0, 4),
                   '4': (1, 0),
                   '5': (1, 1),
                   '6': (1, 2),
                   '*': (1, 3),
                   '(': (1, 4),
                   '1': (2, 0),
                   '2': (2, 1),
                   '3': (2, 2),
                   '-': (2, 3),
                   ')': (2, 4),
                   '0': (3, 0),
                   '00': (3, 1),
                   '.': (3, 2),
                   '+': (3, 3),
                   '=': (3, 4),
                  }
        # Create the buttons and add them to the grid layout
        for btnText, pos in buttons.items():
            self.buttons[btnText] = QPushButton(btnText) # We are inside the loop here - creates the buttons and adds them to the layout
            self.buttons[btnText].setFixedSize(40, 40) # Sets every button to fixed size 40x40
            buttonsLayout.addWidget(self.buttons[btnText], pos[0], pos[1])
        # Add buttonsLayout to the general layout
        self.generalLayout.addLayout(buttonsLayout)

    # BUT WHAT IF YOU WANT TO UPDATE THE DICTIONARY? I MEAN - DO WE REALLY HAVE TO SET STATIC INFORMATION FOR THE BUTTONS?
        # .setDisplayText() to set and update the display’s text
        # .displayText() to get the current display’s text
        # .clearDisplay() to clear the display’s text

    def setDisplayText(self, text): # uses .setText() to set and update the display’s text, and .setFocus() to set the cursor’s focus on the display
        """Set display's text."""
        self.display.setText(text)
        self.display.setFocus()

    def displayText(self): # is a getter method that returns the display’s current text. When the user clicks on the equals sign (=), the program will use the return value of .displayText() as the math expression to be evaluated
        """Get display's text."""
        return self.display.text()

    def clearDisplay(self): # sets the display’s text to an empty string ('') so the user can introduce a new math expression
        """Clear the display."""
        self.setDisplayText('')


# BUT WHAT IF WE NEED A CONTROLLER CLASS
    # What does the controller class need to do:
        # Access the GUI’s public interface
        # Handle the creation of math expressions
        # Connect button clicked signals with the appropriate slots

# ******************************CONTROLLER******************************

# Create a Controller class to connect the GUI and the model
class PyCalcCtrl:
    """PyCalc Controller class."""
    def __init__(self, view, model): # This is also passing the view (PyCalcUi class from ln22), but I'm unsure how? (From the tutorial: The first thing you do is give PyCalcCtrl an instance of the view PyCalcUi. You’ll use this instance to gain full access to the view’s public interface). OHHHH! When we got down to updating `main` below, I found where 'view' connects 'PyCalcUi'
        # initializing 'model' will now connect the GUI and the model (plus more work below) (we will also probably update 'main' to help this class understand what 'model' is assigned)
        """Controller initializer."""
        self._evaluate = model # sets up a self call to _evaluate to call from the model
        self._view = view
        # Connect signals and slots
        self._connectSignals()

    def _calculateResult(self): # takes the display’s content, evaluate it as a math expression, and finally show the result in the display
        """Evaluate expressions."""
        result = self._evaluate(expression=self._view.displayText())
        self._view.setDisplayText(result)

    def _buildExpression(self, sub_exp): # This is going to handle the math expression
        """Build expression."""
        if self._view.displayText() == ERROR_MSG: # check if an error has occured
            self._view.clearDisplay() # If it is, clear the display
        expression = self._view.displayText() + sub_exp # also updates the calculator’s display in response to user input
        self._view.setDisplayText(expression)

    def _connectSignals(self): # connect the printable buttons with ._buildExpression() # allows your users to create math expressions by clicking on the calculator’s buttons
        """Connect signals and slots."""
        for btnText, btn in self._view.buttons.items():
            if btnText not in {'=', 'C'}:
                btn.clicked.connect(partial(self._buildExpression, btnText))  # connect the clear button (C) to ._view.clearDisplay(). This method will clear up the text on the display.
        self._view.buttons['='].clicked.connect(self._calculateResult) # This enables the equals button
        self._view.display.returnPressed.connect(self._calculateResult) # If a user hits enter, the calculator can also process the expression (same as equals?)
        self._view.buttons['C'].clicked.connect(self._view.clearDisplay)

# HOWEVER - For this new controller class to work, you need to update main():

# ******************************MODEL******************************

# BUT WHAT ABOUT THE MATH? It currently doesn't do anything on 'equal'
    # So we hit the Model! It holds the data/business/math logic of an application
    # This is where the methods live to evaluate the operators used by the user
    # This is also where error handling (of the math) would occur

ERROR_MSG = 'ERROR' # sets a global variable/constraint to print string 'ERROR' # Should happen when a user introduces an invalid math expression

# Create a Model to handle the calculator's operation
def evaluateExpression(expression):
    """Evaluate an expression."""
    # Thinking for the future:
        # The try...except block does NOT catch any specific exception, which is not a best practice in Python.
        # The function is based on the use of eval(), which can lead to some serious security issues. The general advice is to only use eval() on trusted input.
    try:
        result = str(eval(expression, {}, {})) # use eval() to evaluate a string as an expression
    except Exception: # If not successful
        result = ERROR_MSG # save the global variable ERROR_MSG to the result

    return result # Return the result # Automatically hits this if the 'try' is successful

# UH OH! Why doesn't the calculator work when I've added the model?
    # Well - we haven't actually finished the logic in the controller

# ******************************MAIN/RUNNER/INDEX******************************

# Client code
def main(): # defines your calculator’s main function, which is considered a best practice # This function will be the entry point to the application
    """Main function."""
    # Create an instance of QApplication
    pycalc = QApplication(sys.argv) # creates a QApplication object pycalc
    # Show the calculator's GUI
    view = PyCalcUi()
    view.show() # shows the GUI with view.show()
    # Create instances of the model and the controller
    model = evaluateExpression # assigns a block variable model,
    PyCalcCtrl(view=view, model=model) # This is what tells the controller's initialize method that the 'view' comes from the PyCalcUi (the view variable that is set a few lines above)
    # Execute the calculator's main loop
    sys.exit(pycalc.exec_()) # runs the application’s event loop with pycalc.exec_()

if __name__ == '__main__':
    main()
- And [look]{https://files.realpython.com/media/pycalc.9572fb3104cb.gif) at that beautiful calculator, it can even do the math!
- CELEBRATE! You did it!
