
September 13, 2023. 8AM to 2PM PT
Welcome!
Here you'll find the workshop's exercises and supplemental training materials that is meant to go along with the commits found within this PR. As you work through the exercises, you can reference the related commit(s) to check your progress. YOU WILL NOT NEED TO CHECK OUT THIS BRANCH.
We are a community! "When the tide rises, all ships sail". ⛵️ Your feedback and/or contributing back to the Samvera community directly would be greatly appreciated by all!
REPO: https://github.com/scientist-softserv/softserv-training-workshops-2023
REFERENCE BRANCH: samvera-training-workshop-work-types
- You can use this branch as a working example, to check your progress against as you work through the exercises
For your actual work, please checkout and make a branch off of main.
git clone https://github.com/scientist-softserv/softserv-training-workshops-2023
git checkout main
git checkout -b branch-name
- ref Running The Stack/Hyku's README for more details
Start your docker container. docker-compose up web
If using Dory, Visit url https://hyku.test in your browser to confirm you are connected. Otherwise visit https://localhost:3000.
After running migrations rails db:migrate and seeds rails db:seed, create at least one tenant.
Admin login: username - admin@example.com password - testing123
Visit hyku.test/proprietor/accounts?locale=en. Click "Create new account" to enter a name and save.
-
after creating a new account, click Edit and check "Ssl configured" and "Save Changes"
-
Visit your tenant's site by prepending the tenant name to
hyku.test. Example:https://dev.hyku.test⚠️ if you see a pop up box asking for credentials, the user name is "samvera" and the password is "hyku".
troubleshooting on windows - reference the HYKU README section at the bottom of the repo
Info that may be useful
- Collaborative pairing tools:
- Samvera Docs
- Hyku
- Hyrax
- Predicate sources
- NOTE: This workshop will provide you with specific instructions for defining properties, so you don't have to worry about predicate options for now.
- As a developer, usually the predicate urls are provided to you by the metadata librarian or client; it is not something that you actively choose on your own. But you will have to be aware of certain gotchas!
- NOTE: This workshop will provide you with specific instructions for defining properties, so you don't have to worry about predicate options for now.
- Solr
- Schema wiki
- SchemaXML (more detailed)
- Splainer: the solr search sandbox that helps you understand the why!
- Solrizer::DefaultDescriptors NOTE: Solrizer has since been deprecated but this linked document helps to explain index_as property options and the solr suffixes they'll produce.
- NOTE: This workshop will provide you with specific instructions for defining properties, so you don't have to worry about understanding the index options for now.
- To learn more about solr configurations, attend the next workshop: "Solr: Customizing Search and Facets - Wed, Sept 20, 2023 with Kait Sewell"
- Solr Dashboard
- A GUI to help you see what keys and values are indexed on a solr document
- In the browser visit url: solr.hyku.test
- Login credentials can be found in the docker-compose.yml and/or .env file
- Sidekiq
- Xray-rails (OPTIONAL)
- This tool lets you hover elements of the page to reveal what partials are responsible for rendering it. It is useful when you need to modify views of a Samvera application because many of the partials are inherited from other places and don't necessarily live in your app, so sometimes they can be hard to find.
- How to install.
⚠️ NOTE: This gem conflicts with sidekiq. If you need to run your background jobs, remove or comment this gem out!!
Commit EMOJI STYLE GUIDE:
- 🤔 (:thinking) exercise: The comments within these commits will reveal a more detailed code challenge/EXERCISE.
- 🎁 (:gift) feat: A new feature.
⚠️ SPOILER ALERT: These commits will contain a solution/ANSWER to an exercise.- Use these to compare your progress against a working example.
- If you see a 🎁 and 🤔 emoji together, a new EXERCISE (🤔) and the answer (🎁) to the previous one will be in the same commit.
- 💄 (:lipstick) style: Formatting, missing semi colons, rubocop, etc; no code change
- 💁🏿♀️ (:information_desk_person) info: Explanatory comments have been added in this commit
The following exercise instructions are summarized. Unless the exercise is a 🎁 emoji, more details can be found in the comments of the various linked 🤔 commits.
- WORK TYPES
- 🎁 EXERCISE 1: Generate and enable a new work type called 'Thesis' using the following command
rails generate hyrax:work Thesisfrom the docker shell.- Enable by visiting the admin dashboard > "settings" > "available work types" and checking the work type.
⚠️ IF YOU DON'T SEE YOUR CHANGES IN THE UI, RESTART YOUR SERVER withdocker-compose stop webthendocker-compose up web
- 🎁💁🏿♀️ EXERCISE 2: Set Up LOCAL QUESTIONING AUTHORITY
- Set up yml and service to use Questioning Authority for the property 'department' by copying the commit's files into your local directories.
⚠️ NOTE: I made a mistake in this commit that gets fixed later (:lipstick:). services/departments_service.rb should live in app/services.- Details to set it up yourself can be found in the QA gem.
- This is a pre-requisite needed for you to add and enable a controlled vocabulary property later.
- 🤔 💁🏿♀️ EXERCISE 3 LABELS AND HELP TEXT ref
- Change the description of the Thesis work type in thesis.en.yml. Confirm change in the UI.
- the hyrax.en.yml comment is for information purposes only. No changes need to be made here, for today's workshop.
- Switch languages and notice how labels/hint texts get translated to your selection.
- NOTE: When adding a significant amount of custom translations you'd have to buy a google api key to run translations so we won't be doing the full process during this workshop.
- 💁🏿♀️ UNDERSTANDING THE CONTROLLER
- 🤔 EXERCISE 4: DEFINING METADATA IN THE MODEL
- Extend the model: Add 3 custom metadata properties to the model
- 1 singular called 'contact_email'
- 1 multiple called 'contact_phone'
- 1 controled vocab called 'department'
- ref hyrax to see examples. Predicate URLs and details can be found in the comments of the 🤔 commit.
- 🎁 EXERCISE 4: MODIFIED MODEL
- 🤔 EXERCISE 5: MODIFYING THE EDIT FORM. ref
-
- Add the 3 custom properties to the new work form
⚠️ IF YOU GET AN ERROR ON SAVE, REF THIS FIX
-
- 🎁🤔 EXERCISE 6: MODIFYING THE EDIT FORM. (this commit contains the answer to the previous exercise)
-
- Confirm your changes
-
- 🤔 EXERCISE 7: MODIFYING THE EDIT FORM
-
- Customize field for controlled vocabulary
- Ref the controlled vobulary section of the EDIT FORM section in this gist.
⚠️ NOTE: You will have to create the file and directory. app/views/records/edit_fields/_department.html.erb⚠️ If the terms are not added to self.required or self.primary_terms, they will be hidden from view. You have to click ADDITIONAL FIELDS button on the form and scroll down to find them.
-
- 🎁:thinking:💄EXERCISE 8: CREATE AND INSPECT DATA. (this commit contains the answer to the previous exercise)
- connect the controlled vocab property to the local questioning authority. The department field should display a dropdown of QA local authority options from your config/authorities/departments.yml file. See EXERCISE 2.
- create a thesis record
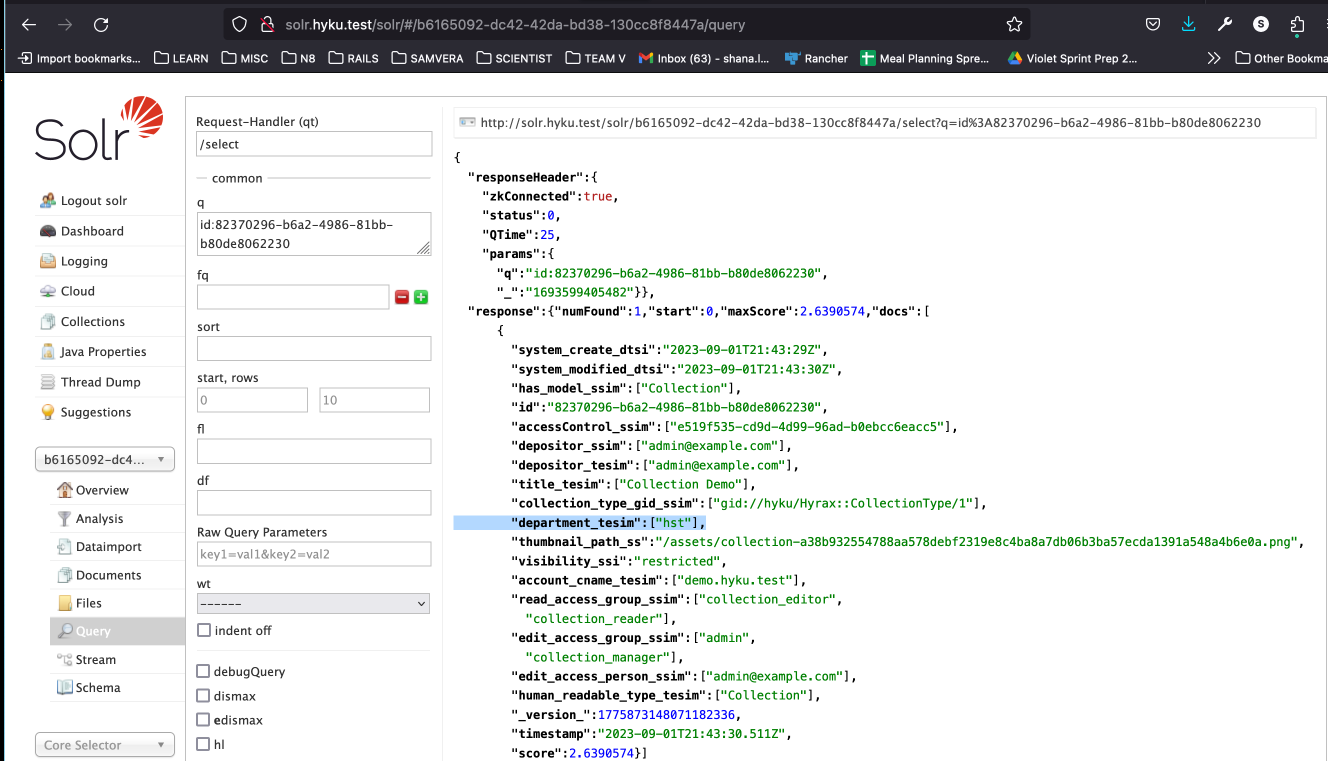
⚠️ At this point you will NOT see the data on the show page!- confirm data is saved using the SOLR DASHBOARD or the RAILS CONSOLE:
docker-compose exec web bash  # get inside the docker container's shell
rails c # start rails console
switch!('tenant name') # ie: switch!('dev') => switch context to a tenant named 'dev' (dev.hyku.test)
thesis = Thesis.find('id') # retrieve the record by replacing 'id' with the record's id as a string.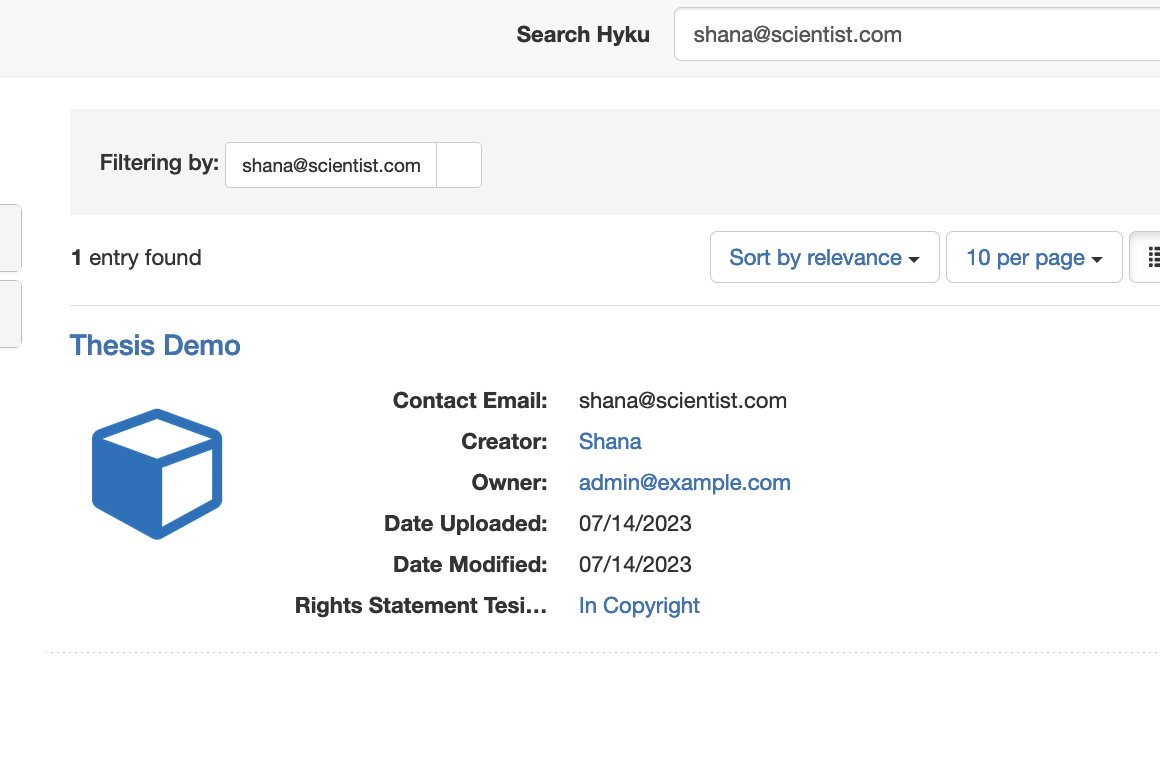
thesis.contact_email # to see the value ie => "shana@scientist.com"- 🤔💄 EXERCISE 9: DISPLAY NEW PROPERTIES ON THE SHOW PAGE. ref
- Add the 3 custom properties to the thesis' show page
- Use a custom renderer to display the department term, instead of the id.
- 🎁 EXERCISE 9: DISPLAYED PROPERTIES
- 🎁 EXERCISE 10: Display the QA term instead of the id. For example, if I selected 'hst' for the department value, it should be displayed as HISTORY on the show page.
⚠️ FOR THIS EXERCISE, IF THE DIRECTORY AND FILE DON'T EXIST YOU MUST CREATE IT. THIS MAY REQUIRE A RESTART
- 🎁 EXERCISE 11: ADMIN ONLY - Make the contact properties display to admin users only.
- Hint: Check the user's abilities. example ref see the ADMIN ONLY CONDITIONAL EXAMPLE in the Modifying the Show Page of this gist.
Extra time? Play with blacklight options to prep for the next workshop, or try customizing the Collection model! Also feel free to apply these concepts to your own project(s).
CONFIGURE BLACKLIGHT
- 🎁 EXERCISE 12: CONFIGURE BLACKLIGHT:
- A user should be able find works by searching for a contact number.
- This exercise is a preview of what's to come in the next workshop. "Solr: Customizing Search and Facets Workshop - Wed, Sept 20, 2023 by Kait Sewell" ref
- 🎁 [BONUS]: Display controlled vocab/QA term instead of id in search results and facets.
- ie: display History instead of hst in the Department facet.
- hint: you'll need to create a custom helper method, referenced in the catalog controller. See rights_statements as an example from Hyrax.
- 🎁 EXERCISE 13: CUSTOMIZE COLLECTION METADATA:
- Add a controlled vocabulary 'department' metadata property to the Collection model.
- HINT: It's similar to how we defined properties for a work type!
- Create a Collection and display the 'department' metadata property on the Collection's show page.
⚠️ NOTE: The collection properties do not use the renderer process to control the display of properties. https://samvera.github.io/customize-metadata-other-customizations.html#customizing-display-of-collection-properties
- Perform an empty search in the catalog controller. A user should see which department the work belongs to in the search results. Show the full controlled vocabulary term (ie: HISTORY vs hst). ref
- This exercise is a preview of what's to come in the next workshop: "Solr: Customizing Search and Facets Workshop - Wed, Sept 20, 2023 by Kait Sewell" ref
Most of the docs for this workshops can be found in Samvera 'Customizing Metadata Tutorial' section. Some of the docs have been copied into this gist, however much of it is outdated and thus misleading. In this section you may find updated solutions, relevant to this workshop.
🎉 After completing this workshop, updating Samvera's documentation would be a great way to contribute back! 🎉
One of the generated files include config/locales/[work-type].en.yml in which many of the labels used on forms and show pages for the new work type are defined. You can modify these labels and also add labels for any new properties defined.
Application specific labels are defined in config/locales/hyrax.en.yml which was created when you generated your Hyrax app.
EXERCISE 3 example - Edit "Thesis works" by updating thesis.en.yml

How to Generate and Use Translations
NOTE: This is for informational purposes only. You will NOT need to run the translator in this workshop! Selecting a different language should automatically work if following the exercises of this workshop. If you are adding custom views that require additional locale files/translations (for example) THEN you would need to run the translator. You would need to buy a Google API Key to run it.
- ref: https://playbook-staging.notch8.com/en/samvera/hyrax/how_to/generate_translations
- ref: https://github.com/samvera/hyrax/wiki/Translations-(internationalization)
EXAMPLE
# config/locales/en.yml
en:
  search:
    hint: "You searched for %{term}"
# app/views/_partial.html.erb
<%= t('search.hint', term: params[:q]) %>Select language:
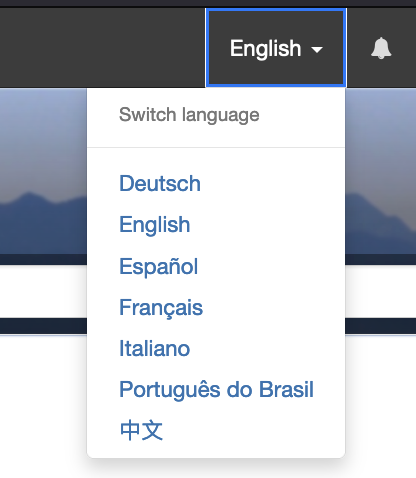
Spanish:

DASHBOARD: In the browser visit solr.hyku.test to perform queries
Login credentials can be found in the solr section of the docker-compose.yml, but it's username: solr, password: SolrRocks. You will have to select your tenant id from the collections drop down in the left pan. I like to use the dashboard to confirm that my properties are indexed and the values are saved.
What is Solr && How does it work?
It is NOT database. In a nutshell, Solr indexes are like a librarian's catalog for your data, helping you quickly find the information you need without sifting through all the raw data. It's an essential tool for search and retrieval in many applications, like e-commerce websites, search engines, and data analysis systems.
-
Books (Data): Imagine you have a massive collection of books (data) containing lots of information. These books represent the documents or data you want to search through.
-
Catalog (Solr Index): Now, you don't want to flip through every book to find what you need. So, you create a special catalog (Solr index). In this catalog, you list all the important keywords, topics, and page numbers for every book.
-
Searching: When you want to find something specific, you don't go through all the books. Instead, you consult the catalog. It tells you exactly which books (documents) contain the information you're looking for and where to find it. This is much faster and more efficient.
-
Updating: When new books are added or old ones change, you update the catalog accordingly. Solr does something similar – it continuously updates its index as new data is added or existing data is modified.
-
Speed: Because you have this well-organized catalog (Solr index), you can search for information super quickly. It's like having an instant reference guide to your library.
DASHBOARD: In the browser visit hyku.test/sidekiq

What is Sidekiq?
-
Background Task Manager: Sidekiq is a tool for managing background tasks in web applications.
-
Efficiency: It helps offload time-consuming tasks from the main application process to keep your app responsive.
-
Task Queue: Sidekiq uses a queue system to manage tasks, like a to-do list for background jobs.
-
Concurrency: It can handle multiple tasks concurrently, making it efficient and fast.
-
Job Workers: Sidekiq uses worker processes to pick up tasks from the queue and execute them.
-
Reliability: It ensures that important tasks get done reliably without burdening your web app.
- Examples: Common use cases include sending emails, processing data, or any task that doesn't need to happen instantly.
-
Enhanced User Experience: By handling background tasks efficiently, Sidekiq helps maintain a smooth and responsive user experience on your website or app.
- OPTIONAL! This tool isn't required for this workshop, but it is worth mentioning because I use it ALOT when working on Samvera apps.
-
It is helpful to install whenever you are working with views and you want to know where something is being rendered from. BUT there's a GOTCHA! it conflicts with sidekiq!!
-
When using sidekiq you will want to disable this gem by commenting it out in your Gemfile and running
bundle install. -
Commit uncomment. Run
bundle installto enable. Restart server and use the commands:- Press command+shift+x (Mac) or ctrl+shift+x to reveal an overlay of the files that rendered your UI, and click anything to open the file in your editor. Hover over various elements to see their partials' filepaths.

GOTCHA! When defining properties, you CANNOT use the same predicate url more than once in a model.
| Predicate Prefix | Rdf-vocab Predicate Prefix | Namespace |
|---|---|---|
| dce: | DC11: | http://purl.org/dc/elements/1.1/ |
| dct: | DC: | http://purl.org/dc/terms/ |
| edm: | EDM: | http://www.europeana.eu/schemas/edm/ |
| foaf: | FOAF: | http://xmlns.com/foaf/0.1/ |
| rdfs: | RDFS: | http://www.w3.org/2000/01/rdf-schema# |
| xsd: | http://www.w3.org/2001/XMLSchema# | |
| mrel: | http://id.loc.gov/vocabulary/relators/ | |
| schema: | SCHEMA: | https://schema.org/ |
SCREENSHOT

Notable WorkForm Methods
| Method | Description | Overridden? |
|---|---|---|
| terms | Returns an array of all terms that will be displayed on the form. | Common |
| required_fields | Returns an array of terms that are required and will be displayed at the top of the form (above the fold). They will be visible when the new/edit form is initially displayed. | Common |
| primary_terms | Returns the required_fields array. | NO |
| secondary_terms | Returns the array of terms that are optional and will be displayed at the bottom of the form (below the fold). These fields are hidden until the user clicks Additional fields button. This method also removes fields that are not filled in by a user for various reasons (e.g. populated by the system, displayed on another tab, set based on data in other fields, etc.). | Sometimes |
| multiple? | Given a field, return true if it is multi-value. This is sometimes overridden to force a basic multi-value metadata field provided by the system to be single-value. | Sometimes |
| sanitize_params | Clean up params passed back from the form. This is sometimes overridden to put a single-value into the format of a multi-value metadata field for basic multi-value metadata that was forced to be single-value. | Sometimes |
Customizing Form Fields
To customize a form field, you create a partial with the property name under app/views/records/edit_fields. Add form code to display the form as desired. If this is the first form field customization you have made, you will need to create the records/edit_fields directories under app/views.
You can see more examples by exploring those created for the default fields in Sufia.
FOR THIS WORKSHOP YOU ONLY NEED TO ADD A PARTIAL FOR THE CONTROLLED VOCABULARY. The partials for contact_email and contact_phone will be inherited from hyrax.
For a controlled vocabulary field (required)
You must customize the creation of the form field to use autocomplete with a controlled vocabulary. You can use one of the external authorities with access provided through the Questioning Authority (QA) gem. Or you can create your own controlled vocabulary.
For a controlled-value field, you can use something similar to…
# app/views/records/edit_fields/_department.html.erb
<%= f.input :department, as: :select,
    collection: DepartmentsService.select_all_options,
    include_blank: true,
    input_html: { class: 'form-control' }
%>
For additional instructions, see Hyrax Autocomplete.
SCREENSHOT

How to Customize
By default, the new properties will NOT be displayed on the show page for works of this type. If you do nothing, which properties will be on the show page is guided by Hyrax::WorkShowPresenter class. Look for the property names delegated to the solr_document near the top of the file.
Edit the custom presenter class (e.g. app/presenters/hyrax/thesis_presenter.rb) and delegate the retrieval of properties to solr_document for each of the properties to be displayed.
delegate :contact_email, :contact_phone, :department, to: :solr_documentThe full custom presenter class now looks like…
# app/presenters/thesis_presenter.rb
class ThesisPresenter < Hyrax::WorkShowPresenter
  delegate :contact_email, :contact_phone, :department, to: :solr_document
endEdit app/models/solr_document.rb and add a method to retrieve each property’s value from the solr doc. NOTE: Use ::ActiveFedora.index_field_mapper.solr_name to generate the solr field name for each property.
# app/models/solr_document.rb

def contact_email
  self[::ActiveFedora.index_field_mapper.solr_name('contact_email')]
end

def contact_phone
  self[::ActiveFedora.index_field_mapper.solr_name('contact_phone')]
end

def department
  self[::ActiveFedora.index_field_mapper.solr_name('department')]
endIf this is the first custom property added to the show page, you will need to copy Hyrax’s app/views/hyrax/base/_attribute_rows.html.erb to the same directory structure in your app. NOTE: The link goes to master. Make sure you copy from the release/branch of Hyrax that your app has installed.
Add the properties to the local copy of app/views/hyrax/base/_attribute_rows.html.erb
<%= presenter.attribute_to_html(:contact_email) %>
<%= presenter.attribute_to_html(:contact_phone) %>
<%= presenter.attribute_to_html(:department) %>You would wrap a conditional check around the properties.
- Admin only example: #current_ability.admin? || #user_signed_in? conditionals
<% if current_ability.admin? %>

  <%= f.input :collection_id,
           as: :select,
           collection: f.object.collections_for_select,
           selected: f.object.non_fedora_association_collection_id(params[:add_works_to_collection]),
           input_html: { class: 'form-control', multiple: true } %>

<% elsif current_user.present?  & !current_ability.admin? %>

  <%= f.input :collection_id,
           as: :select,
           collection: f.object.public_collections_for_select,
           selected: f.object.non_fedora_association_collection_id(params[:add_works_to_collection]),
           input_html: { class: 'form-control', multiple: true } %>

<% end %>Each value for the property, in this case the single value, will be displayed using a tag. See Hyrax’s default AttributeRenderer.
Optionally, you can customize the display of the property value on the show page.
There are a number of common renderers already defined and in use within the Hyrax app. You can use these existing renderers for your fields. See Hyrax’s renderers for existing renderers.
To use an existing renderer (e.g. (FacetedAttributeRender)[https://github.com/samvera/hyrax/blob/master/app/renderers/hyrax/renderers/faceted_attribute_renderer.rb]) add the attribute to app/views/hyrax/base/_attribute_rows.html.erb using render_as.
<%= presenter.attribute_to_html(:contact_email, render_as: :faceted) %>For controlled vocabularies, the value for the metadata field is the ID of the term. If the ID and TERM are the same, then you can use the default display behavior. Otherwise, you need a renderer that will use the controlled vocabularies service to retrieve the TERM value given the ID.
Define a new renderer to convert the value from the controlled value’s ID to its TERM. The renderer in this case will be specific to the controlled value property.
To define a property specific renderer for the department property…
# app/renderers/department_attribute_renderer.rb
class DepartmentAttributeRenderer < Hyrax::Renderers::AttributeRenderer
  def attribute_value_to_html(value)
    %(<span itemprop="department">#{::DepartmentsService.label(value)}</span>)
  end
end
Identify the renderer to use for the property. Edit the definition in the local copy of app/views/curation_concerns/base/_attribute_rows.html.erb and add the render_as parameter for the property.
<%= presenter.attribute_to_html(:department, render_as: :department) %><%= presenter.attribute_to_html(:contact_email, html_dl: true) %>
<%= presenter.attribute_to_html(:contact_phone, html_dl: true) %>
<%= presenter.attribute_to_html(:department, render_as: :department, html_dl: true) %>NOTES:
- The class name must begin with the renderer name and end with AttributeRenderer.
- To identify a renderer, use the renderer name (everything upto, but not including AttributeRenderer)
- You can use one of the renderers defined in Hyrax.
- You can make more complex renderers. See Hyrax defined renderers for examples.
- See Hyrax defined renderers.
A user should be able to find a Thesis by searching for the contact phone number

A user should be able to display department in the search results, and make it facetable

Search Results
Optionally, you can configure a property to be shown in the search results for a work.
Edit app/controllers/catalog_controller.rb and look for the section including add_index_field statements. Add the following:
config.add_index_field solr_name("contact_email", :stored_searchable), label: "Contact Email"where...
| config.add_index_field | tells BlackLight to add this to the search results. |
|---|---|
| solr_name("contact_email", :stored_searchable) | tells BlackLight the name of the field in Solr. The solr_name method generates the solr field name according to the indexing set in the property definition in the model. The second parameter should match the indexing specified in the model for the property. |
| label | tells BlackLight the label to display before the value of the metadata field in search results. By default, the label is the property name (e.g. Contact_email). |
Customizing display of Collection properties
- UTK example ref
It's similar to adding custom metadata to works BUT...
The collection properties do not use the renderer process to control the display of properties.
To modify the display of a colleciton property…
- add a partial with the property’s name to app/views/records/show_fields (e.g. _department.html.erb)
- in that file, include markup to control the display of the field NOTE: See Hyrax’s show_fields for examples.

Remove a default property from the set of required fields
Edit app/forms/generic_work_form.rb (substitute your work-type name for generic_work) and make add the following to make keyword and rights optional fields. NOTE: This also moves these fields below all required fields and they only display on the form when the Additional Fields button is clicked.
self.required_fields -= [:keyword, :rights]WARNING: Do not remove any of the core metadata fields. Works will not save correctly without these fields. Core metadata fields are defined as properties in Hyrax’s core_metadata.rb
Making a default property single-value
By default all fields in Hyrax are repeatable. If you’d like to change this behavior for a field that Hyrax provides out of the box, you can do the following. This example makes title, description, and publisher fields single-value.
Edit app/forms/generic_work_form.rb (substitute your work-type name for generic_work) and make the following changes
- Override self.multiple?(field) and return false for any default fields you want to be single value.
- Override self.model_attributes(_) to cast back to multi-value when saving
- Add methods to return the field value as single-value for populating the form fields during editing The form class after making these changes looks like…
# Generated via
#  `rails generate hyrax:work GenericWork`
module Hyrax
  class GenericWorkForm < Hyrax::Forms::WorkForm
    self.model_class = ::GenericWork

    def self.multiple?(field)
      if [:title, :description, :publisher].include? field.to_sym
        false
      else
        super
      end
    end

    def self.model_attributes(_)
      attrs = super
      attrs[:title] = Array(attrs[:title]) if attrs[:title]
      attrs[:description] = Array(attrs[:description]) if attrs[:description]
      attrs[:publisher] = Array(attrs[:publisher]) if attrs[:publisher]
      attrs
    end

    def title
      super.first || ""
    end

    def description
      super.first || ""
    end

    def publisher
      super.first || ""
    end
  end
end
In hyrax initializer, add...
config.work_requires_files = falseBy default, Hyrax will ask you to accept a deposit agreement each time you upload a file. You can make this implicit by having a passive agreement instead. To do this, change the app/config/initializers/hyrax.rb to:
config.active_deposit_agreement_acceptance = falseCreate custom translations in your hyrax.en.yml locales file:
en:
  hyrax:
    passive_consent_to_agreement: "By clicking the Save button, I am agreeing to etc..."
    deposit_agreement: "Institutional Agreement"
Lastly, create your own app/views/static/agreement.html.erb page with the content of your deposit agreement.
- AllinsonFlex offers the ability to dynamically set work types and properties via a yaml file. However, there is no support for Collections or FileSets yet.
- Hyrax Valkyrie && the Surfliner project has worked on a similar solution but it's still a Work In Progress - see hyraxv5.0.0-release candidate
- The IiifPrint gem will allow you to import a pdf and create a child work per page. ref
fix for error from _additional_citations.html.erb
replace the contents of app/views/shared/_additional_citations.html.erb with the following.
# app/views/shared/_additional_citations.html.erb
<% content_for(:gscholar_meta) do %>
  <% unless @presenter.try(:doi).blank? %>
    <meta name="citation_doi" content="<%= @presenter.doi %>"/>
  <% end %>
  <% unless @presenter.try(:isbns).blank? %>
    <% @presenter.isbns.each do |isbn| %>
      <meta name="citation_isbn" content="<%= isbn %>"/>
    <% end %>
  <% end %>
<% end %>