I wrote this guide starting from different articles, to share with other ubuntu user a good procedure to install NextCloud on an Apache 2 server, without using "snap". You can find all the references to those articles at the bottom of this guide.
In this guide:
- Prerequisites: Install Ubuntu Server 20.04
- Install NextCloud 19
- Setup the "ufw" firewall
- Obtain a free SSL certificate using Let's Encrypt
- Installing Apache "mod_evasive" module to protect the server from DDoS attacks
- Reference
I made an home server using a PC with two 512 GB SSD disks in RAID 1 configuration. For more info about RAID, check this link. If you want you can use just one disk, but I preferred RAID 1 to enance data redundancy.
- Here an official guide you can find how to install Ubuntu Server step by step.
- Here I answered to a thread and I described how I made the RAID 1 configuration. I think that for a newbie it is not easy to make a RAID 1 in the Ubuntu installer.
1. Install a clean version of Ubuntu Server 20.04
2. Open a terminal and execute these commands to update your system:
sudo apt-get update
sudo apt-get updgrade
3. This installs the packages for the Nextcloud core system:
sudo apt-get install apache2 mariadb-server libapache2-mod-php7.4
sudo apt-get install php7.4-gd php7.4-json php7.4-mysql php7.4-curl php7.4-mbstring
sudo apt-get install php7.4-intl php-imagick php7.4-xml php7.4-zip
4. Run these commands to disable Apache 2 directory listing
sudo sed -i "s/Options Indexes FollowSymLinks/Options FollowSymLinks/" /etc/apache2/apache2.conf
5. It is necessary to secure and configure our "mariadb-server". From terminal, these commands will start the settings and the script will prompt you some questions, you can answer "yes" to all questions, and also create a new root DB user:
sudo mysql_secure_installation

    Enter current password for root (enter for none):    press Enter
    Set root password? [Y/n]:    Y
    New password:    Enter password (this is the MariaDB root password that MUST be different from system root password)
    Re-enter new password:    Repeat password
    Remove anonymous users? [Y/n]:    Y
    Disallow root login remotely? [Y/n]:    Y
    Remove test database and access to it? [Y/n]:    Y
    Reload privilege tables now? [Y/n]:    Y
6. Restart MariaDB
sudo systemctl restart mariadb.service
7. Login MariaDB server
sudo mysql -u root -p
8. Create a new database, you can choose a name (pay attention, semicolon at the end of a command is important). Attention: don't copy and paste directly this command inside the terminal using mouse wheel, because it will be executed immediately, instead use CTRL + SHIFT + V!
CREATE DATABASE choose_a_db_name_here;
At every succeeded operation you will see:
Query OK, 1 rows affected (0.00 sec)
9. Create a DB user and password
CREATE USER 'choose_your_db_username_here'@'localhost' IDENTIFIED BY 'password_here';
10. Then you need to grant the user full access to the database
GRANT ALL ON database_name_chosen_before.* TO 'username_chosen_before'@'localhost' IDENTIFIED BY 'user_password_chosen_before' WITH GRANT OPTION;
11. Save changes and exit from MariaDB
FLUSH PRIVILEGES;
EXIT;
12. Edit php.ini files to change some default settings
sudo nano /etc/php/7.4/apache2/php.ini
Press "CTRL + W", search and change the following lines below and save php.ini. You can find here a list of timezones
file_uploads = On
allow_url_fopen = On
memory_limit = 512M
upload_max_filesize = 500M
post_max_size = 600M     <-- Use always a size that is a bit more of "upload_max_filesize"
max_execution_time = 300
display_errors = Off
date.timezone = use_your_timezone e.g. Europe/Rome (remove the ';' at the row beginning)
13. It's time to download the NextCloud latest release from the official repository, unzip it, and move the unzipped folder to the Apache2 "html" folder:
cd /tmp && wget https://download.nextcloud.com/server/releases/nextcloud-19.0.0.zip
unzip nextcloud-19.0.0.zip
sudo mv nextcloud /var/www/nextcloud/
Choose to execute 14.1 OR 14.2:
14.1. If you want to install the "data" folder in the root partition - / -, probably in this case you will not have enough space, run the commands below to set the correct permissions:
sudo chown -R www-data:www-data /var/www/nextcloud/
sudo chmod -R 755 /var/www/nextcloud/
14.2. If you prefer to install the "data" folder in the "/home" partition, where you probably have more space, create a folder in "/home", you can call it "clouddata", and then run the commands below to set the correct permissions:
sudo mkdir /home/clouddata/
sudo chown -R www-data:www-data /home/clouddata/
sudo chown -R www-data:www-data /var/www/nextcloud/
sudo chmod -R 755 /var/www/nextcloud/
15. Configure Apahce 2 site configuration file for NextCloud. This file will control how users access the NextCloud content. Run the commands below to create a new configuration file called "nextcloud.conf"
sudo nano /etc/apache2/sites-available/nextcloud.conf
Then copy and paste the content below into the file and save it. Replace the "ServerName" and "ServerAlias" line with your own domain name and directory root location, save the file and exit
<VirtualHost *:80>
     ServerAdmin admin@example.com
     DocumentRoot /var/www/nextcloud/
     ServerName example.com
     ServerAlias www.example.com

     Alias /nextcloud "/var/www/nextcloud/"

     <Directory /var/www/nextcloud/>
        Options +FollowSymlinks
        AllowOverride All
        Require all granted
          <IfModule mod_dav.c>
            Dav off
          </IfModule>
        SetEnv HOME /var/www/nextcloud
        SetEnv HTTP_HOME /var/www/nextcloud
     </Directory>

     ErrorLog ${APACHE_LOG_DIR}/error.log
     CustomLog ${APACHE_LOG_DIR}/access.log combined
</VirtualHost>
16. Now configure the VirtualHost by running the commands below
sudo a2ensite nextcloud.conf
sudo a2enmod rewrite
sudo a2enmod headers
sudo a2enmod env
sudo a2enmod dir
sudo a2enmod mime
17. To load all the settings above, restart Apache 2
sudo systemctl restart apache2.service
18. Open your browser and browse the server domain name that you specified before: "example.com". You should see NextCloud setup wizard to complete the installation.
Note: to reach your home server from internet, if you are using your domain name (example.com), probably you need to configure the "A" record type value from your domain vendor administration panel, binding your public IP with the domain name. If your ISP gives you only a set of dynamic public IPs, you can use a free DDNS service to auto update your public IP every time that your modem will restart. There are some free DDNS services that don't require you to confirm your account every month. From your modem router configuration panel you also need to allow traffic through ports 80 (HTTP) and 443 (HTTPS).
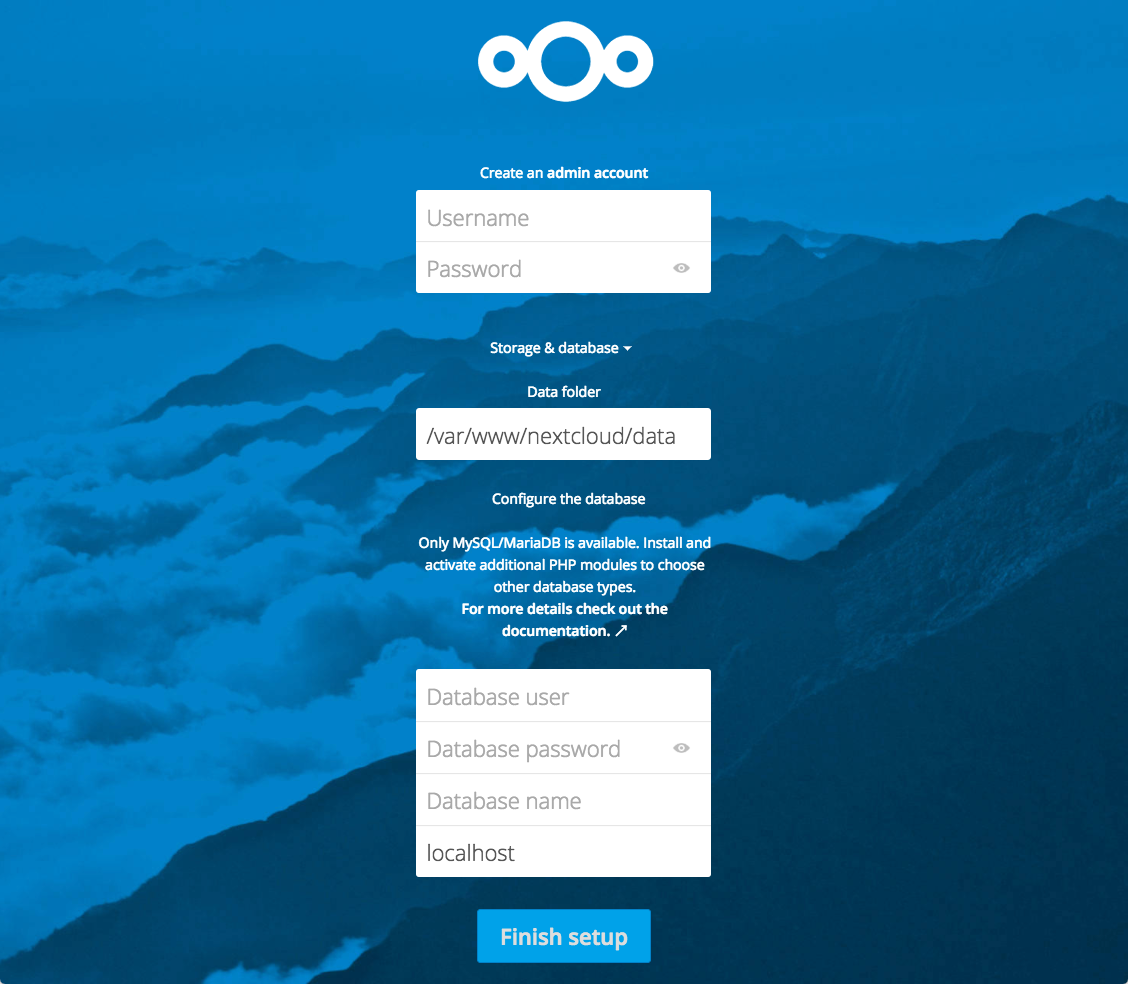
18.1. In the "Create an admin account" area, create a valid admin username and password;
18.2. In the "Data Folder" area, specify the path to the "data folder" - you have chosen it at point 14.1 or 14.2 of this guide;
18.3. In the "Configure the database" area, specify the database name and account, you have chosen it at point 8 and 9 of this guide, and click Finish setup;
19. Try to reach your domain name "www.example.com" via browser, probably you will obtain the message "Access through untrusted domain". If you have obtained this error, you need to modify the "config.php" file in "/var/www/nextcloud/config" folder:
sudo nano /var/www/nextcloud/config/config.php
Via nano editor check all the parts highlighted with arrows:
<?php
$CONFIG = array (
  'instanceid' => 'here you will see a unique id',
  'passwordsalt' => 'here you will see password',
  'secret' => 'here you will see a secret key',
  'trusted_domains' =>
  array (
    0 => 'localhost',
    1 => 'example.com', <---------- CHECK YOUR DOMAIN HERE
  ),
  'datadirectory' => '/home/clouddata',  <---------- CHECK YOUR DATA DIRECTORY HERE (we chose it at point 14.x)
  'dbtype' => 'mysql',
  'version' => '19.0.0.12',
  'overwrite.cli.url' => 'http://example.com/nextcloud',   <---------- CHECK YOUR DOMAIN HERE
  'dbname' => 'next_db',
  'dbhost' => 'localhost',
  'dbport' => '',
  'dbtableprefix' => 'oc_',
  'mysql.utf8mb4' => true,
  'dbuser' => 'here you will see the DB username',
  'dbpassword' => 'here you will see the DB password',
  'installed' => true,
);
20. You’re done.
1. During installation, Apache registers itself with UFW to provide a few application profiles that can be used to enable or disable access to Apache through the firewall.
Check if "ufw" is active, you will get "active" or "inactive" status response:
sudo ufw status
If it is not active, enable "ufw" typing:
sudo ufw enable
List the "ufw" application profiles by typing:
sudo ufw app list
You will see a list of the application profiles:
Output
Available applications:
  Apache
  Apache Full
  Apache Secure
  OpenSSH
As you can see, there are three profiles available for Apache 2:
- Apache: This profile opens only port 80 (normal, unencrypted web traffic)
- Apache Full: This profile opens both port 80 (normal, unencrypted web traffic) and port 443 (TLS/SSL encrypted traffic)
- Apache Secure: This profile opens only port 443 (TLS/SSL encrypted traffic)
It is recommended to enable the most restrictive profile that will still allow the traffic you have configured.
2. Since we haven’t configured SSL for our server yet, we will only need to allow traffic on port 80:
sudo ufw allow 'Apache'
You can verify the change by typing:
sudo ufw status
You should see HTTP traffic allowed (Apache) in the displayed output.
Note if you don't have OpenSSH installed, you will not see "OpenSSH" records in the output.
Output
Status: active

To                         Action      From
--                         ------      ----
OpenSSH                    ALLOW       Anywhere
Apache                     ALLOW       Anywhere
OpenSSH (v6)               ALLOW       Anywhere (v6)
Apache (v6)                ALLOW       Anywhere (v6)
As you can see, the profile has been activated to allow access to the web server.
It is highly recommended to use the SSL protocol encryption to secure all the traffic from and to your NextCloud app. To do this, for free, you can use Let's Encrypt, that give you a script to create free SSL certificates.
Note that sometimes if you are using a free DDNS service to obtain your public domain, for example "pippo.serviceddns.com", probably Let's Encrypt will not give you a certificate, due to the high request from the DDNS provider "*.serviceddns.com". I reccommend to buy your own domain name with a DNS parking service.
Note that before proceding you must have configured the VirtualHost for your nextcloud installation (see point 15).
1. Install certbot:
sudo apt install certbot python3-certbot-apache
2. Now we need to check if we have configured the VirtualHost configuration file correctly. To check this, open the virtual host file for your domain using nano or your preferred text editor:
sudo nano /etc/apache2/sites-available/nextcloud.conf
3. Find the existing "ServerAdmin", "ServerName" and "ServerAlias" lines. They should look like this:
...
ServerAdmin your_email@domain.something
ServerName your_domain
ServerAlias www.your_domain
...
If you already have your "ServerAdmin", "ServerName" and "ServerAlias" set up like this, you can exit your text editor and move on to the next step.
If your current virtual host configuration doesn’t match the example, update it accordingly. When you’re done, save the file and quit the editor. Then move on to the next step.
4. Run the following command to validate your changes:
sudo apache2ctl configtest
You should get a "Syntax OK" as a response. If you get an error, reopen the virtual host file and check for any typos or missing characters. Once your configuration file’s syntax is correct, reload Apache so that the changes take effect:
sudo systemctl reload apache2
With these changes, Certbot will be able to find the correct VirtualHost block and update it.
5. Now we’ll update the firewall to allow HTTPS traffic. Before we did the setup of the "ufw" firewall, it's time to switch from "Apache" policy (we will delete it), to "Apache Full" policy, that will allow only SSL traffic on 443 port. From terminal:
sudo ufw allow 'Apache Full'
sudo ufw delete allow 'Apache'
Check the new status:
sudo ufw status
You should see HTTPS traffic allowed (Apache Full) in the displayed output:
Output
Status: active

To                         Action      From
--                         ------      ----
OpenSSH                    ALLOW       Anywhere
Apache Full                ALLOW       Anywhere
OpenSSH (v6)               ALLOW       Anywhere (v6)
Apache Full (v6)           ALLOW       Anywhere (v6)
6. At point 15 you have specified the "ServerName" - your domain name -, now you need to use it with certbot to obtain an SSL certificate, change "your_domain" placeholder with your real domain name, from terminal:
sudo certbot --apache
If this is your first time running certbot, you will be prompted to enter an email address - used for renewal and security notices - and agree to the terms of service. After doing so, certbot will communicate with the Let’s Encrypt server, then run a challenge to verify that you control the domain you’re requesting a certificate for.
If that’s successful, certbot will ask how you’d like to configure your HTTPS settings, digit "2", and hit "enter"
Output
Please choose whether or not to redirect HTTP traffic to HTTPS, removing HTTP access.
-------------------------------------------------------------------------------
1: No redirect - Make no further changes to the webserver configuration.
2: Redirect - Make all requests redirect to secure HTTPS access. Choose this for
new sites, or if you're confident your site works on HTTPS. You can undo this
change by editing your web server's configuration.
-------------------------------------------------------------------------------
Select the appropriate number [1-2] then [enter] (press 'c' to cancel):
The configuration will be updated, and Apache will reload to pick up the new settings. certbot will wrap up with a message telling you the process was successful and where your certificates are stored. Your certificates are downloaded, installed, and loaded. Try reloading your website using "https://" and notice your browser’s security indicator. It should indicate that the site is properly secured, usually with a green lock icon.
7. Now we’ll test the auto-renewal feature of Certbot, which guarantees that your certificate will be renewed automatically before the expiration date.
Let’s Encrypt’s certificates are only valid for ninety days. This is to encourage users to automate their certificate renewal process, as well as to ensure that misused certificates or stolen keys will expire sooner rather than later. The certbot package we installed takes care of renewals by including a renew script to "/etc/cron.d", which is managed by a "systemctl" service called "certbot.timer". This script runs twice a day and will automatically renew any certificate that’s within thirty days of expiration.
To check the status of this service and make sure it’s active and running, use:
sudo systemctl status certbot.timer
The output will be:
● certbot.timer - Run certbot twice daily
     Loaded: loaded (/lib/systemd/system/certbot.timer; enabled; vendor preset: enabled)
     Active: active (waiting) since Sun 2020-06-28 09:29:41 UTC; 19min ago
    Trigger: Sun 2020-06-28 23:14:29 UTC; 13h left
   Triggers: ● certbot.service

Jun 28 09:29:41 server systemd[1]: Started Run certbot twice daily.
To test the renewal process, you can do a dry run with:
sudo certbot renew --dry-run
If you see no errors, you’re all set. When necessary, Certbot will renew your certificates and reload Apache to update the changes. If the automated renewal process ever fails, Let’s Encrypt will send a message to the email you specified, warning you when your certificate is about to expire.
8. Enable the "Strict-Transport-Security" HTTP header - HSTS -.
While redirecting all traffic to HTTPS is good, it may not completely prevent man-in-the-middle attacks. Thus administrators are encouraged to set the HTTP Strict Transport Security header, which instructs browsers not to allow any connection to the Nextcloud instance using HTTP, and it attempts to prevent site visitors from bypassing invalid certificate warnings.
This can be achieved by setting the following settings within the Apache VirtualHost file.
Edit the "nextcloud-le-ssl.conf" file:
sudo nano /etc/apache2/sites-enabled/nextcloud-le-ssl.conf
Then copy and paste the content below at the bottom of the file, before the closing tag. Save the file and exit:
<IfModule mod_headers.c>
  Header always set Strict-Transport-Security "max-age=15552000; includeSubDomains"
</IfModule>
Your "nextcloud-le-ssl.conf" file will appear like this:
<IfModule mod_ssl.c>
<VirtualHost *:443>
     ServerAdmin admin@example.com
     DocumentRoot /var/www/nextcloud/
     ServerName example.com
     ServerAlias www.example.com

     [... some other rows ...]

Include /etc/letsencrypt/options-ssl-apache.conf
SSLCertificateFile /etc/letsencrypt/live/example.com/fullchain.pem
SSLCertificateKeyFile /etc/letsencrypt/live/example.com/privkey.pem

<IfModule mod_headers.c>
  Header always set Strict-Transport-Security "max-age=15552000; includeSubDomains"
</IfModule>

</VirtualHost>
</IfModule>
This configuration will make all subdomains only accessible via HTTPS. If you have subdomains not accessible via HTTPS, remove "includeSubDomains".
The "mod_evasive" Apache utility works by monitoring incoming server requests. Also, it watches for suspicious requests such as:
- Several requests for the same page in one second
- More than "x" simultaneous requests per second
- Requests made while temporarily blacklisted
1. Install Apache 2 utils, from a terminal run:
sudo apt-get install apache2-utils
2. Install the mod_evasive module
sudo apt-get install libapache2-mod-evasive
3. Now we need to configure "mod_evasive". Like most Linux software packages, mod_evasive is controlled by a configuration file, we will open and configure it:
sudo nano /etc/apache2/mods-enabled/evasive.conf
Press "CTRL + W" and search for the entries listed below, and remove the "#" comment tag, and insert a valid value as shown:
3.1. "DOSHashTableSize": Increase this for busier web servers. This allocates space for running the lookup operations. Increasing the size improves the speed at the cost of memory
DOSHashTableSize 3097
3.2. "DOSPageCount": The number of requests for an individual page that triggers blacklisting. If you set it too low it will increase false-positives
DOSPageCount 10
3.3. "DOSSiteCount": The total number of requests for the same site by the same IP address. By default, this is set to 50. You can increase to 100 to reduce false-positives
DOSSiteCount 100
3.4. "DOSPageInterval": Number of seconds for "DOSPageCount". By default, this is set to 1 second. That means that if you don’t change it, requesting 2 pages in 1 second will temporarily blacklist an IP address
DOSPageInterval 1
3.5. "DOSSiteInterval": Like "DOSPageInterval", this specifies the number of seconds that "DOSSiteCount" monitors. By default, this is set to 1 second. That means that if a single IP address requests 50 resources on the same website in a single second, it will be temporarily blacklisted
DOSSiteInterval 1
3.6. "DOSBlockingPeriod": The amount of time an IP address stays on the blacklist. Set to 10 seconds by default, you can change this to any value you like. Increase this value to keep blocked IP addresses in time-out for a more extended period
DOSBlockingPeriod 10
3.7. "DOSEmailNotify": Replace "email@yourdomain.com" with your email address. Use an email that you check regularly, this is where the tool will send alerts
DOSEmailNotify email@yourdomain.com
3.8. "DOSLogDir": By default, this is set to write logs to "/var/log/mod_evasive". These logs can be reviewed later to evaluate client behavior
DOSLogDir "/var/log/mod_evasive"
Leave commented the other row present in the "evasive.conf" file. Save and exit.
4. Test mod_evasive let’s verify if the module is working correctly. In this example, use the "test.pl" script provided by the developers to test "mod_evasive". The script is located at: "/usr/share/doc/libapache2-mod-evasive/examples/test.pl". Use the following command to run the script:
perl /usr/share/doc/libapache2-mod-evasive/examples/test.pl
The output should appear as below with 403 status, that means "Forbidden", however the server received the request but refuses to authorize it:
HTTP/1.1 403 Forbidden
HTTP/1.1 403 Forbidden
HTTP/1.1 403 Forbidden
HTTP/1.1 403 Forbidden
HTTP/1.1 403 Forbidden
HTTP/1.1 403 Forbidden
5. Whitelisting IP addresses (if necessary) This option is not included in the "evasive.conf" file by default. If you need to whitelist some IPs, open the file for editing as before, then add the following line:
DOSWhitelist 192.168.0.13
DOSWhitelist 192.168.0.*
Substitute the IP address you want to whitelist. Also, you should list only one entry per line. This is typically used with a trusted client that exchanges a lot of data with your website. This tool is good at detecting bots and scripts, if there are bots or scripts that you want to allow, you can whitelist them to prevent them from triggering a blacklist action. Make sure to save the file and exit, then reload your Apache service before testing any of these options.
- Nextcloud installation (old Ubuntu Server 18.04): https://docs.nextcloud.com/server/18/admin_manual/installation/example_ubuntu.html
- MariaDB installation: https://mariadb.com/kb/en/mysql_secure_installation/
- A good old installation guide: https://websiteforstudents.com/setup-nextcloud-on-ubuntu-18-04-lts-beta-with-apache2-mariadb-and-php-7-1-support/
- A guide for configuring mod_evasive in Apache (DDoS protection): https://phoenixnap.com/kb/apache-mod-evasive
- Configuring Apache 2 firewall: https://www.digitalocean.com/community/tutorials/how-to-install-the-apache-web-server-on-ubuntu-18-04#step-2-%E2%80%94-adjusting-the-firewall
- Configuring Certbot: https://www.digitalocean.com/community/tutorials/how-to-secure-apache-with-let-s-encrypt-on-ubuntu-20-04
- Enable HSTS: https://docs.nextcloud.com/server/20/admin_manual/installation/harden_server.html#enable-http-strict-transport-security